

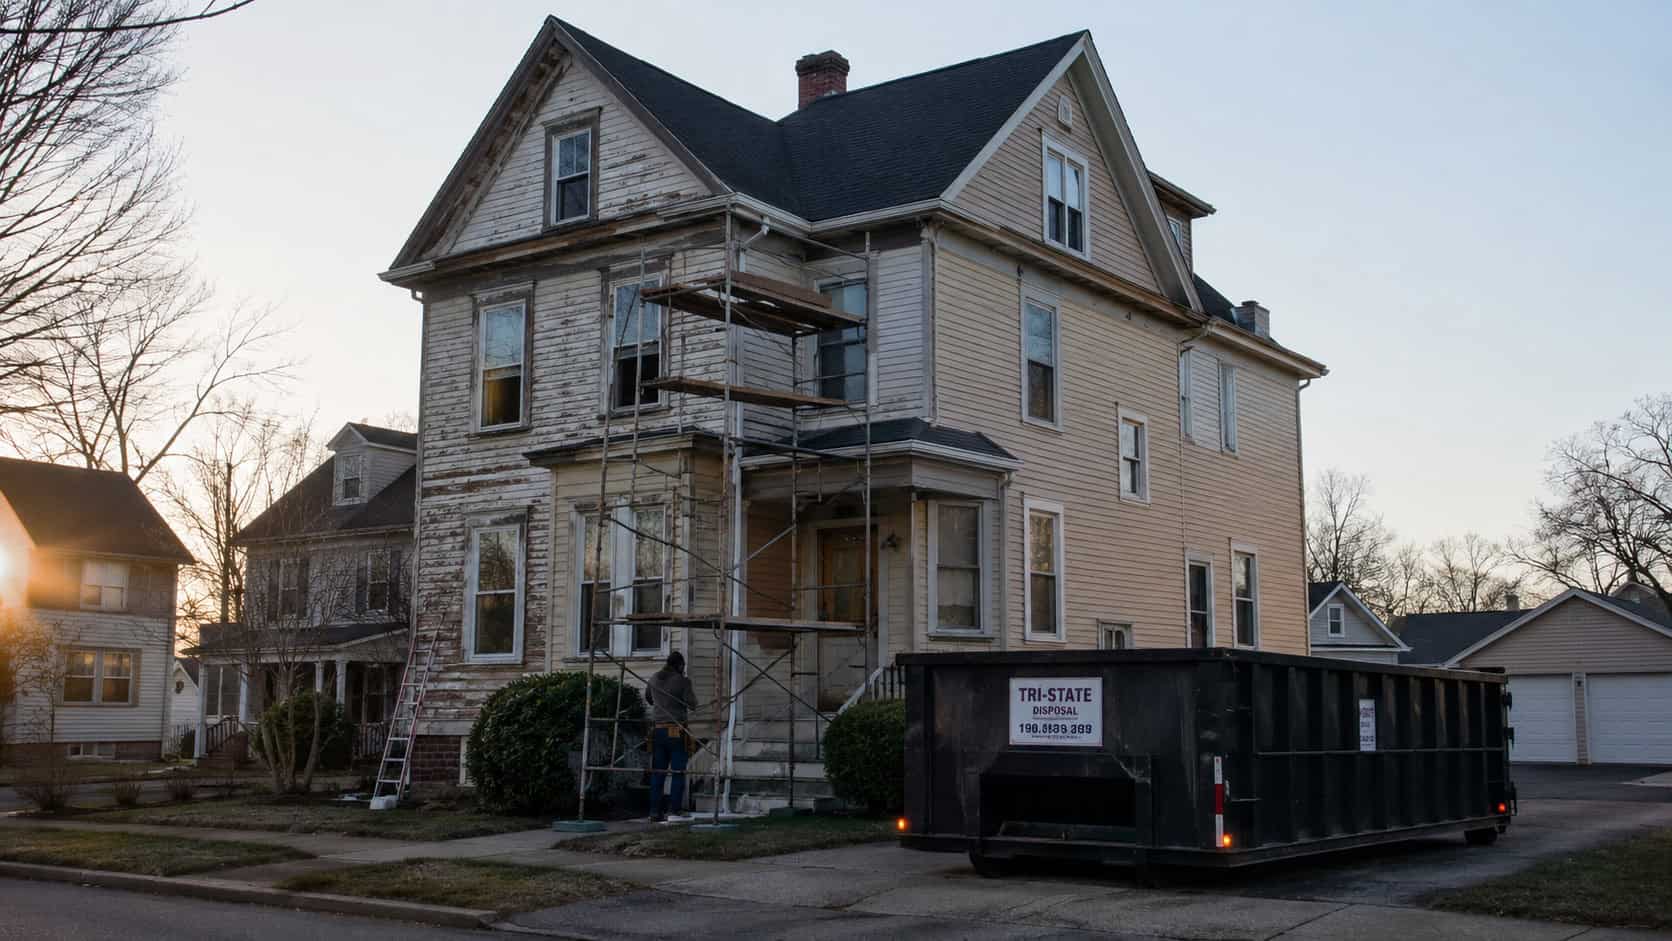
A house that’s stood since 1905 has already survived every storm, freeze, and heat wave the last twelve decades could throw at it. That’s not luck.
It’s a building that was designed to get wet and then dry out. Wood sills sat high above grade. Lime mortar sacrificed itself so the brick wouldn’t. Plaster absorbed humidity and gave it back. Air moved through the walls, the attic, the crawlspace — slowly, constantly, invisibly.
Then somebody buys it, loves it, and starts improving it.
Almost every item below was done by an owner who wanted the house to last. Most were recommended by a contractor. Several were subsidized by a utility rebate. And nearly all of them shorten the life of a building that was doing fine before the truck pulled up.
Here are 30 well-intentioned upgrades that quietly take years off an old house.
1. Spray Foam Packed Into the Wall Cavities
Start here, because everything else on this list is a variation of the same mistake.
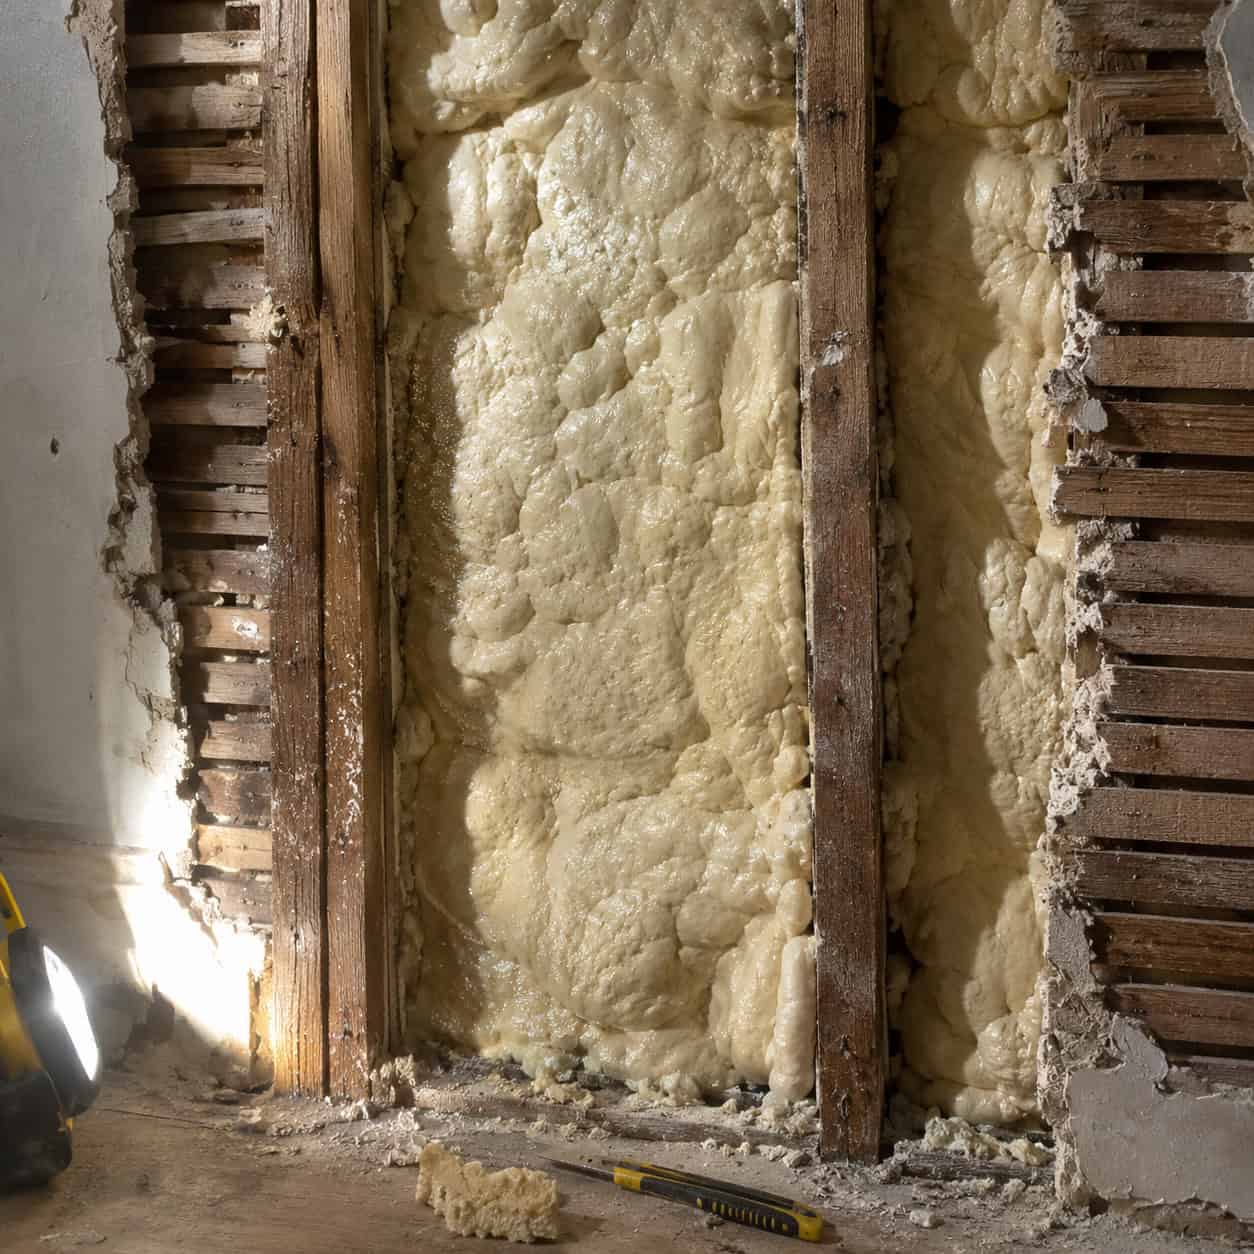
A pre-1940 wall is a drying machine. Water gets in — wind-driven rain, a leaky gutter, condensation on a cold February morning — and the assembly dries in both directions. Out through the clapboard, in through the plaster. No housewrap, no vapor barrier, no insulation. Just air moving through an empty stud bay carrying moisture away.
Closed-cell foam ends that. Permanently.
The foam bonds to the back of the sheathing and the sides of the studs. Now when water finds its way in — and over a hundred-year service life, it will — it has nowhere to go. It sits against the sheathing behind a plastic skin you can’t see through, can’t probe, and can’t dry. Rot starts at the bottom of the bay where the water pools and works upward for years before anything shows on the inside.
By the time the plaster stains, the sill is gone.
The removal problem is the part nobody mentions at the sales appointment. Fiberglass pulls out in an afternoon. Cellulose vacuums out. Cured closed-cell foam comes out with a reciprocating saw, a scraper, and a lot of swearing — and because it’s bonded to the sheathing, you often take the sheathing with it. Crews that specialize in foam removal in historic houses charge more than the original install cost.
Open-cell is more forgiving because it stays vapor-open, but it still fills a cavity that was designed to be empty and it still hides what’s happening behind it.
Insulate an old house from the attic down and the basement up, where the heat actually goes. Preservation offices have been making this argument for years — the Connecticut State Historic Preservation Office puts air sealing, attic insulation, and storm windows far ahead of stuffing the walls, because the return is higher and the risk is near zero.
Leave the walls empty. They’ve been empty since Taft was president.
2. Vinyl Replacement Windows in Place of the Original Sash
The most common upgrade on this list and the one with the widest gap between the sales pitch and the math.
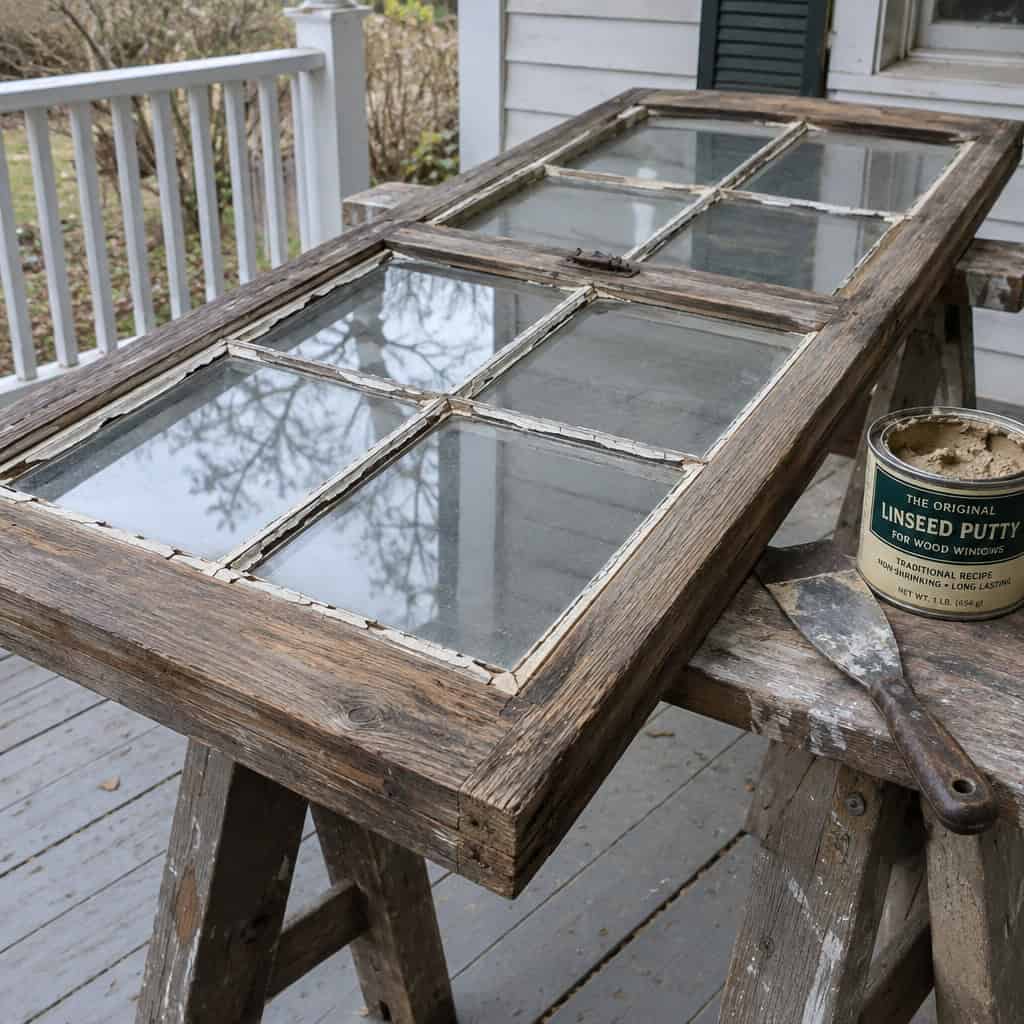
An 1890 double-hung is made of old-growth heartwood — tight-ringed, dense, naturally rot-resistant timber from trees that took 200 years to grow. You cannot buy that lumber today at any price. It was assembled with mortise-and-tenon joints, glazed with linseed putty, and designed from the first drawing to be taken apart and fixed.
Every piece of it is replaceable individually. A rotted sill horn gets a Dutchman. Cracked putty gets reglazed. A broken cord gets retied in fifteen minutes. The National Park Service has a whole brief devoted to the repair sequence, and the striking thing about it is how routine the work is.
A vinyl replacement unit is the opposite. It’s a sealed assembly with fused corners, a gas fill that leaks out over time, and insulated glass that fogs when the seal fails. Nothing in it is serviceable. When the seal goes at year 16, you buy another window.
Run the numbers over a long horizon. Vinyl units commonly run $500 to $900 installed and manufacturers quote service lives of 20 to 25 years. Restoring an original sash — reglazing, new cords, weatherstripping the jamb — typically lands in the $200 to $400 range per window and buys another 40 or 50 years before it needs attention again.
Over a century, that’s one restoration versus four or five replacements.
And the efficiency delta is smaller than the brochure implies. A tuned-up original sash with good weatherstripping and an exterior storm window measures close to a new double-pane unit, because most of the heat loss in an old window was never through the glass — it was around the sash.
Check the stiles before you throw anything out. If the wood is sound, you own something better than what’s in the showroom.
3. Plaster and Lath Torn Out for Drywall
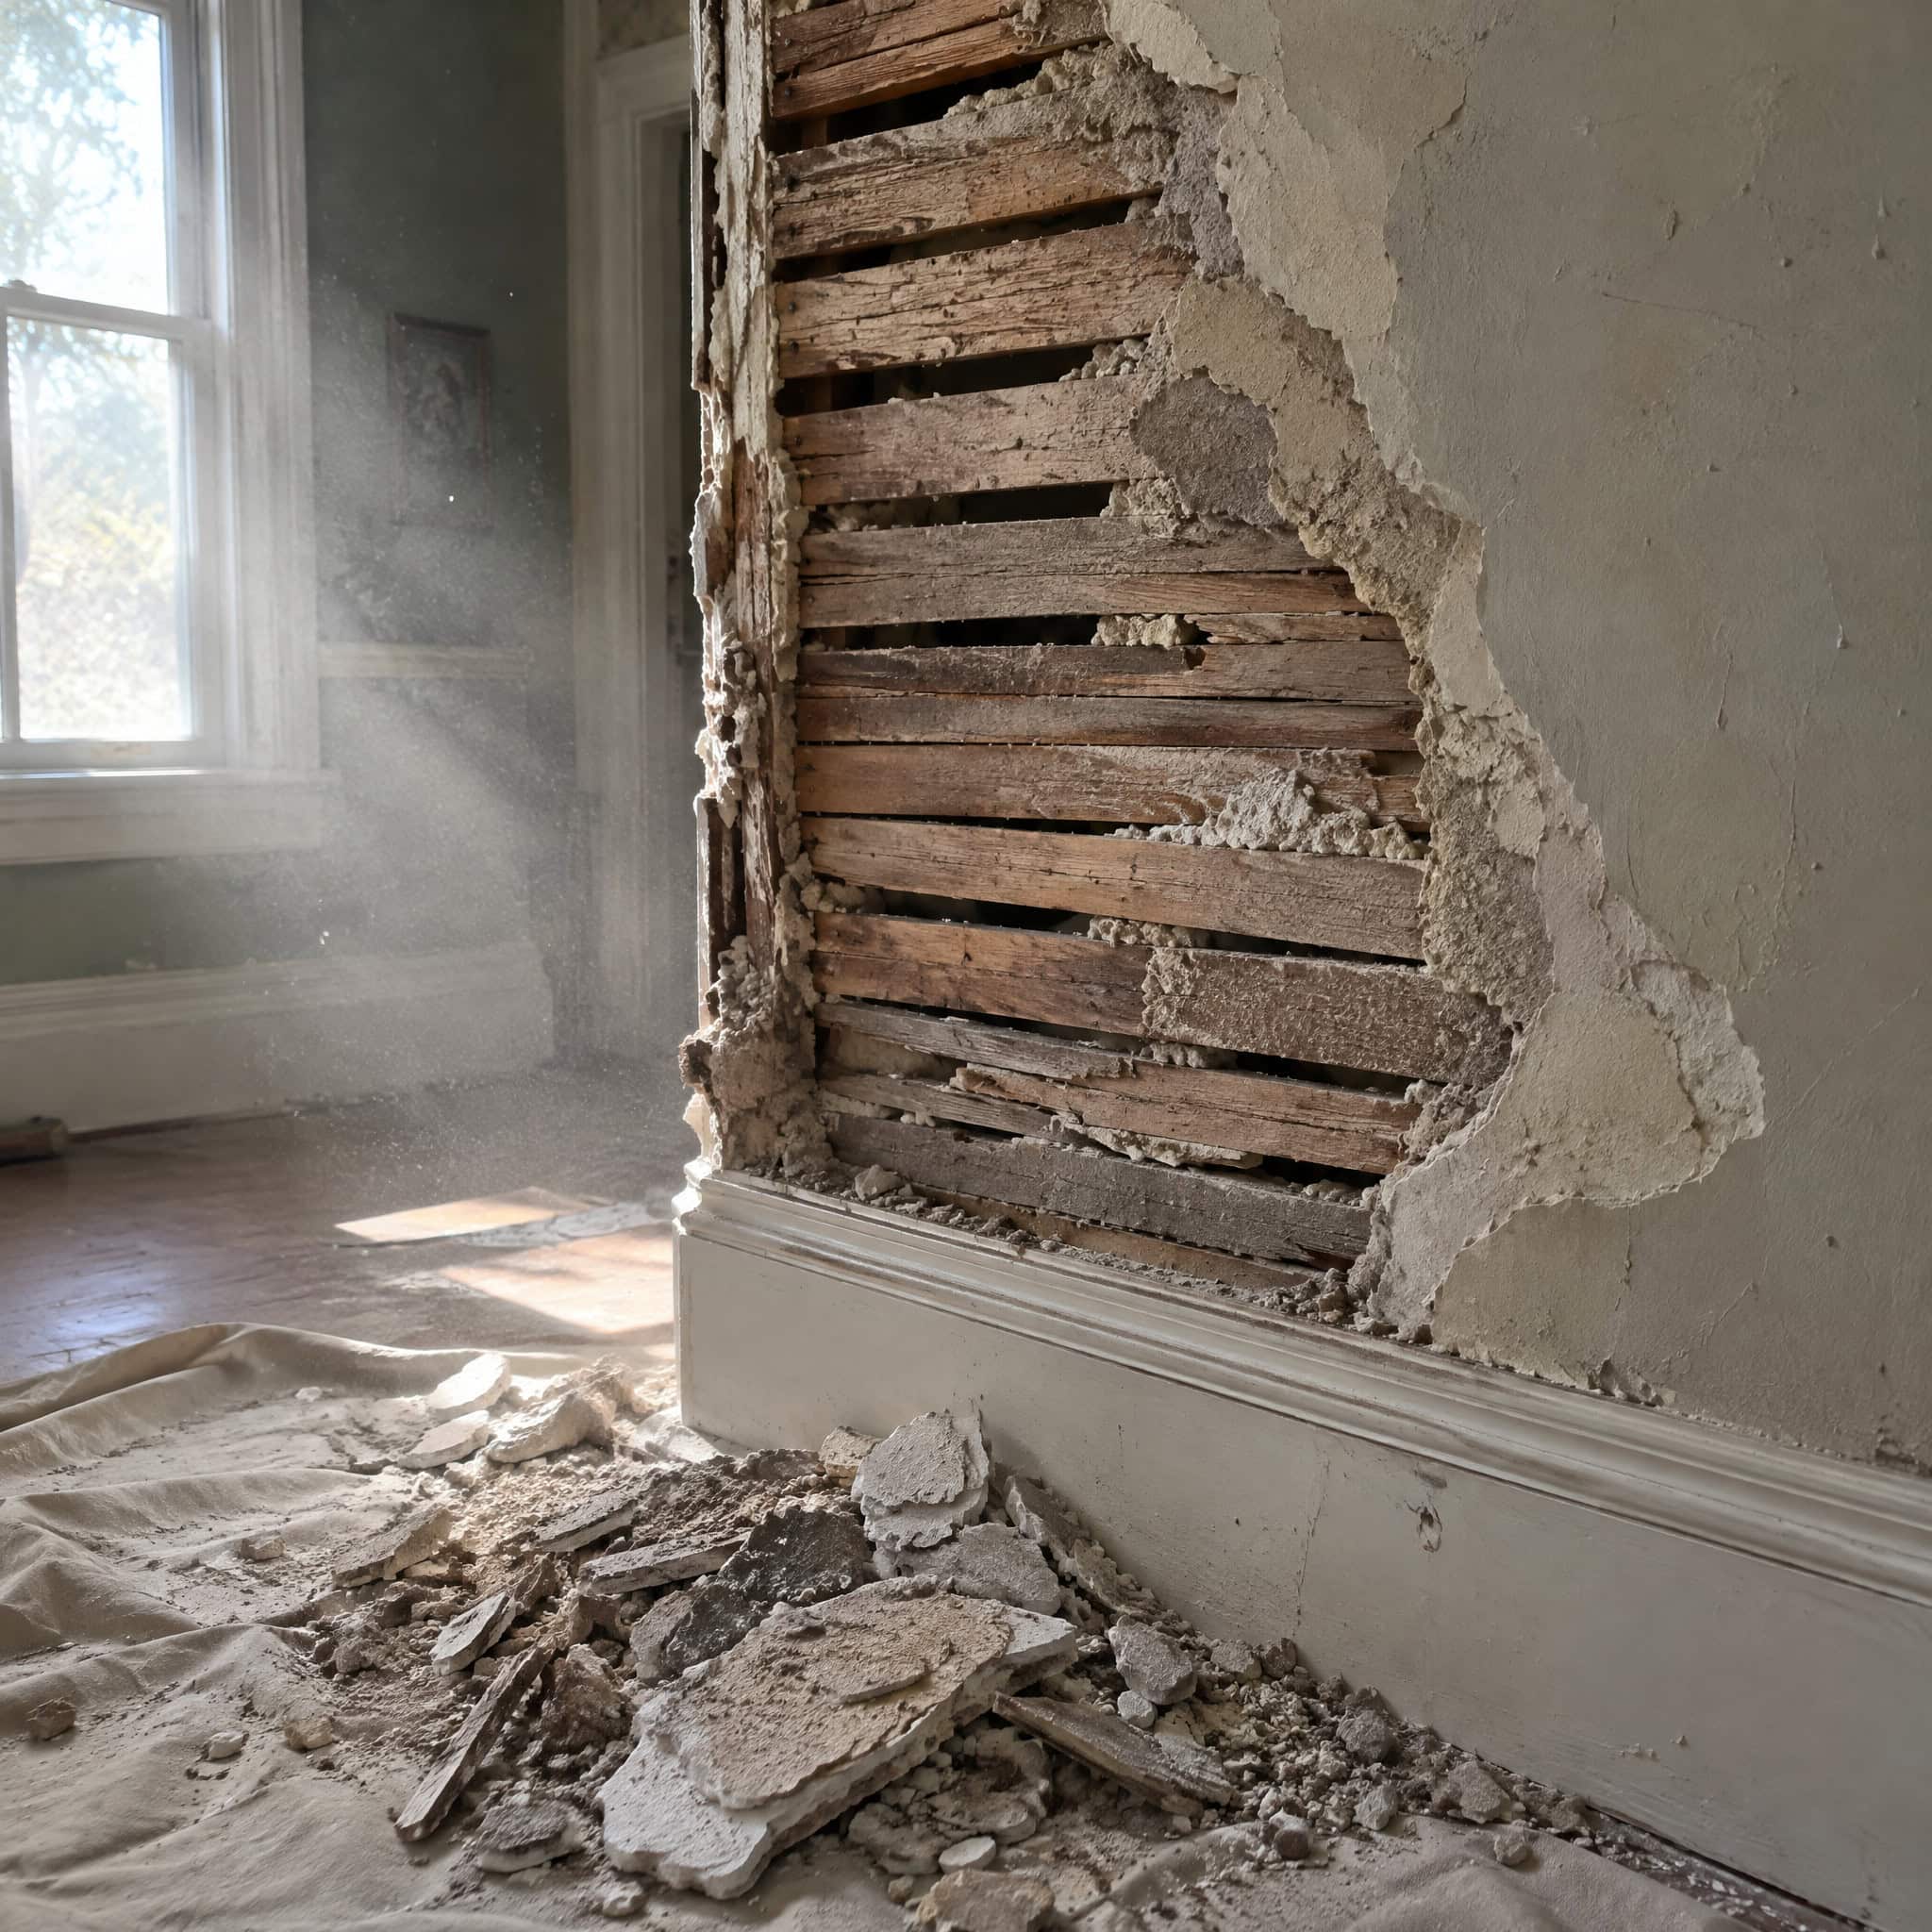
Knock on a plaster wall. That dead, solid thud is three coats of lime and sand pressed into wood lath, roughly 7/8 of an inch thick.
Drywall is half an inch of gypsum in paper. It transmits sound, dents with a doorknob, and does nothing to buffer humidity. Plaster absorbs moisture when a room is damp and releases it when the air dries — part of why old houses feel steady.
The collateral damage is worse than the loss of the wall. Door casings, baseboards, and window stools were all milled to sit proud of a plaster surface. Swap the thickness and every reveal in the room goes wrong.
Cracked plaster isn’t failed plaster. Most of it reattaches with washers and adhesive for a fraction of what a gut costs.
4. Portland Cement Repointing on Soft Old Brick
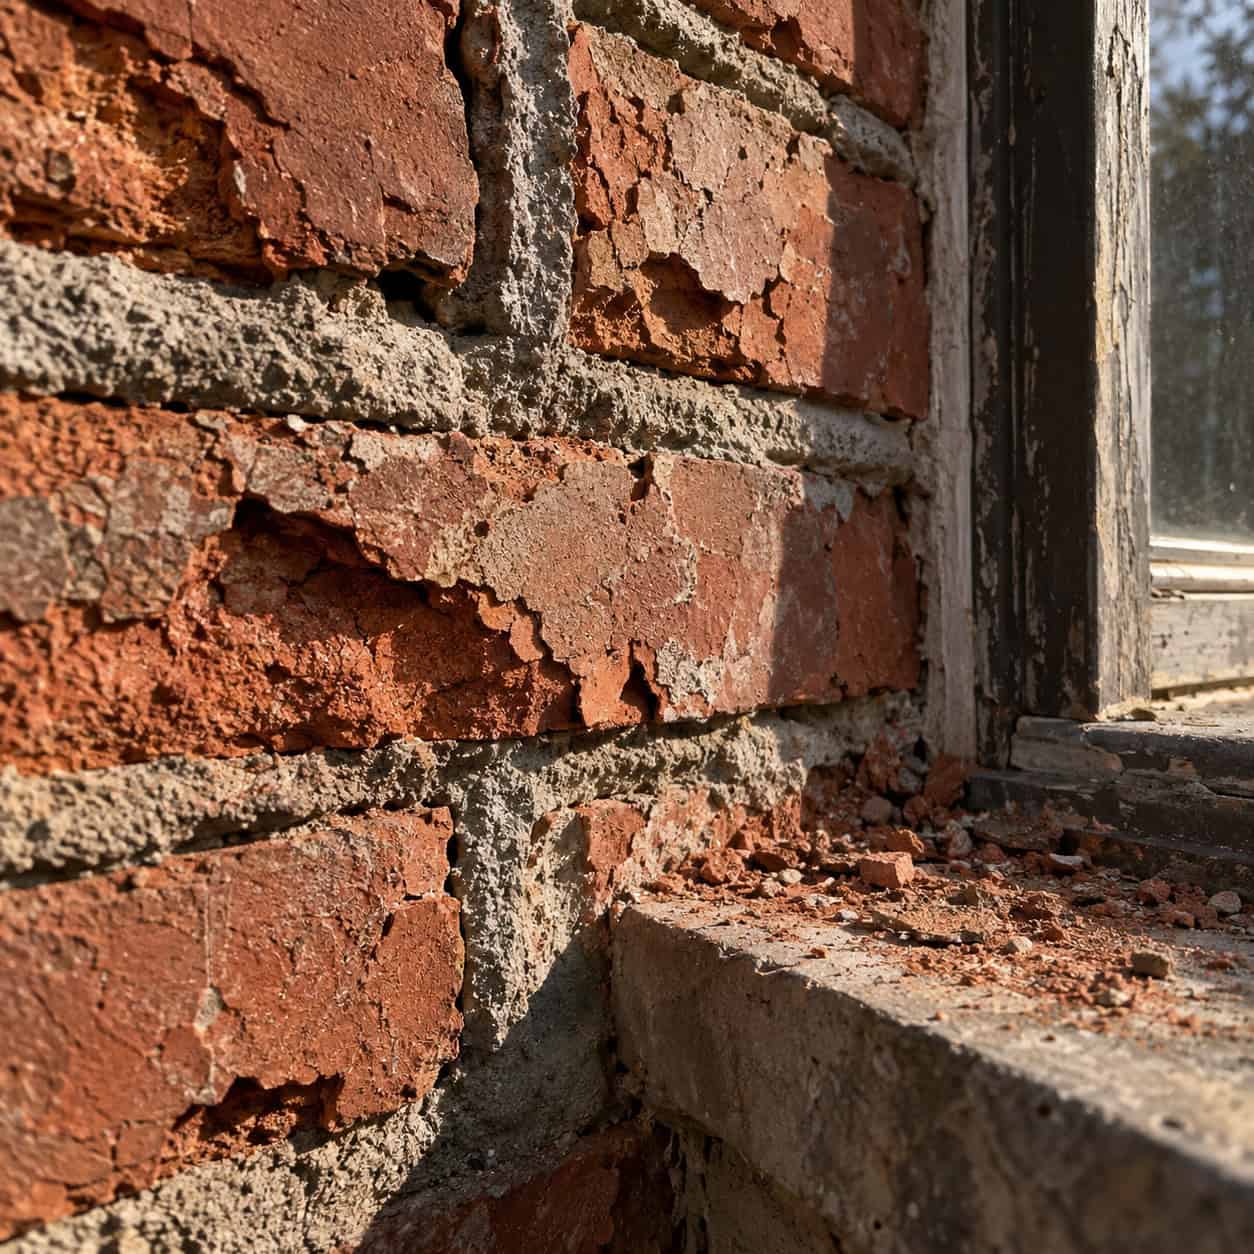
The rule is simple and almost universally broken: mortar must be softer than the brick it holds.
Lime mortar is the sacrificial element. It crumbles slowly, absorbs movement, and lets moisture escape through the joint. Replace it with modern Portland-rich mix and you’ve made the joint harder than the brick — so now the brick face spalls instead.
Soft-fired brick from the 1880s starts shedding its skin within a few freeze-thaw cycles. You’ll see the faces popping off in flakes above the repointed joints.
It can’t be undone. The brick is gone.
Match the original mix. Preservation Brief 2 walks through analyzing the existing mortar and specifying a compatible replacement, and any mason who claims it doesn’t matter shouldn’t be on the job.
5. Vinyl or Aluminum Siding Over the Original Clapboard
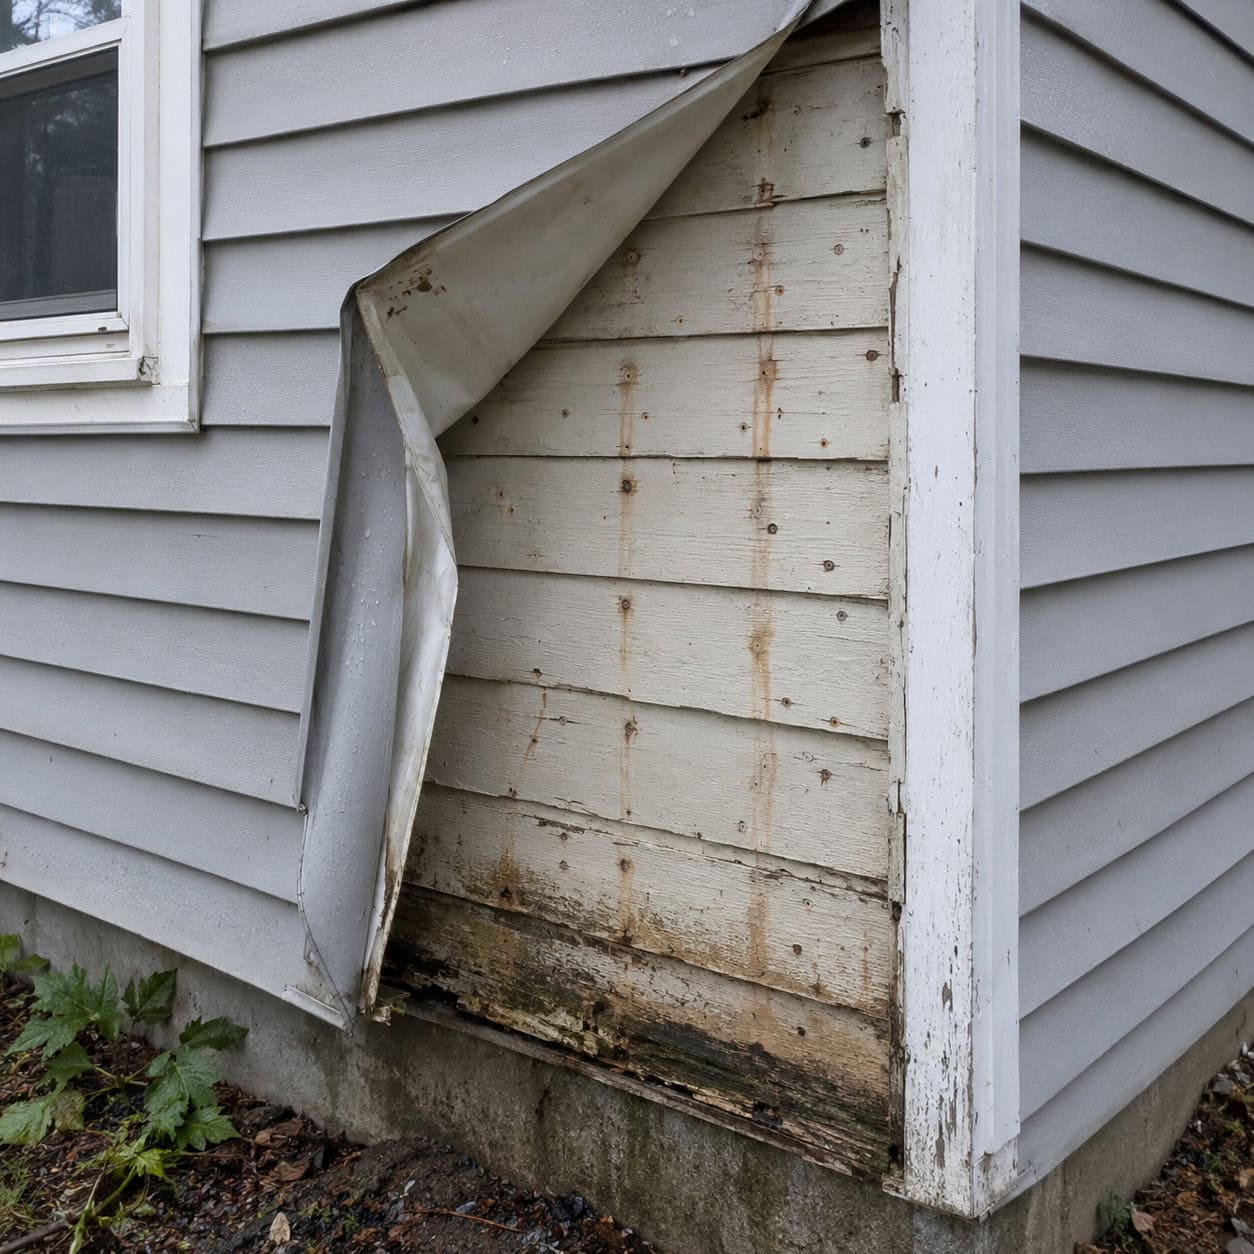
“No more painting” is the pitch. The real transaction is giving up your early warning system.
Peeling paint on clapboard tells you water is getting in somewhere. Blistering on a north wall points to a plumbing leak. The paint failing is the house reporting a problem while it’s still small.
Wrap it in vinyl and the reporting stops. Rot runs for a decade behind the panels with nothing visible from the sidewalk.
Capped trim is the worst of it — aluminum coil bent over a rotting cornice, sealed with caulk, holding water against the wood it covers.
Underneath, the original clapboard is punched with thousands of nail holes and gouged from the furring strips.
6. Walls Knocked Out for Open Concept
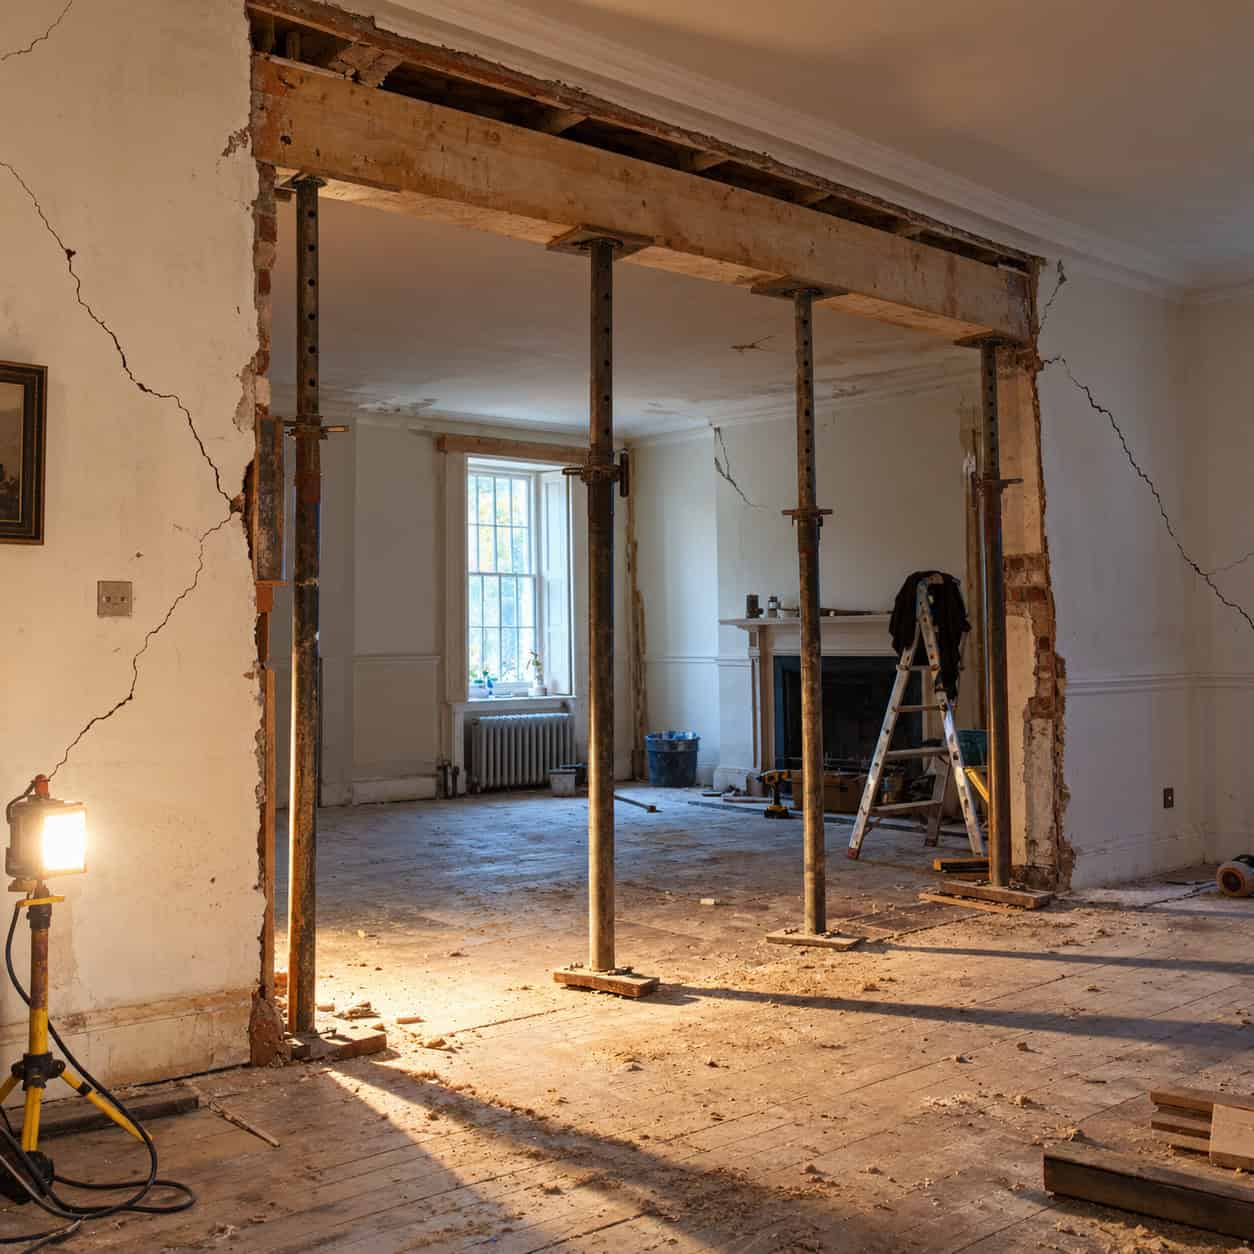
In a balloon-framed house, interior partitions often do more than divide rooms. They carry upper floor loads and stiffen the structure against racking.
Pull one out with a flush beam that’s undersized by a hair and the floor above drops a quarter inch. That’s enough.
Doors stop latching. New cracks run diagonally from every upstairs door header. The bathroom tile grout opens up.
Compartmented floor plans also did real work — they contained heat, blocked noise, and gave old houses the sense of unfolding space that an open box can’t reproduce. Old builders had other tricks for making small rooms feel open that didn’t involve removing structure.
7. Flower Beds, Mulch, and New Concrete Raised Against the House
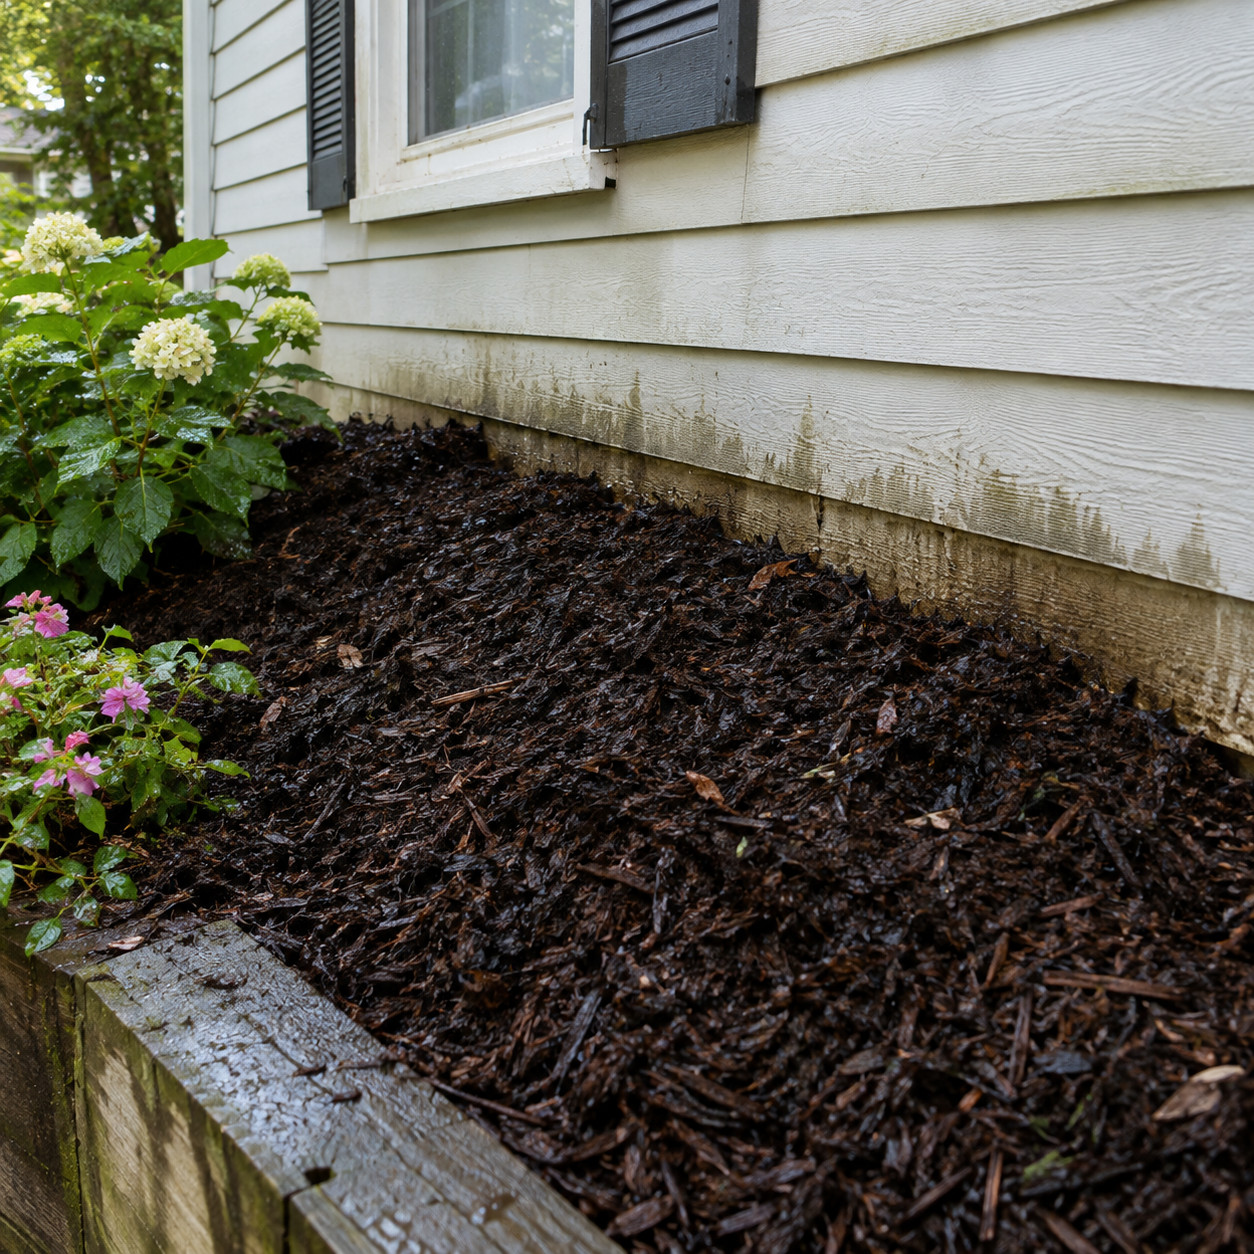
Old builders left eight inches or more between finished grade and the wood sill plate. That gap wasn’t decorative.
Then come the landscapers. Three inches of mulch this spring. A raised bed along the foundation. A patio poured tight to the wall, sloped the wrong way.
Twenty years of good intentions and the sill is now below grade, sitting in wet soil year-round.
Sill rot is the most expensive repair in an old house because the whole wall sits on it. Dig the grade back down and keep soil six inches clear of any wood.
8. Radiators Ripped Out for Forced Air
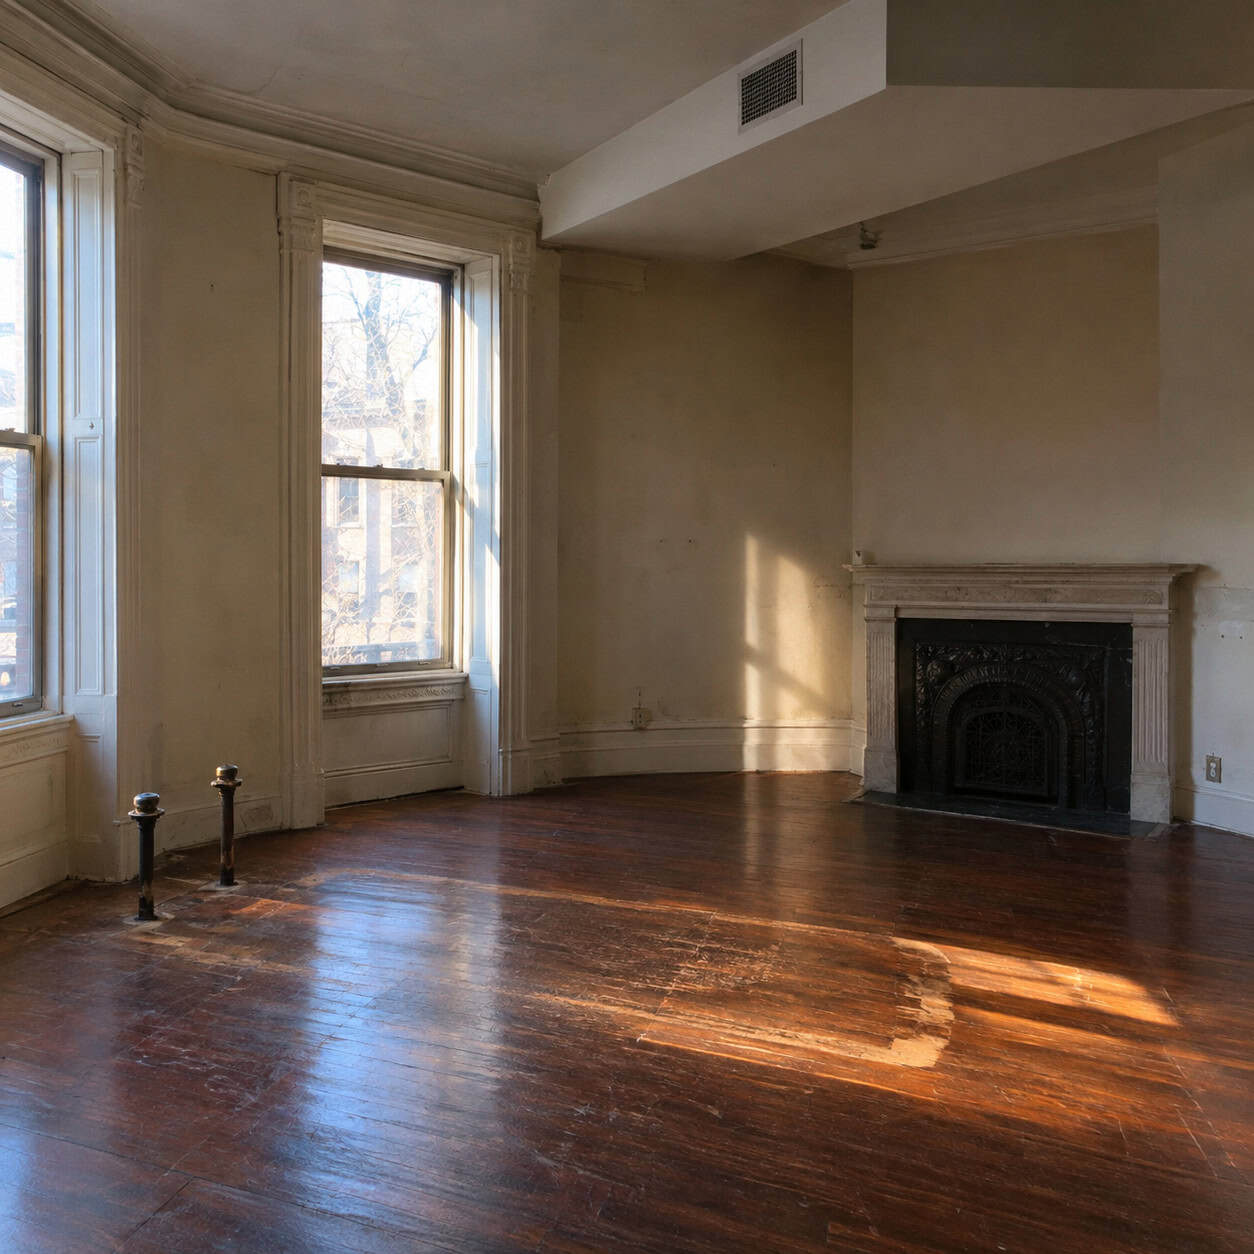
The cast iron isn’t the main loss. It’s what the ductwork does on the way in.
Houses built for steam or hot water have no chases. No room for a 14-inch trunk line. So installers notch joists, box in corners of the best rooms, and drop soffits across ten-foot ceilings.
Radiant heat also held interior humidity steady. Blow dry forced air through a plaster-and-old-wood house all winter and the trim shrinks, joints open, and furniture suffers.
A working boiler is worth keeping. Radiators outlast everything.
9. Bare Brick Painted or ‘Sealed’ With Waterproofer
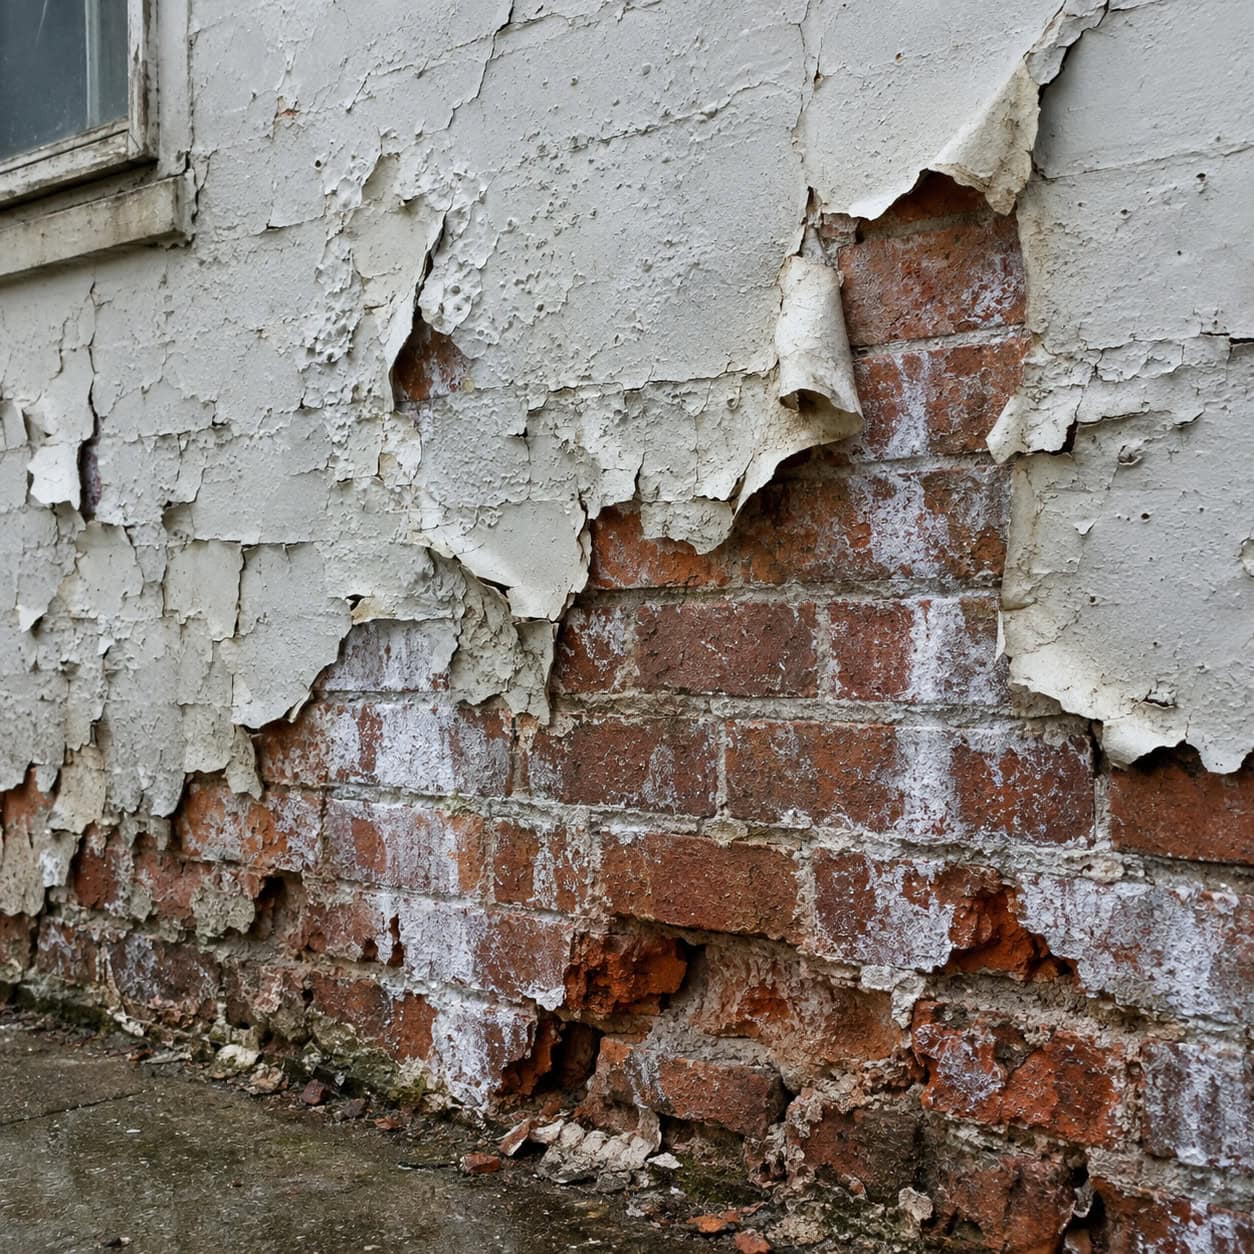
Solid masonry walls — two or three wythes thick, no cavity — handle water by absorbing it and then releasing it through the face.
Elastomeric paint and clear “breathable” sealers interrupt that. Water still gets in through the parapet, the chimney, the window heads. It just can’t get out.
You get white efflorescence bleeding through, paint lifting in sheets, and brick faces popping after a hard freeze when trapped water expands.
Stripping it later is sandblasting, which brings its own problem — see entry 14.
10. Blown Attic Insulation Stuffed Into the Eaves
Here’s where a good idea gets ruined in the last three feet.
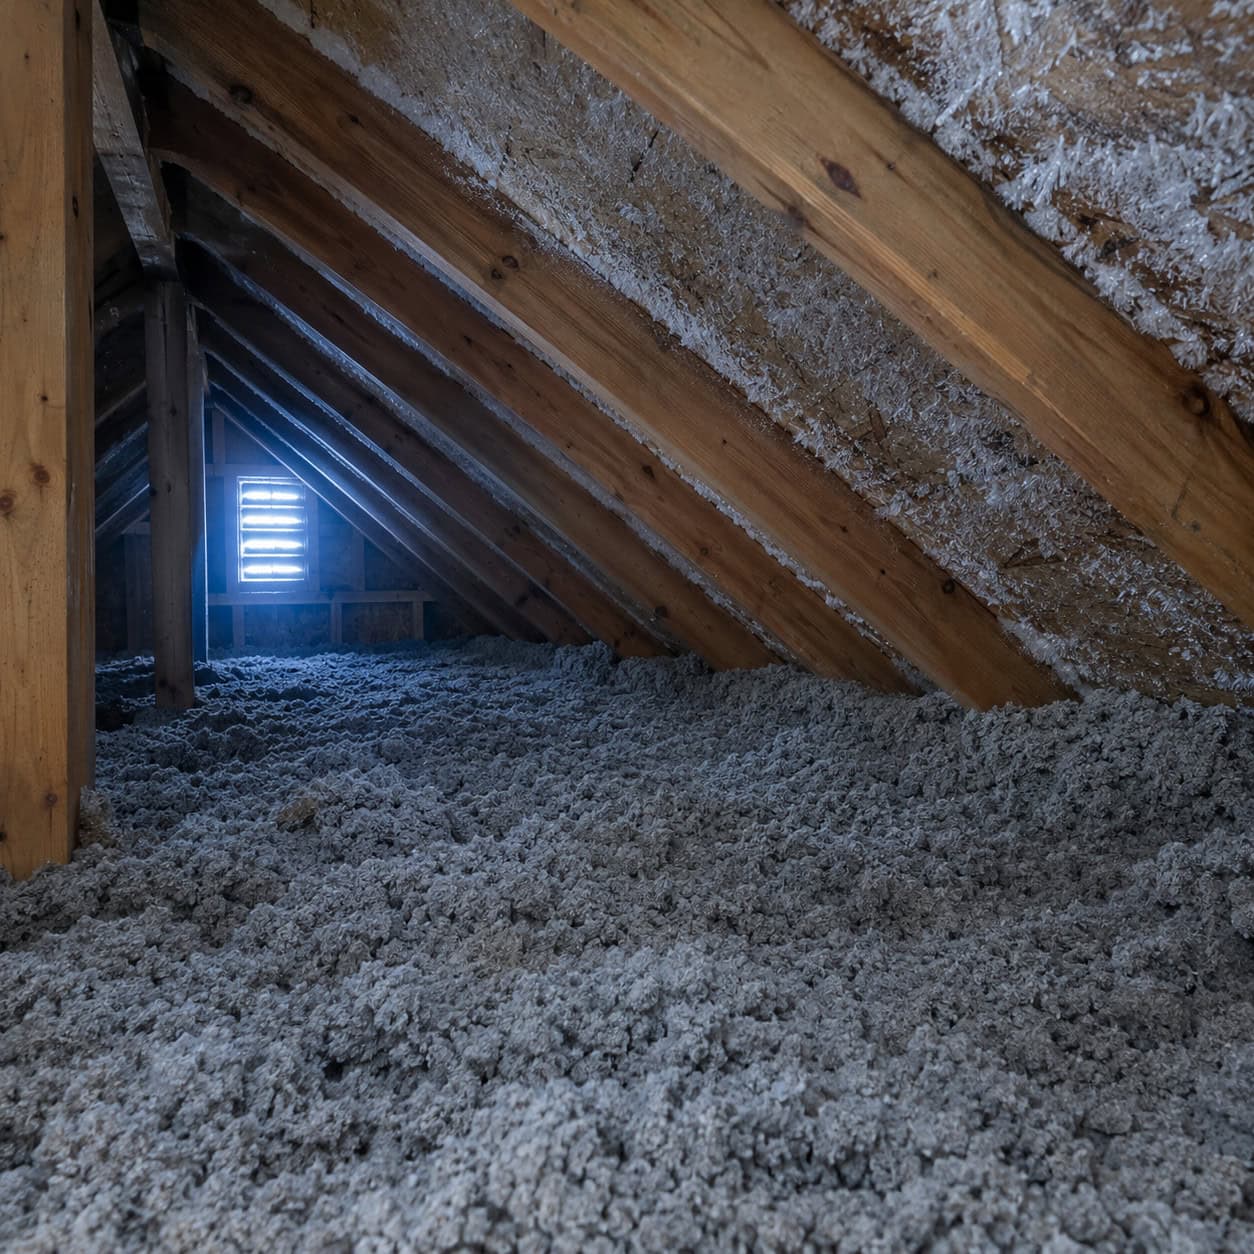
Attic insulation is one of the best investments in an old house. But crews working fast blow cellulose all the way out to the rafter tails, packing the eave solid and sealing off whatever soffit airflow existed.
Now the roof deck runs warm. Snow melts, refreezes at the cold overhang, and ice dams back water up under the shingles.
Watch for these after the first real cold snap:
- Frost on the underside of the roof sheathing
- Icicles along one section of eave and not others
- Brown rings on the bedroom ceiling below
- Insulation visibly jammed against the roof boards
Baffles cost a few dollars apiece. Install them before the insulation, not after.
11. Interior Waterproofing Paint on a Rubble Stone Foundation
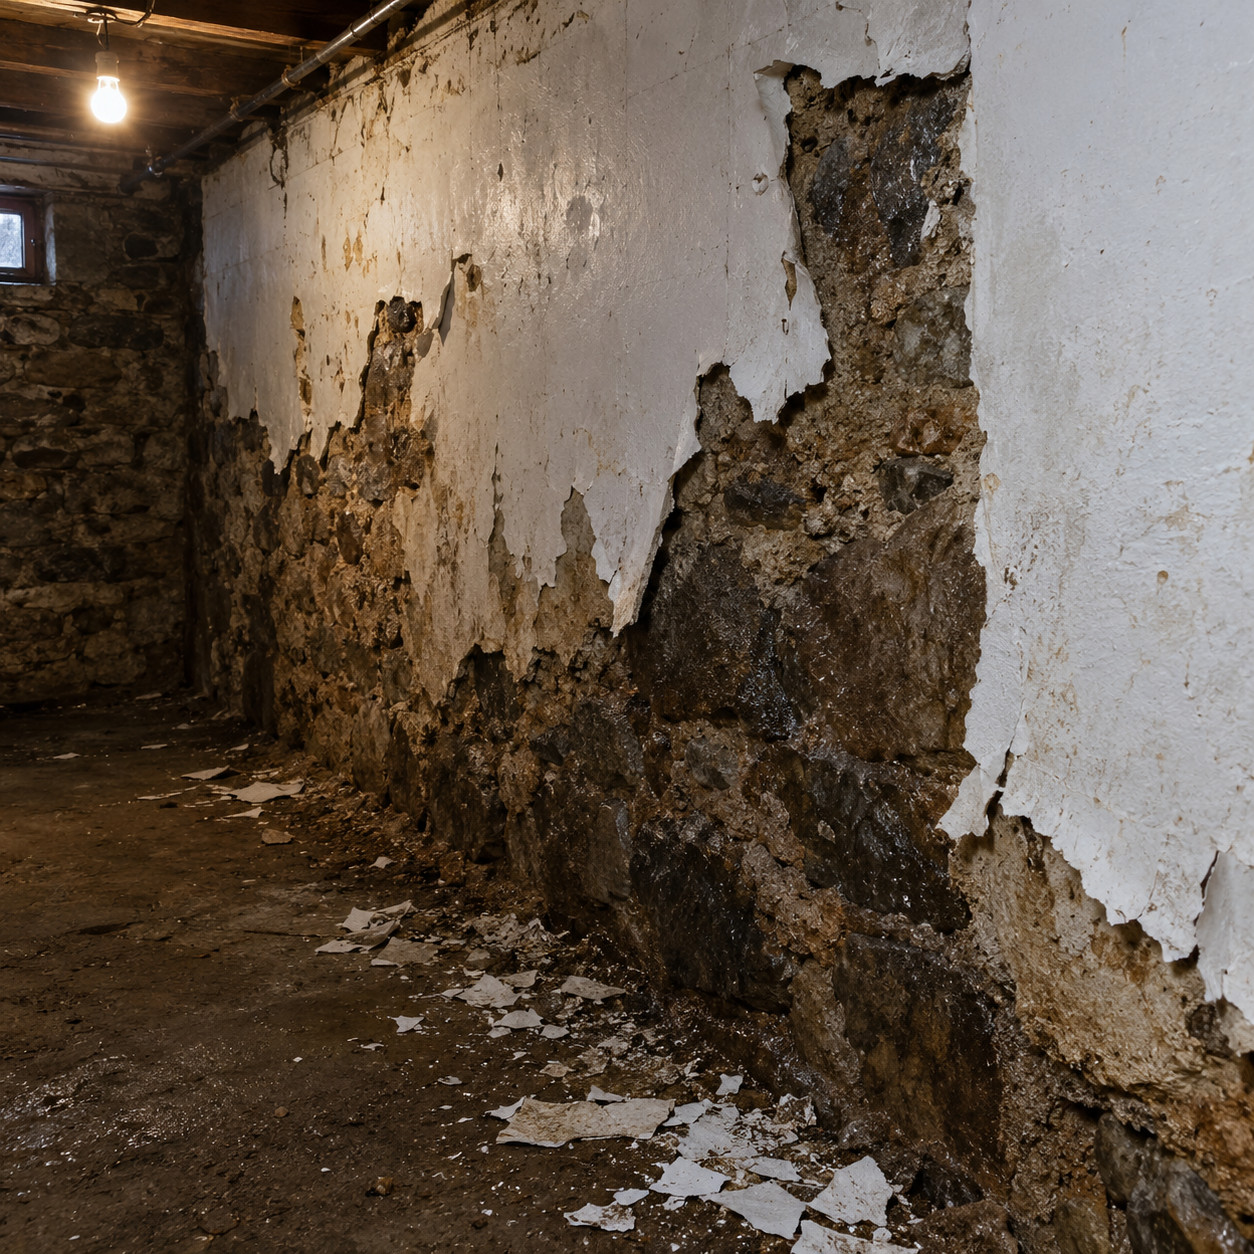
A rubble stone cellar was never meant to be a dry room. It was a cold hole for coal, potatoes, and the furnace.
Those walls are mortared fieldstone, often with a clay or lime core and no footing drain. Groundwater moves through them constantly and evaporates off the inside face. That evaporation is the wall’s only exit.
Roll on a waterproofing coating and the moisture doesn’t stop arriving — it just has to push harder. Hydrostatic pressure builds behind the film until the coating lifts off in sheets, usually taking mortar with it. In freeze-prone climates, saturated stone that can’t dry spalls from the inside.
The actual fix is almost always outside, and it’s almost always cheaper.
Start with the gutters. A clogged gutter dumps hundreds of gallons at one spot against the foundation during a single storm. Then the downspouts — six feet of extension or a buried line carrying water well away from the wall, not a splash block that puts it right back where it started.
Then grade. You want the first ten feet sloping away from the house at roughly six inches of fall. Most old houses have settled into a slope running the wrong direction, and regrading that strip solves more wet basements than any product sold in a bucket.
Fix the water before it reaches the wall. Everything else is treating a symptom from the wrong side.
12. The Slate or Tile Roof Swapped for Asphalt
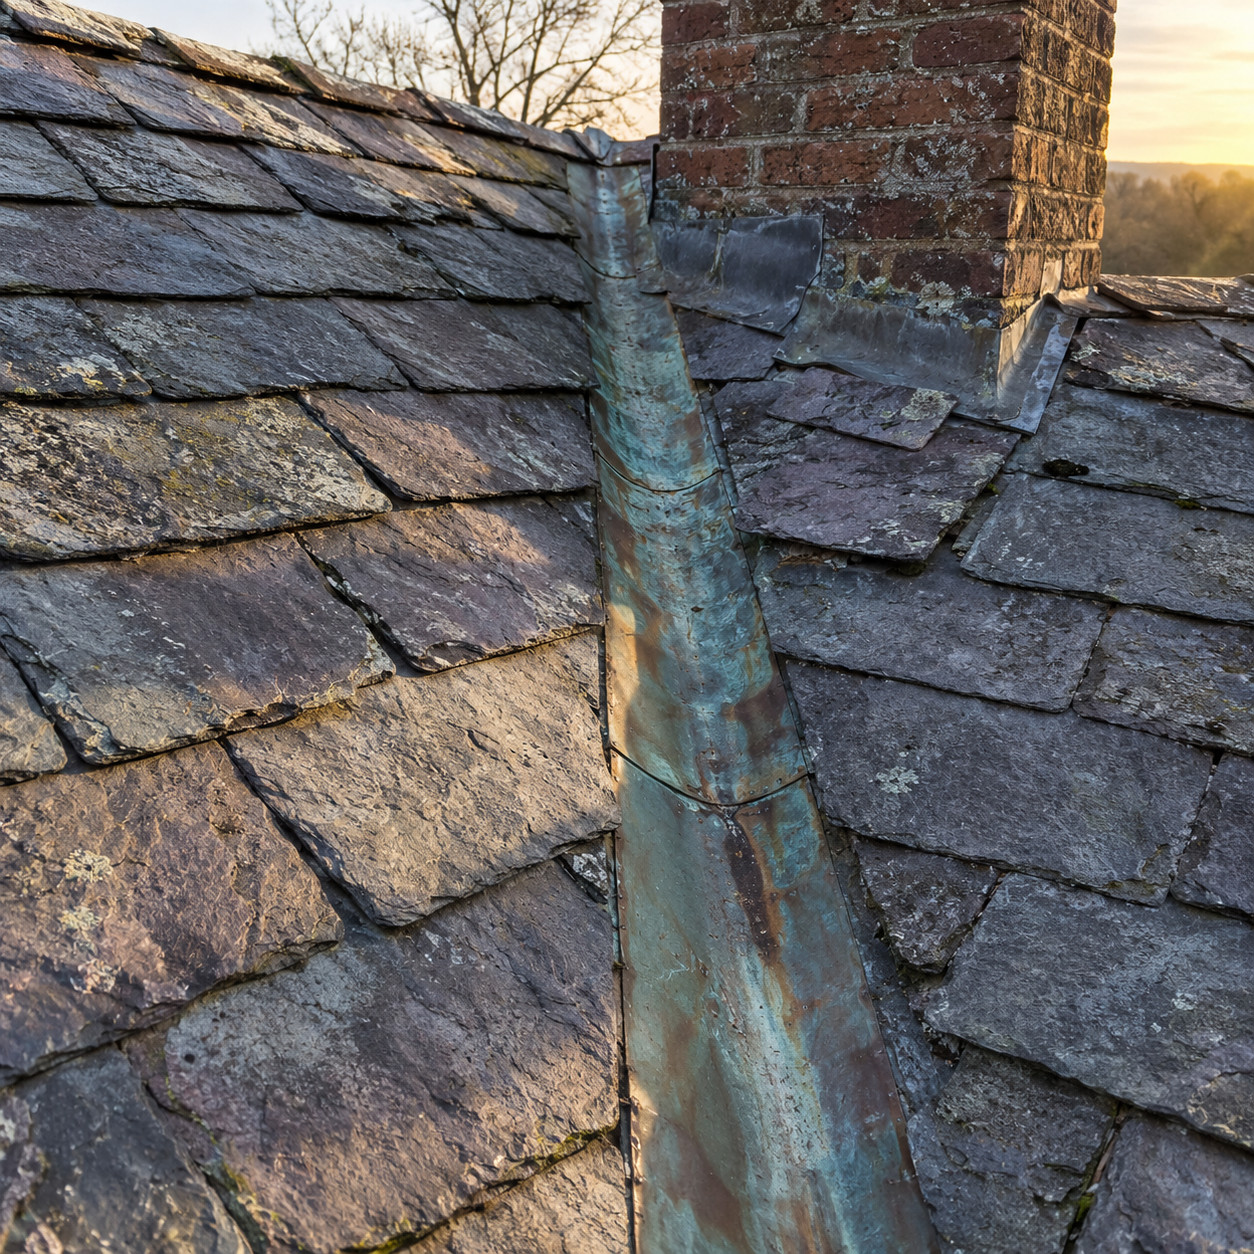
A slate roof installed in 1910 may well still have 40 or 50 years left in the stone.
What fails on an old slate roof usually isn’t the slate. It’s the flashing — valleys, chimney counterflashing, the step flashing along a dormer cheek. Copper that’s been up for a century finally gives out and water starts coming in.
A roofer unfamiliar with slate sees stains on the attic ceiling and quotes a tear-off. The homeowner hears “the roof is failing” and believes it.
Do the math over the long term. A full slate replacement runs $20,000 to $50,000 on a typical house. Architectural asphalt might be $12,000 to $18,000 — but it’s rated for 25 to 30 years and often delivers less in a hot climate. Over the 75 to 150 years good slate lasts, you’ll buy asphalt four or five times.
And the repair that would have saved it? Reflashing a chimney and two valleys is frequently in the low four figures.
The framing was sized for the weight, too. Slate runs 800 to 1,500 pounds per square; asphalt is about 250. That rafter structure was overbuilt specifically to carry stone, and it’s going to sit there underloaded for the next century holding up fiberglass mat.
Find a slater before you find a roofer. There are fewer of them, and they’re worth the drive.
13. Recessed Can Lights Punched Through Plaster Ceilings
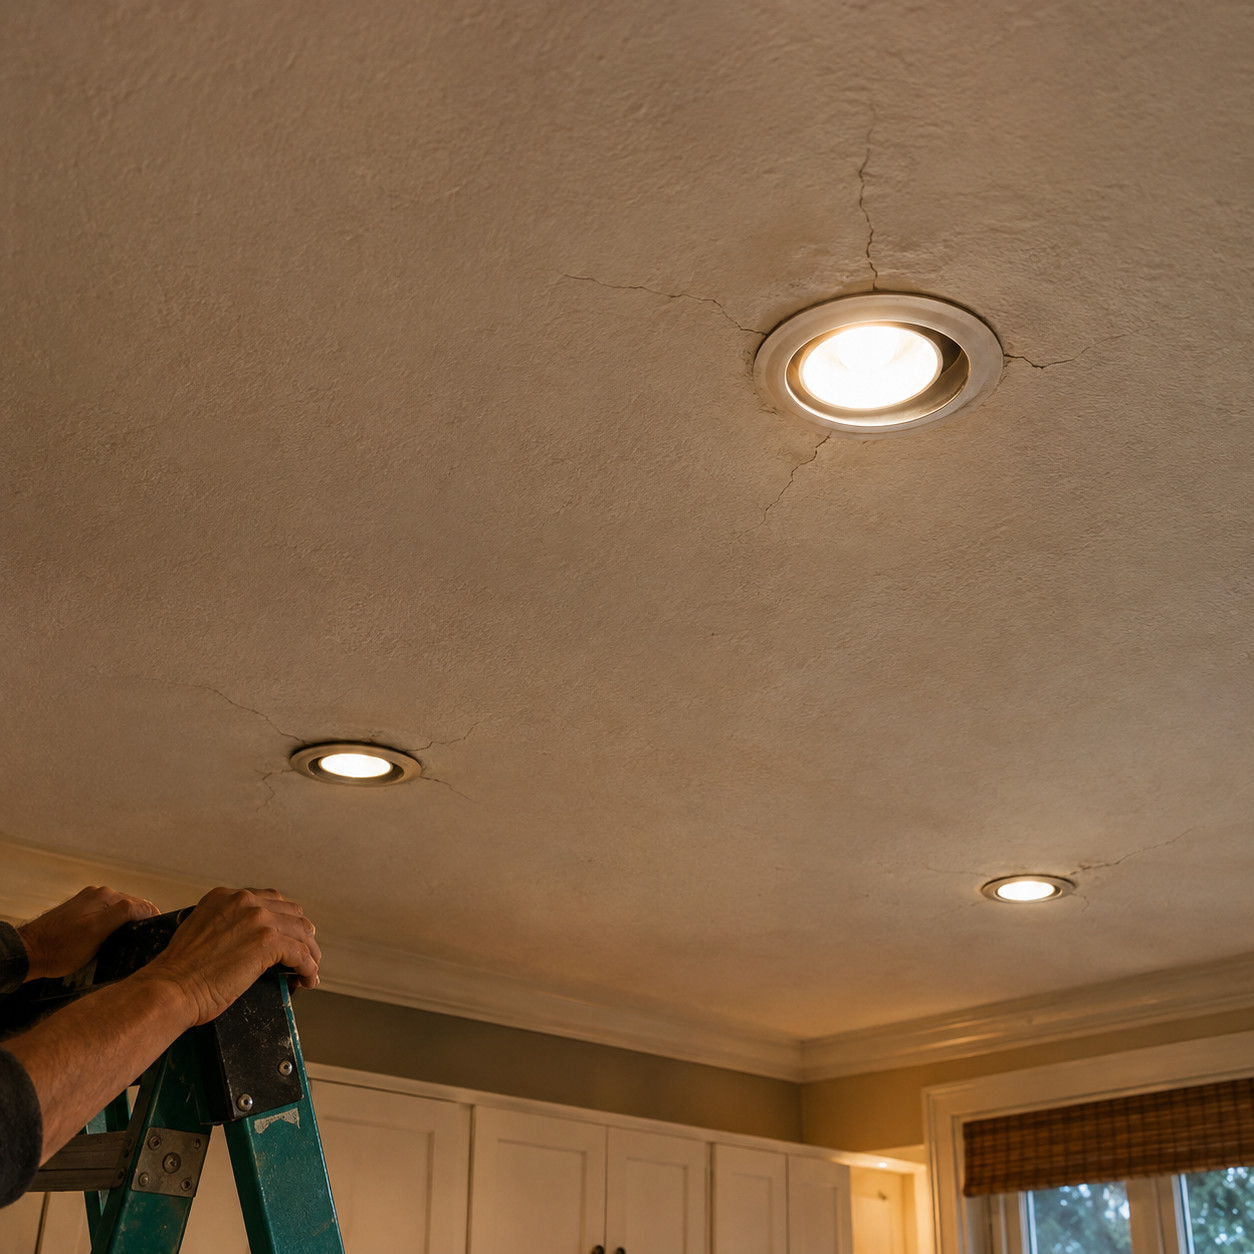
Eight cans in a kitchen ceiling means eight holes in the barrier between your heated house and a freezing attic.
Older housings leak air badly even when they’re labeled IC-rated. Warm, humid kitchen air rises through them all winter and condenses on the cold roof sheathing above.
That’s the same mechanism that feeds ice dams.
The plaster takes a hit too. Every hole cut in a continuous plaster field is a stress point, and the cracks radiate out from the cans within a couple of seasons.
Surface-mounted fixtures leak nothing.
14. Sandblasting and Pressure-Washing the Exterior
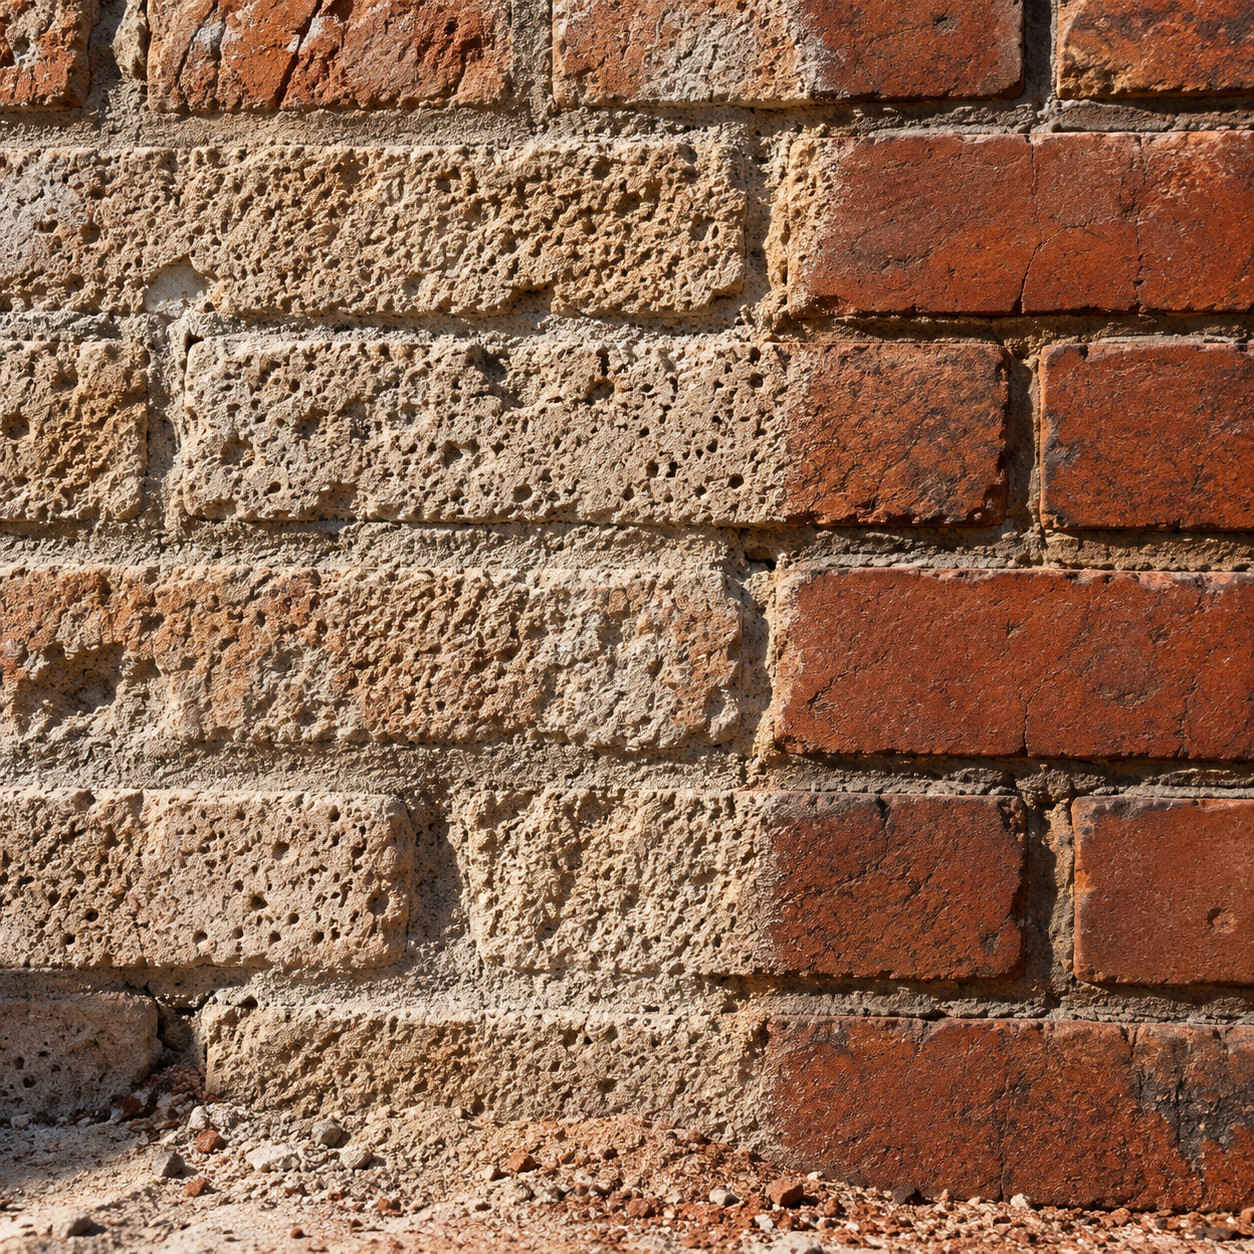
Historic brick has a hard, vitrified skin formed in the kiln. It’s the only weatherproofing the brick ever had.
Sandblasting removes it in minutes and exposes the soft, porous core underneath. That brick will now drink water and spall every winter for the rest of its life.
Pressure washing old wood siding does a quieter version of the same thing — it blasts out the soft early wood between growth rings and leaves a fuzzy, raised grain that holds moisture and refuses to hold paint.
Use low pressure, water, and a soft brush. There’s no shortcut that doesn’t cost you the surface.
15. The Wood Storm Windows Taken Down and Never Rehung
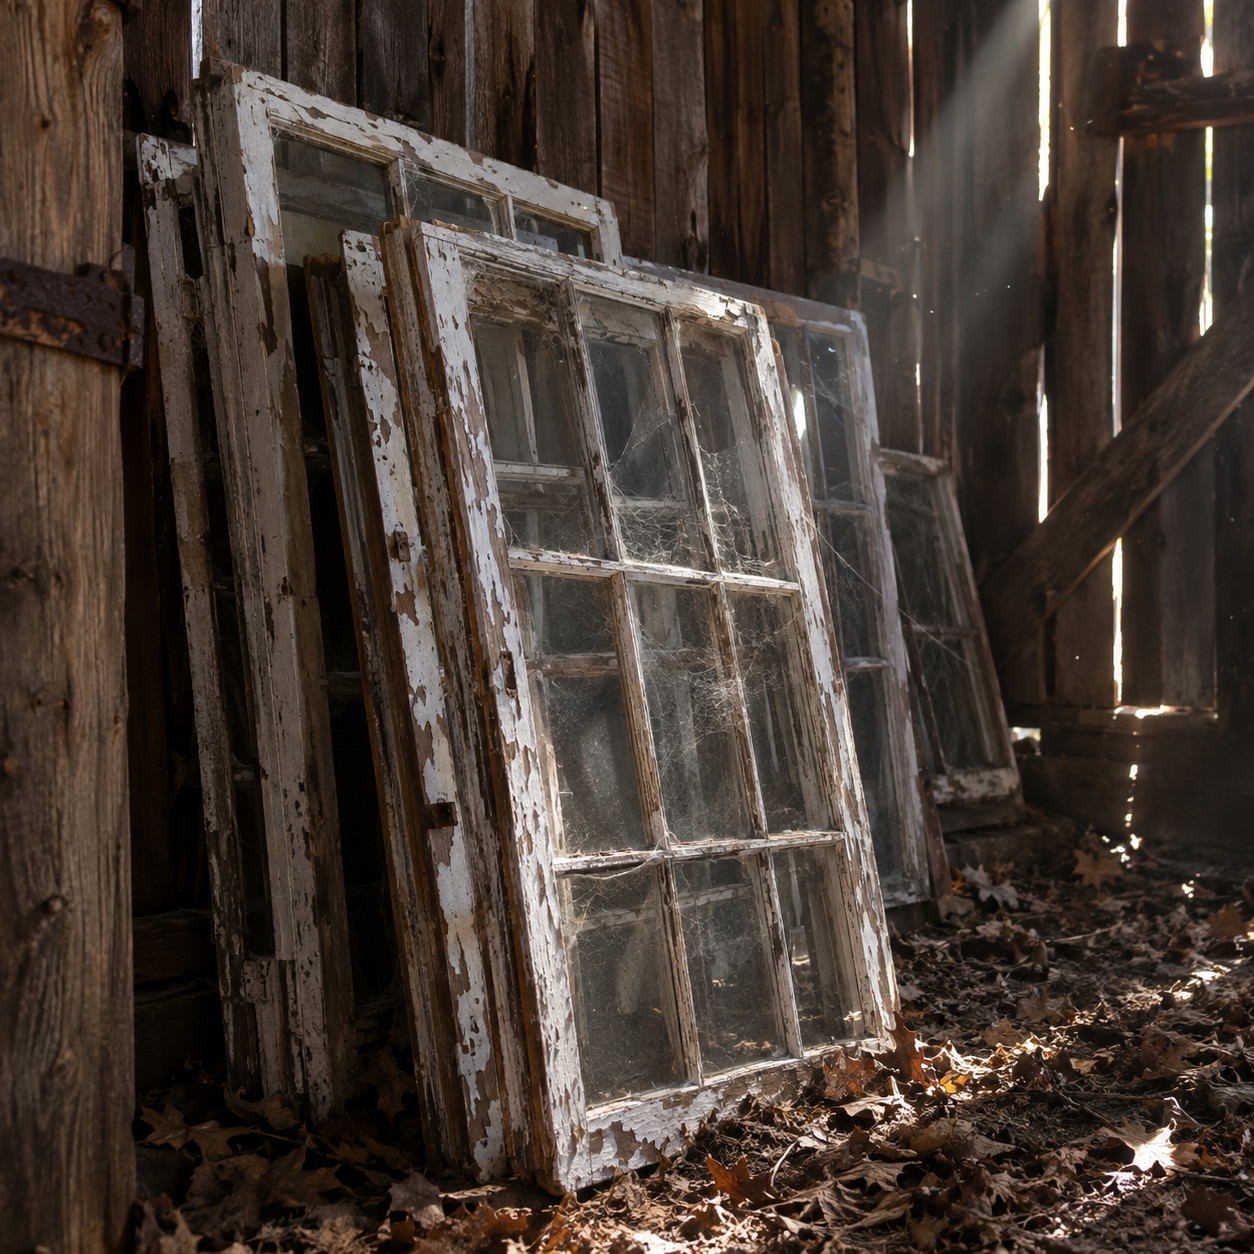
Those wooden storms stacked in the garage rafters aren’t clutter. They’re half the window system.
An original sash plus an exterior storm creates a dead air space that performs remarkably close to modern double glazing. That combination is why the repair-versus-replace math works at all.
The storms do something else, too. They take the weather — UV, driving rain, hail — so the primary sash’s glazing putty and paint don’t.
Leave them off for fifteen years and the putty cracks, the glass loosens, and the sill starts holding water. Then somebody declares the window beyond saving.
16. Crawlspace Vents Sealed Shut
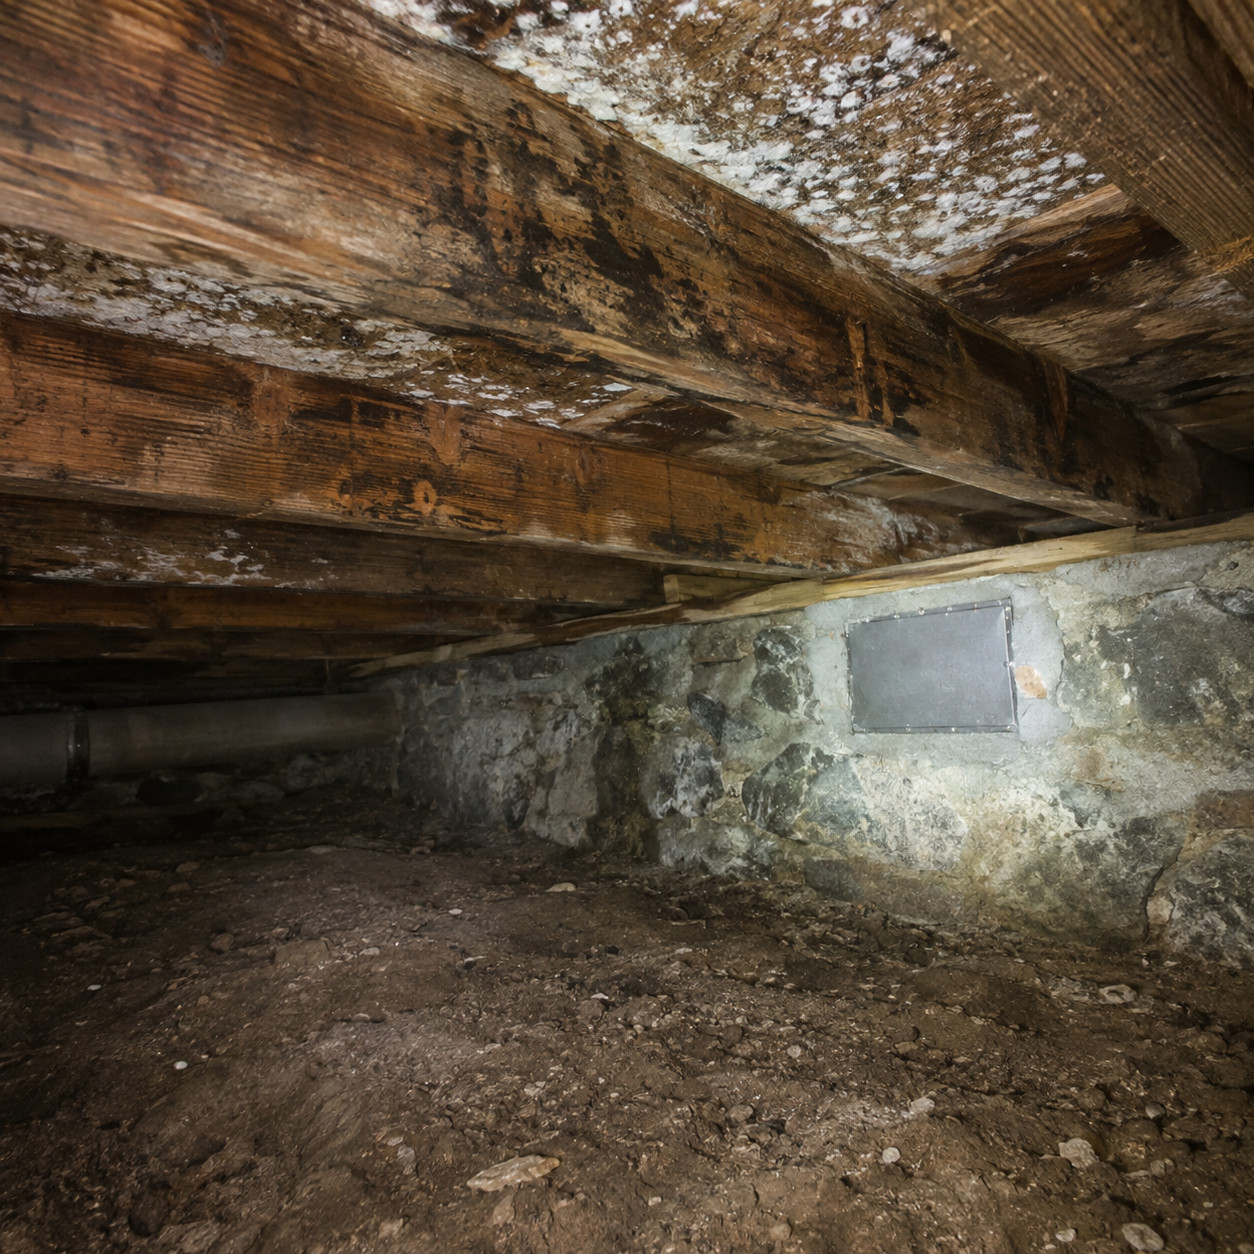
Encapsulation done right is a genuine improvement. Done halfway, it’s one of the fastest ways to rot a floor system.
A vented crawlspace works because outside air moves through and carries moisture out. It’s inefficient, but it’s self-correcting.
Close the vents and that exchange stops. If there’s still bare dirt on the floor — and in most pre-1950 houses there is — the ground keeps releasing moisture into a sealed box with no exit. Relative humidity climbs past 70%, which is the threshold where wood-decay fungi get to work on your joists and subfloor.
A proper job has three parts, and all three are required:
- A continuous heavy poly vapor barrier over the ground, sealed at seams and run up the walls
- Insulation on the perimeter walls rather than between the joists
- Conditioned air — a supply register, a dedicated dehumidifier, or an exhaust fan sized to the space
Skip the dehumidifier and you’ve built a terrarium under your living room.
If you’re not doing all three, leave the vents open. Seriously. A damp, breezy crawlspace has kept floor joists alive for a century; a sealed humid one takes them out in five years.
Put a cheap hygrometer down there either way and check it monthly for a year.
17. Latex Paint Rolled Over Lime Plaster
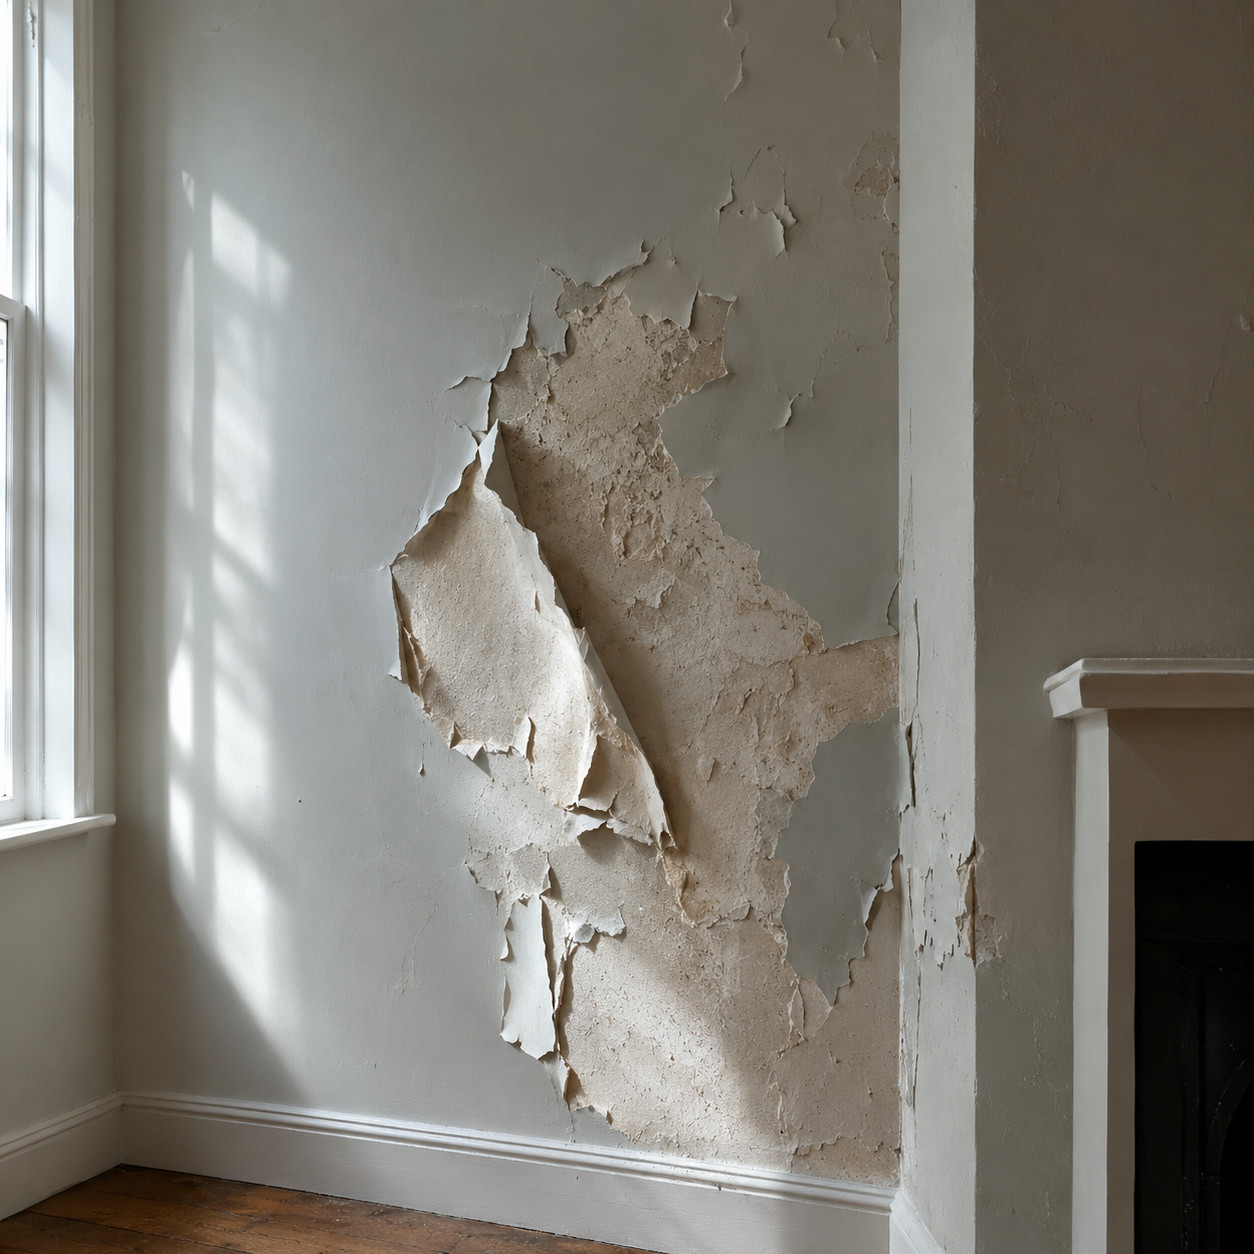
Distemper and limewash were chosen because they’re permeable. Moisture passes through them and the plaster stays sound.
Acrylic latex forms a continuous plastic film. On an exterior wall or a chimney breast where moisture is moving, that film blisters.
When it lets go, it doesn’t come off clean. It peels away with the plaster’s finish coat stuck to the back of it.
Mineral paints and limewash are still made. They cost more per gallon and save you a plaster repair.
18. The Chimney Taken Down Below the Roofline
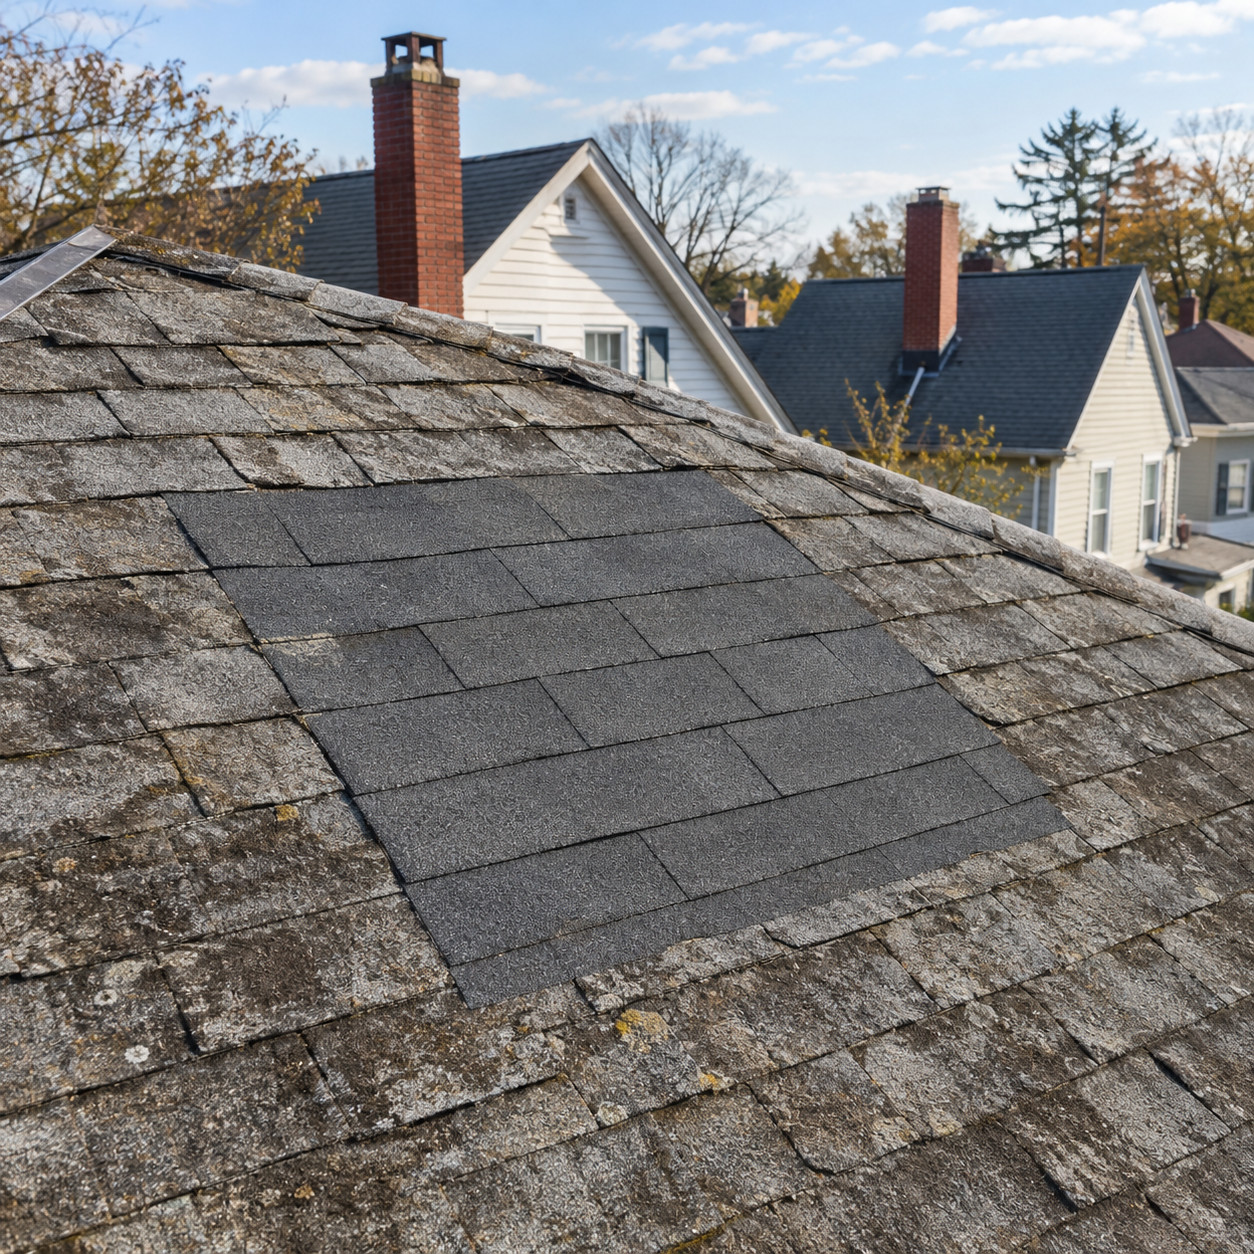
Tuckpointing a tall stack means staging, a mason, and real money. Cutting it off at the attic floor costs a fraction.
But that masonry mass was often doing structural work — carrying joists at the center of the house and stiffening the whole frame against movement.
Remove it and the center of the house starts to settle differently than the perimeter. You’ll see it in the second-floor hallway first.
Then there’s the flue. It’s the only path a future wood stove, a high-efficiency boiler, or a gas water heater has to the outside. Once the stack is gone, running a new one through a finished house is brutal.
19. Bath Fans and Dryers Vented Into the Attic
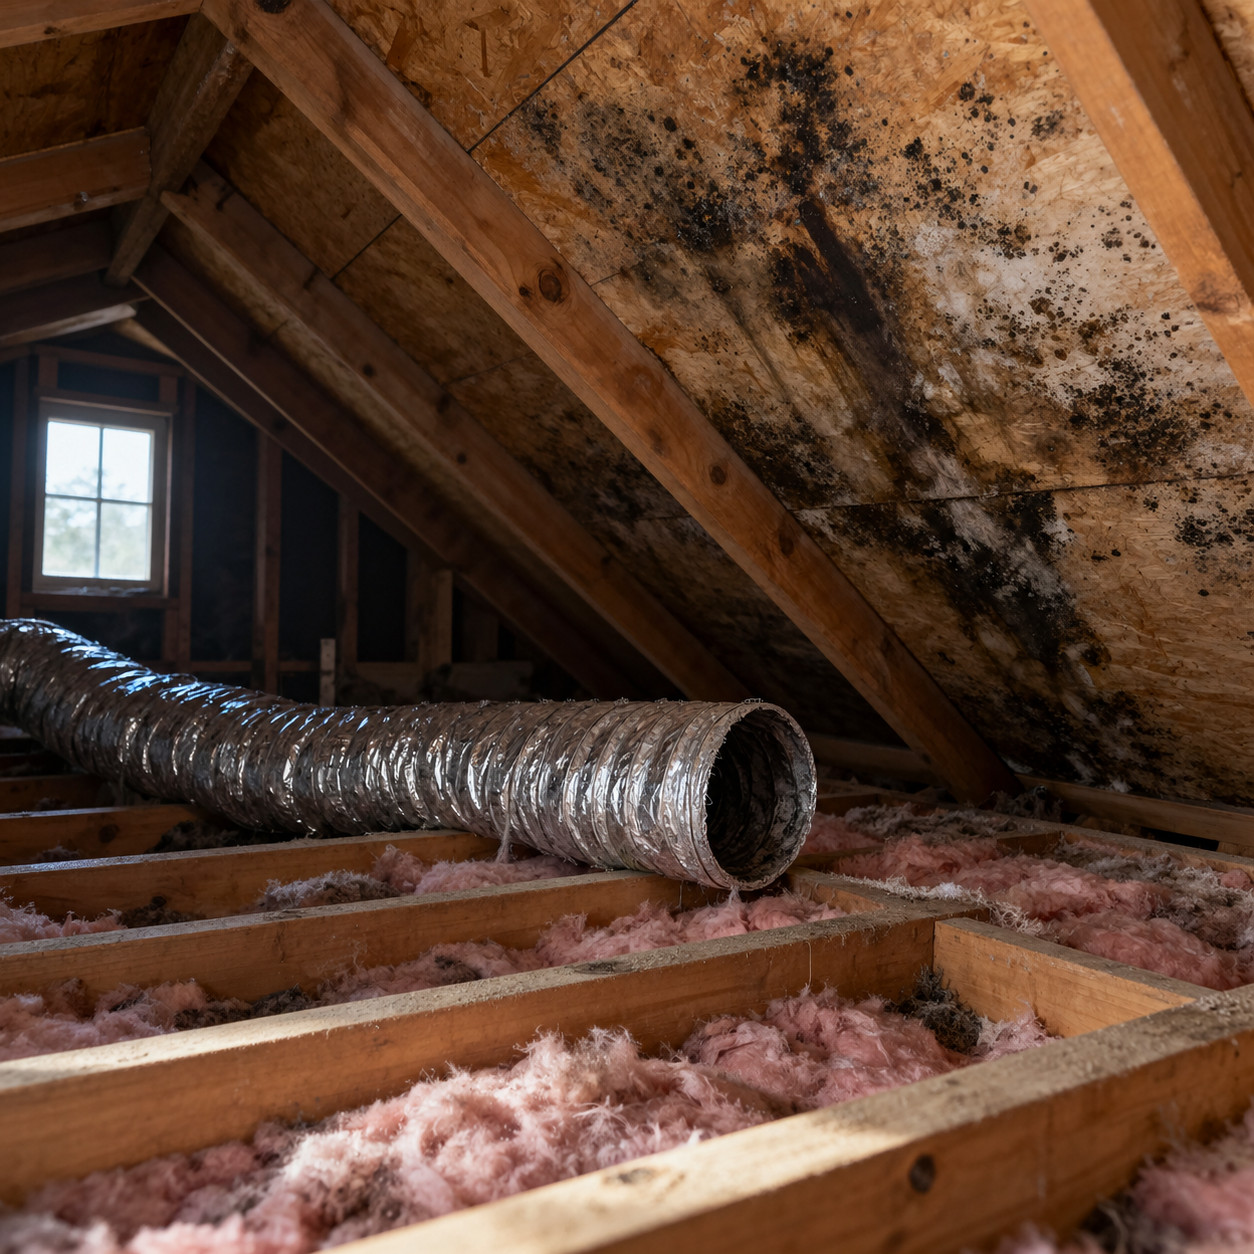
Open any old-house attic and start looking at duct terminations. You’ll find at least one flex hose pointed at nothing.
It happens because second-floor bathrooms were added long after the house was built, usually carved out of a closet or a back bedroom. There was no chase, no soffit, no easy route to the exterior — so the installer ran the duct ten feet into the attic and called it done.
A single shower puts roughly half a pint of water into the air. A dryer vents several pounds of moisture per load. Aim that at cold roof sheathing all winter and you get condensation, then black staining, then soft wood.
Attic mold on a hundred-year-old roof deck almost always traces back to one of these ducts.
Do it properly. Run insulated rigid duct — not uninsulated flex, which condenses inside itself — the shortest possible path to a roof cap or gable vent with a working damper. Slope it slightly downward toward the exterior so any condensate drains out rather than back into the fan housing. Seal the joints with foil tape, not cloth duct tape, which fails in a few years in attic heat.
Never terminate into a soffit vent. The air you just pushed out gets pulled right back into the attic.
Then go check the one in your house. There’s a real chance it’s pointed at the rafters.
20. A Deck Ledger Bolted Straight to the Siding
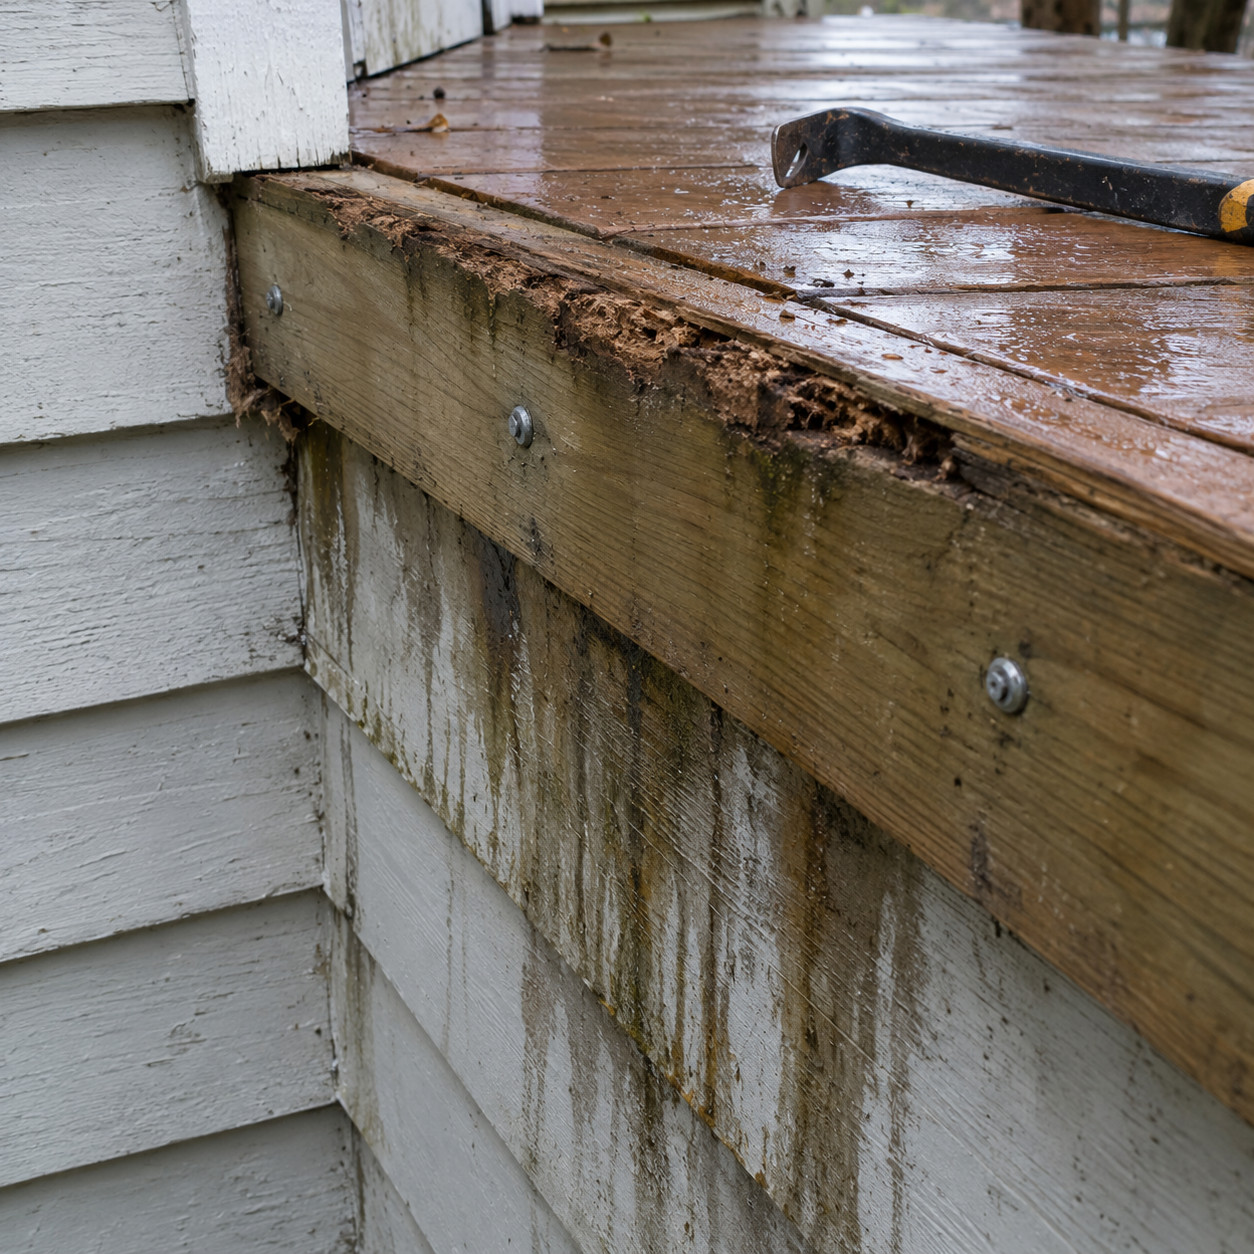
Lag a pressure-treated 2×10 over clapboard and you’ve built a water collection shelf on the side of your house.
Every rain runs down the siding, hits the top of that ledger, and sits. The boards above shed water directly onto the joint. There’s nothing stopping it from working into the band joist.
Modern houses survive this a while because housewrap buys them time. Old houses have no housewrap — nothing between the clapboard and the sheathing but air and a century of paint.
So the water goes straight into the rim, then down to the sill plate. By the time the deck feels springy, you’re into structural repair on the house, not just the deck.
A correct installation means siding cut away behind the ledger, self-adhered flashing membrane lapped over the sheathing and behind the housewrap or felt, and a metal Z-flashing over the top edge of the ledger that kicks water out onto the decking. Bolts, not lags, and spaced per the span table.
Better still on an old house: build the deck freestanding. Add two posts along the house side and skip the ledger entirely. It costs a few hundred dollars more and it never touches your framing.
21. The Front Porch Enclosed Into a Room
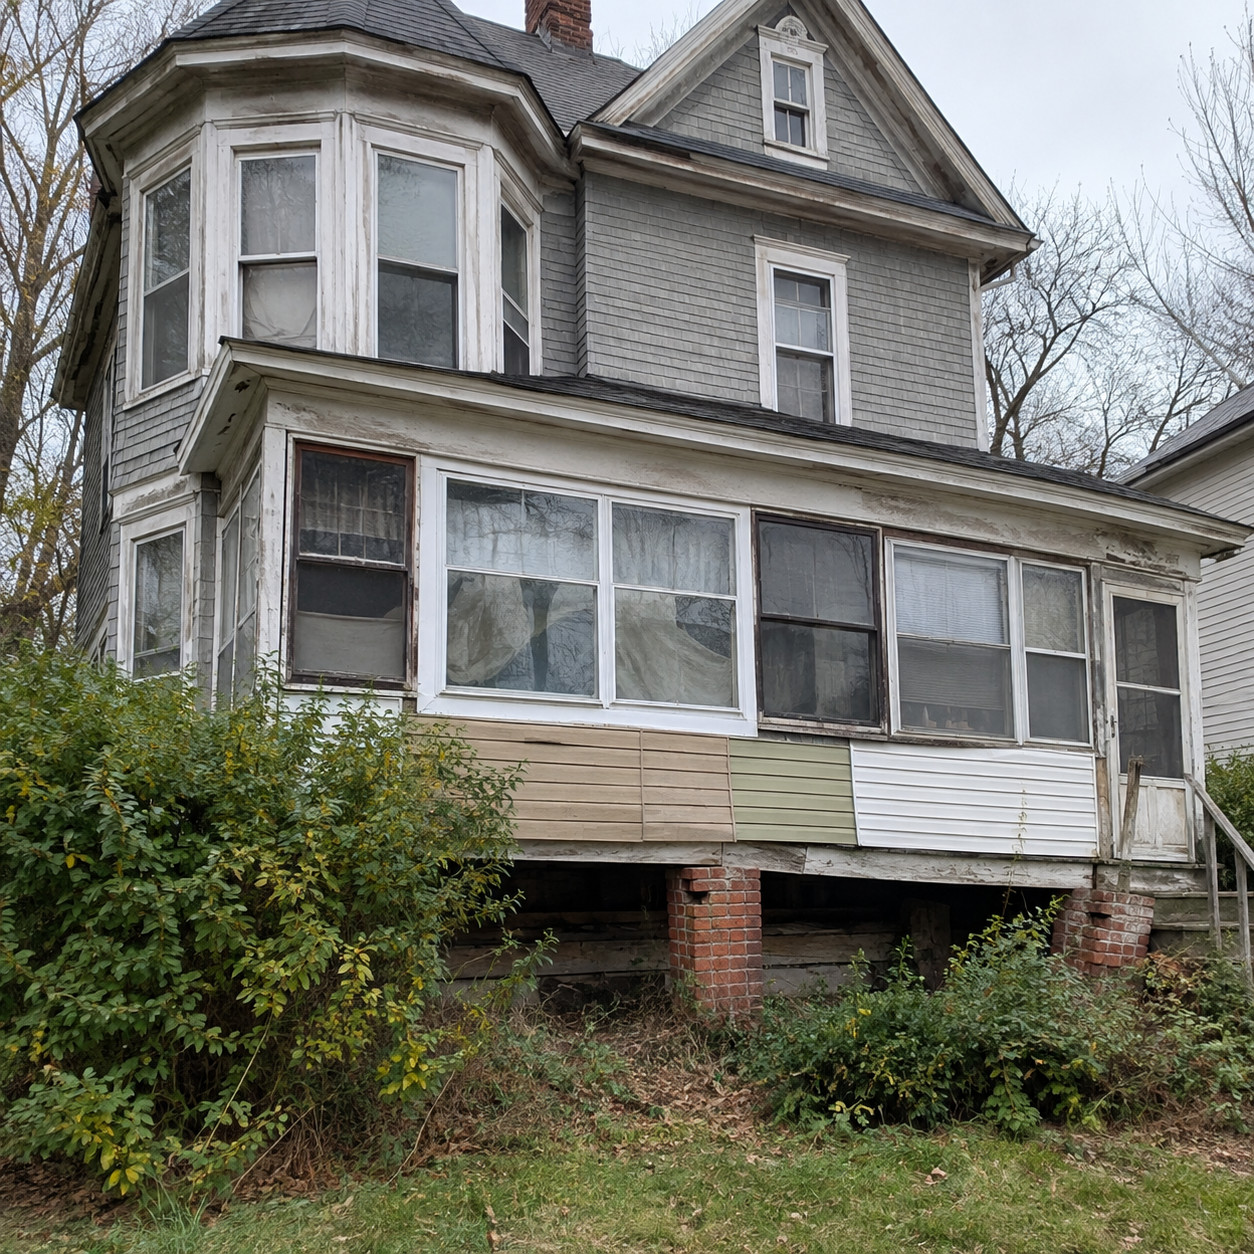
Porches were built light and open on purpose. Brick piers, minimal footings, framing sized for a roof and a couple of rocking chairs.
Enclose it and you add glass, insulation, drywall, flooring, furniture, and a few thousand pounds of dead load onto piers that were never engineered for it. The floor develops a slope toward the yard.
Worse, the wall behind it is suddenly interior. It was built to dry in open air, with siding and no vapor control, and now there’s conditioned humid air on both sides of it.
That wall rots quietly for years behind the new paneling.
22. Stone Countertops and Tile Floors on Century-Old Joists
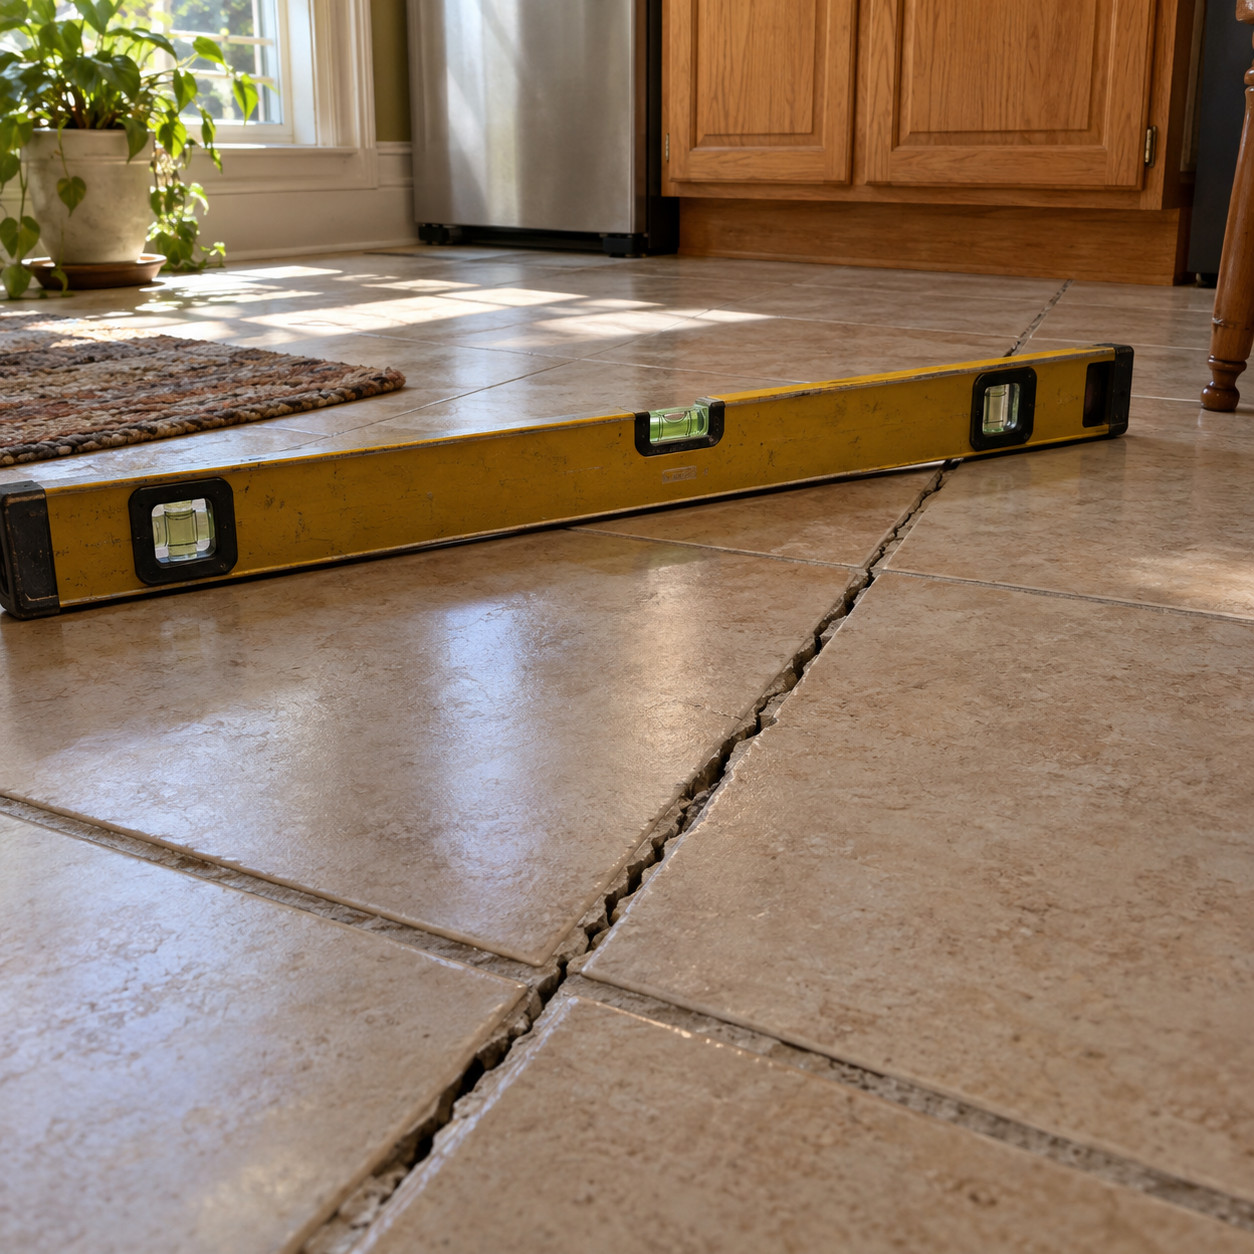
Old joists are often true full-dimension lumber — an actual 2×10, not 1.5 by 9.25 — and they’re strong. Strength isn’t the issue.
Deflection is. Those joists were spanned for linoleum, pine flooring, and rugs, all of which flex happily. Code-era floors target L/360 for tile and L/720 for natural stone; a long old span rarely gets close.
Set mortar and porcelain on a floor with that much bounce and the grout cracks in a year. Thinset lets go. A slab countertop on undersized cabinets over the same floor eventually shows a hairline seam.
Downstairs, the plaster ceiling cracks along every joist line.
Sister the joists or add an uncoupling membrane before you buy the tile, not after.
23. Old-Growth Floors Sanded Down and Polyurethaned
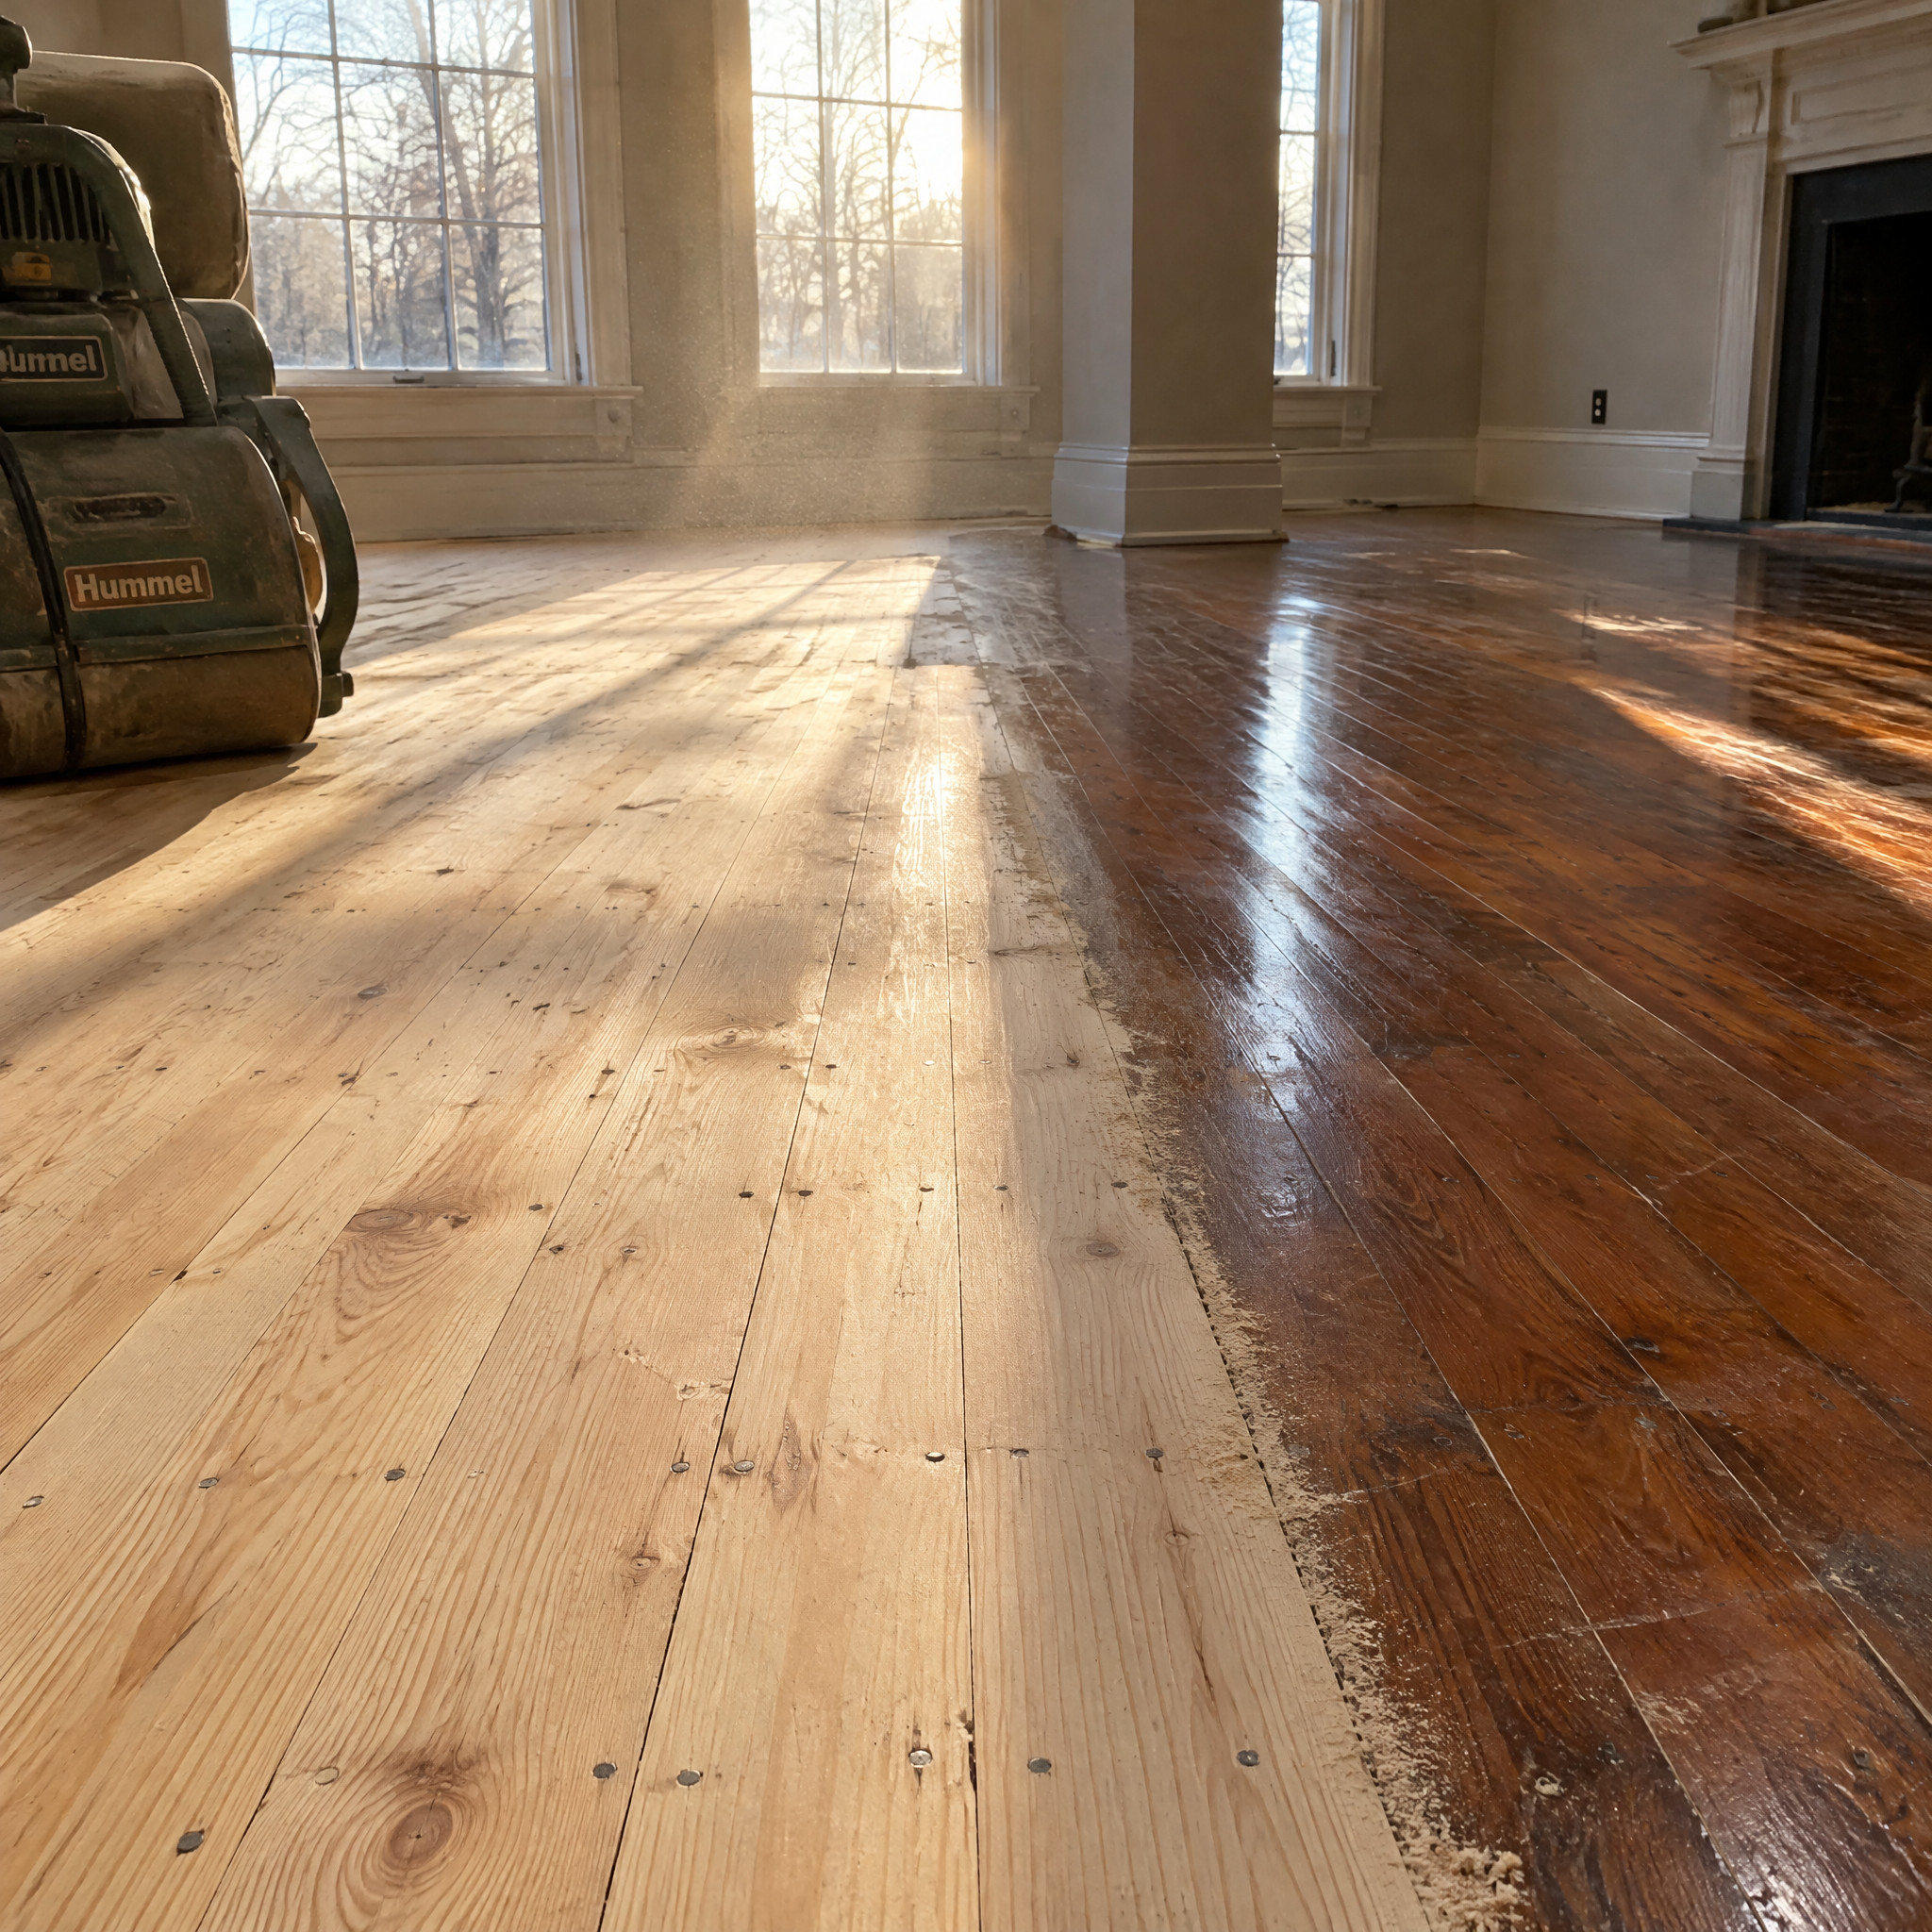
A heart pine floor from 1895 has maybe three-eighths of an inch of wear surface above the tongue. An aggressive drum sanding takes a sixteenth or more.
Do that four times and you’re at the nail heads. On face-nailed pine, you hit them sooner.
The finish choice compounds it. Shellac and wax repair in place — scuff the bad spot, pad on more shellac, done in an hour with no sanding. Polyurethane doesn’t spot-repair. When it wears through at the kitchen door, the whole floor comes up again.
This table shows the trade clearly.
| Shellac & Wax | Polyurethane | |
|---|---|---|
| Spot repair | Yes, blends in | No, visible patch |
| Recoat prep | Clean and apply | Full sand required |
| Wood removed per cycle | None | 1/32″ to 1/16″ |
| Historic accuracy | Correct pre-1940 | Post-1950 finish |
| Water resistance | Fair | Excellent |
Poly wins on durability and loses on everything else. If the floor is original and thin, that trade isn’t worth it.
24. Jacking and Underpinning the Foundation Too Fast
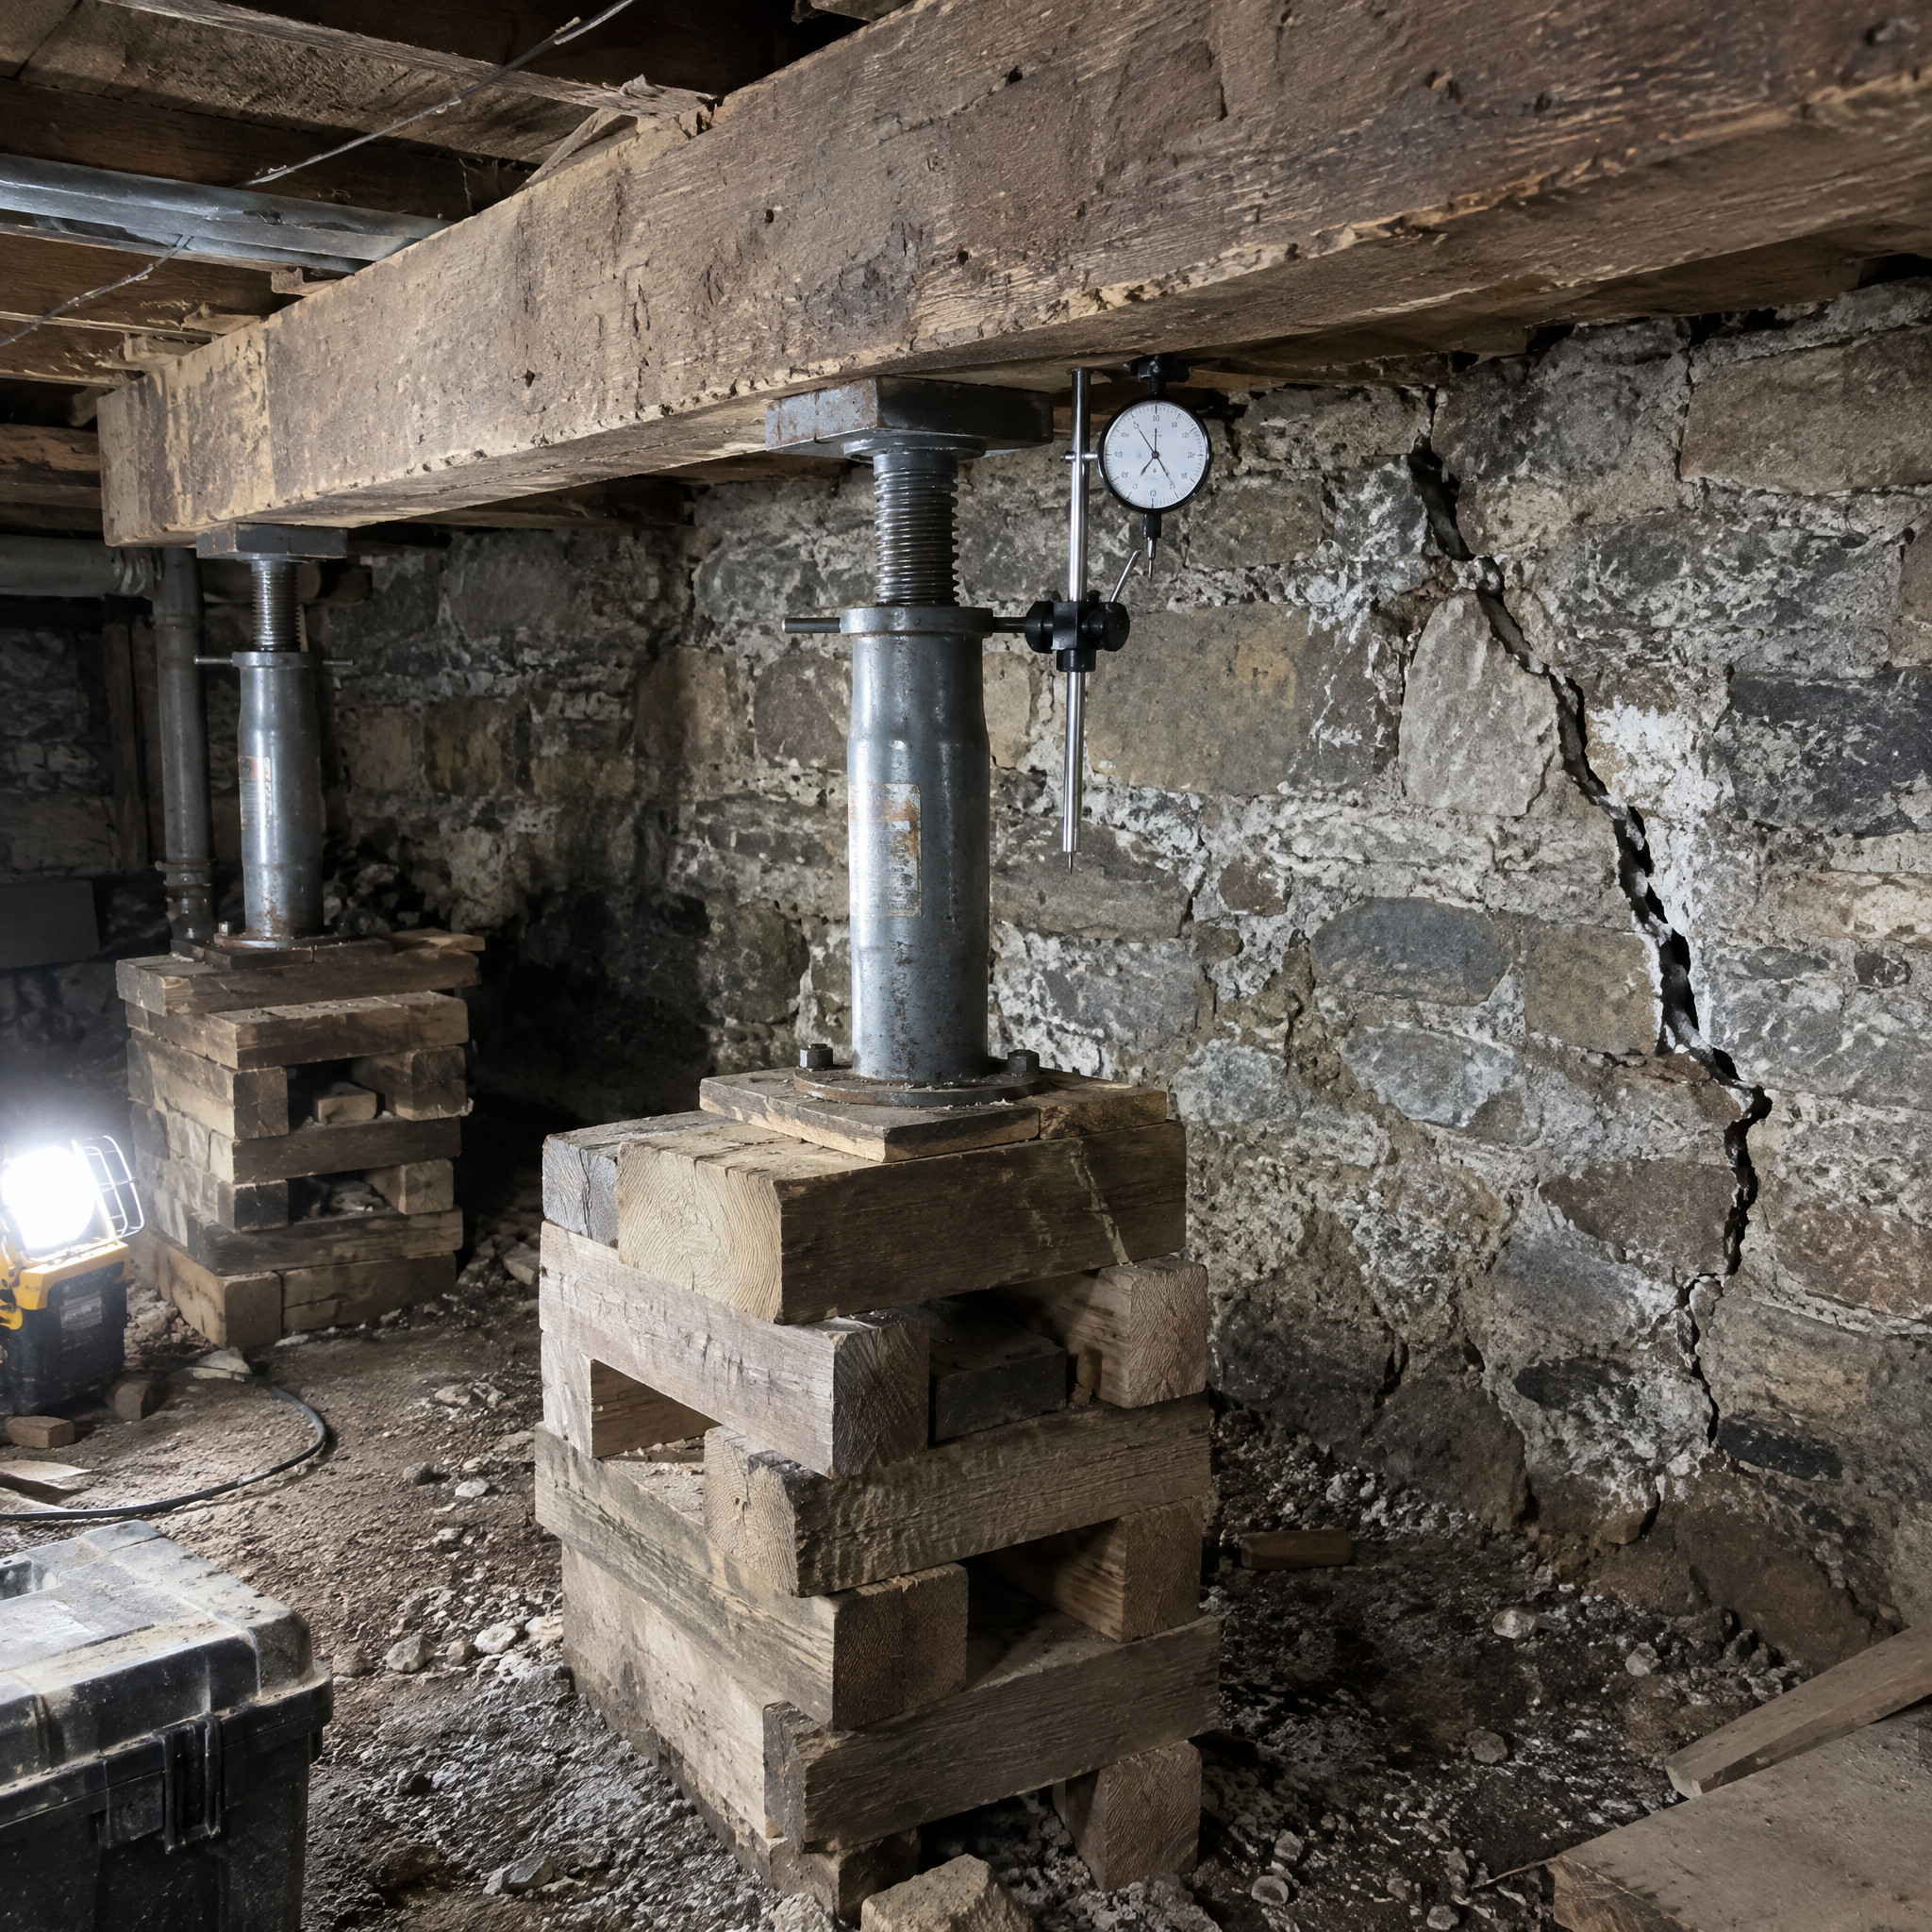
A house that settled in 1930 and hasn’t moved since is stable. Not level — stable. Those are different conditions and only one of them matters.
Every joint, every plaster key, every door jamb has spent decades adjusting to that geometry. The building reached equilibrium.
Lift it an inch over a weekend and you reverse ninety years of accommodation in two days. Plaster shears along the lath. Door frames rack out of square. Masonry that had been quietly holding cracks open across three courses. Tile grout opens everywhere at once.
Preservation contractors lift in increments measured in fractions — often an eighth of an inch at a time, with days or weeks between turns of the jack, letting the structure migrate with the change rather than snap.
A full lift that a production foundation company schedules for three days can legitimately take a preservation crew four to six months. That sounds absurd until you price repairing every plaster wall in the house.
Ask any contractor two questions before signing: how many pre-1900 houses have you lifted, and what’s your schedule of increments? If the answer to the first is vague or the second is “we do it in one shot,” keep calling.
And get a structural engineer who works on old buildings to write the spec first. Their fee is a rounding error against the cost of getting it wrong.
25. Asbestos-Cement Shingles Ripped Off Over a Weekend
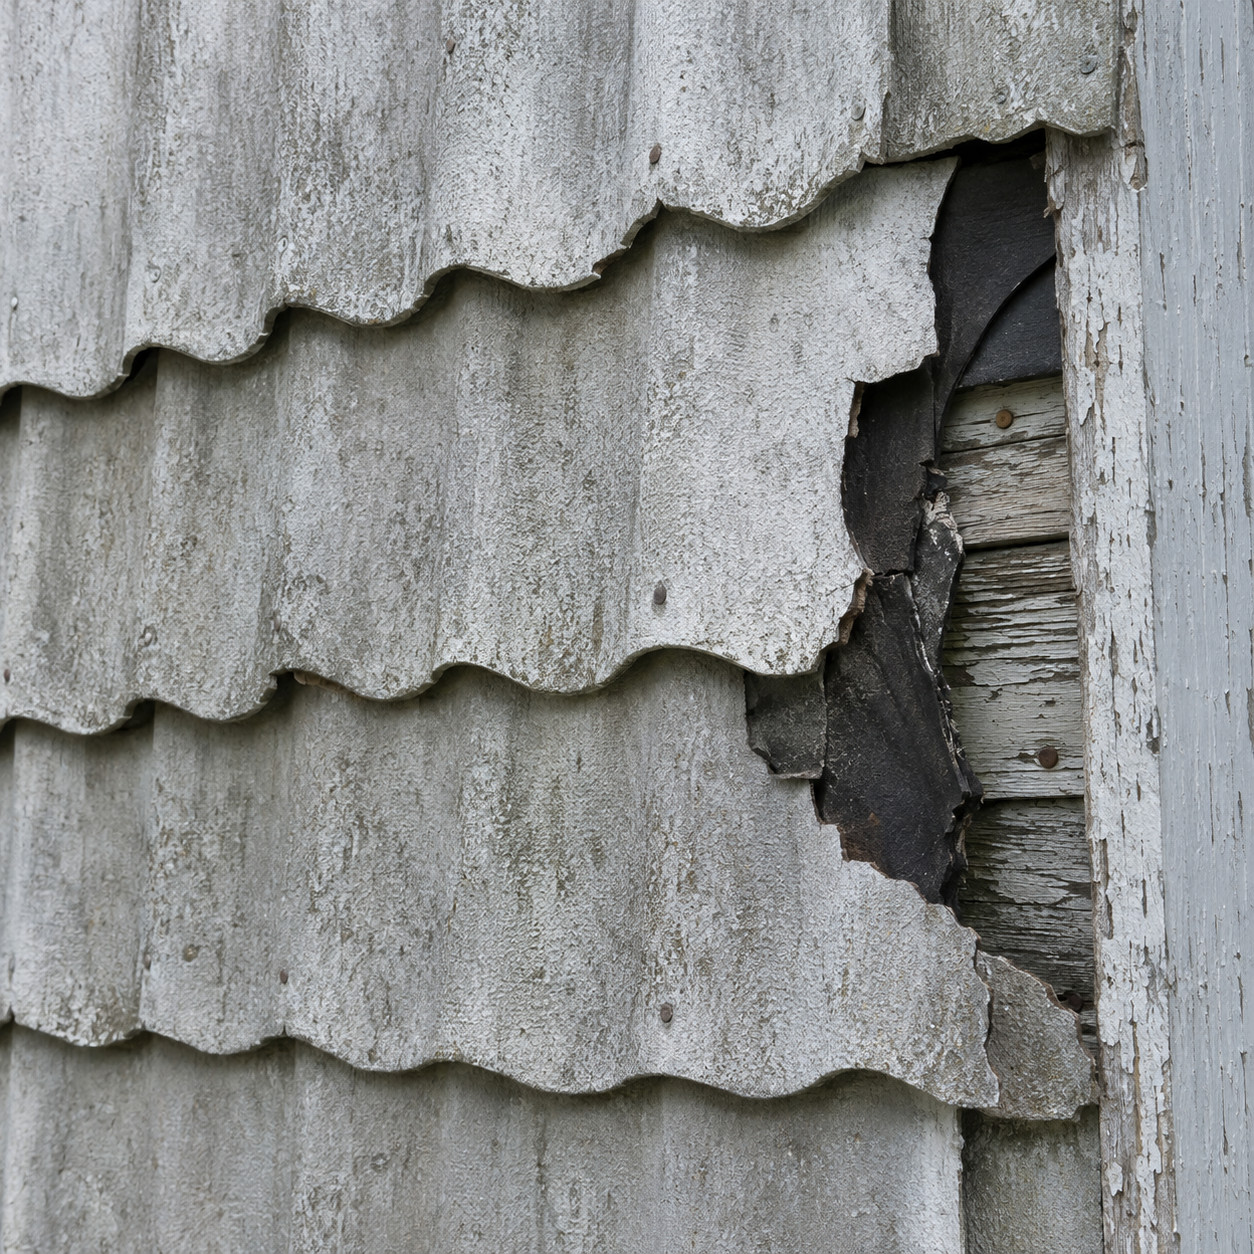
Those thick, slightly wavy shingles with the fluted bottom edge went on millions of American houses between the 1920s and the 1970s. They’re asbestos fiber bound in Portland cement.
And intact, painted, undisturbed, they’re generally considered stable. The fibers are locked in the cement matrix. Nobody’s breathing anything.
The danger starts when a homeowner with a pry bar decides to get back to the original clapboard underneath. Breaking, snapping, cutting, or sanding that material releases fiber into the air — and into the soil around the house, and onto the clothes you wear inside afterward.
Two things usually go unconsidered.
First, the clapboard underneath has typically been nailed through hundreds of times and furred out. It’s rarely in the condition people picture.
Second, asbestos-cement siding is extremely durable. Plenty of it has been on houses for 80 years with nothing but repainting.
Test before you touch it. A lab sample runs $30 to $75 and tells you definitively what you have. If it comes back positive and the siding is sound, the right move is often to paint it and leave it.
If it has to come off, that’s licensed abatement work with containment, wetting, sealed disposal, and documentation — not a weekend and a dumpster. Many states regulate homeowner removal and nearly all regulate disposal.
None of this is cause for panic. It’s cause for a phone call before the first shingle moves.
26. Painted Softwood Trim and Doors Stripped to Bare Wood
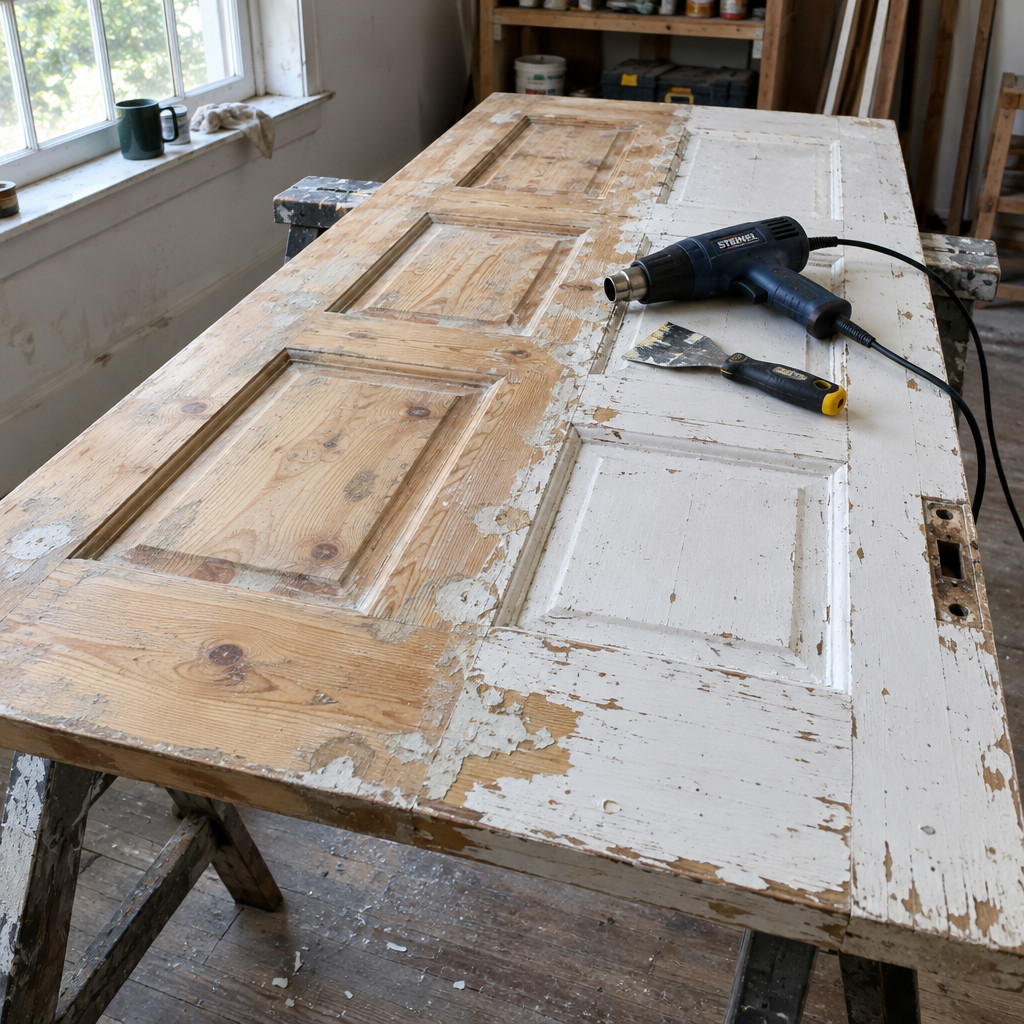
There’s a widespread belief that all old woodwork is secretly beautiful hardwood hiding under paint. Usually it isn’t.
Builders specified clear oak and chestnut for the rooms guests saw and plain pine or poplar everywhere else — bedrooms, back halls, closets. That softwood was always meant to be painted. It’s assembled with open joints, shimmed gaps, and putty the painter filled before priming.
Strip it and you expose all of that, plus bland grain and a hundred years of dings that paint was hiding.
Chemical stripping also swells joints and raises grain, and on pre-1978 paint it liberates lead dust. Renovation guides like Real Homes list it among the regrets people voice most often after the fact.
Test one small spot in a closet first. If it’s pine, repaint it and move on.
27. Sash Weight Pockets Stuffed With Insulation
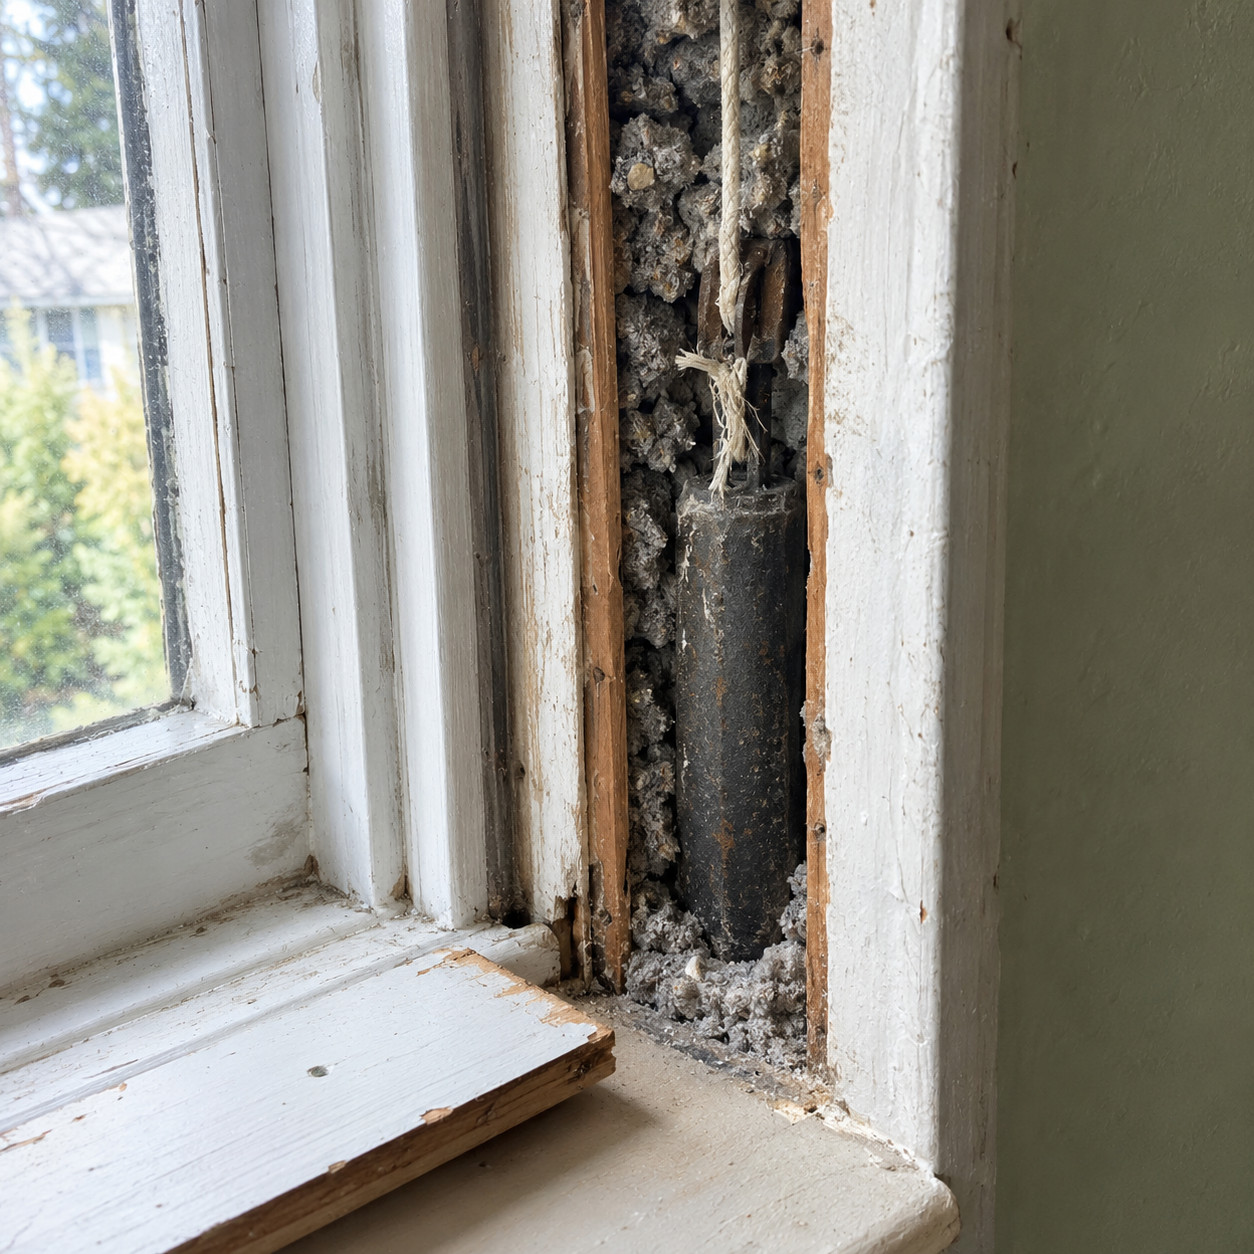
Energy crisis thinking, still being done today: drill the pocket cover, blow it full of cellulose, call it a win.
You just entombed the counterweight. The sash now either slams shut on its own or won’t move at all.
The gain is a few square inches of R-value in a wall that leaks far more air around the jamb and at the meeting rail.
The loss is a mechanism that worked flawlessly for a century and can’t be restored without opening the whole jamb.
Weatherstrip the sash instead. Same result, nothing destroyed.
28. The Original Doors, Trim, and Hardware in the Dumpster
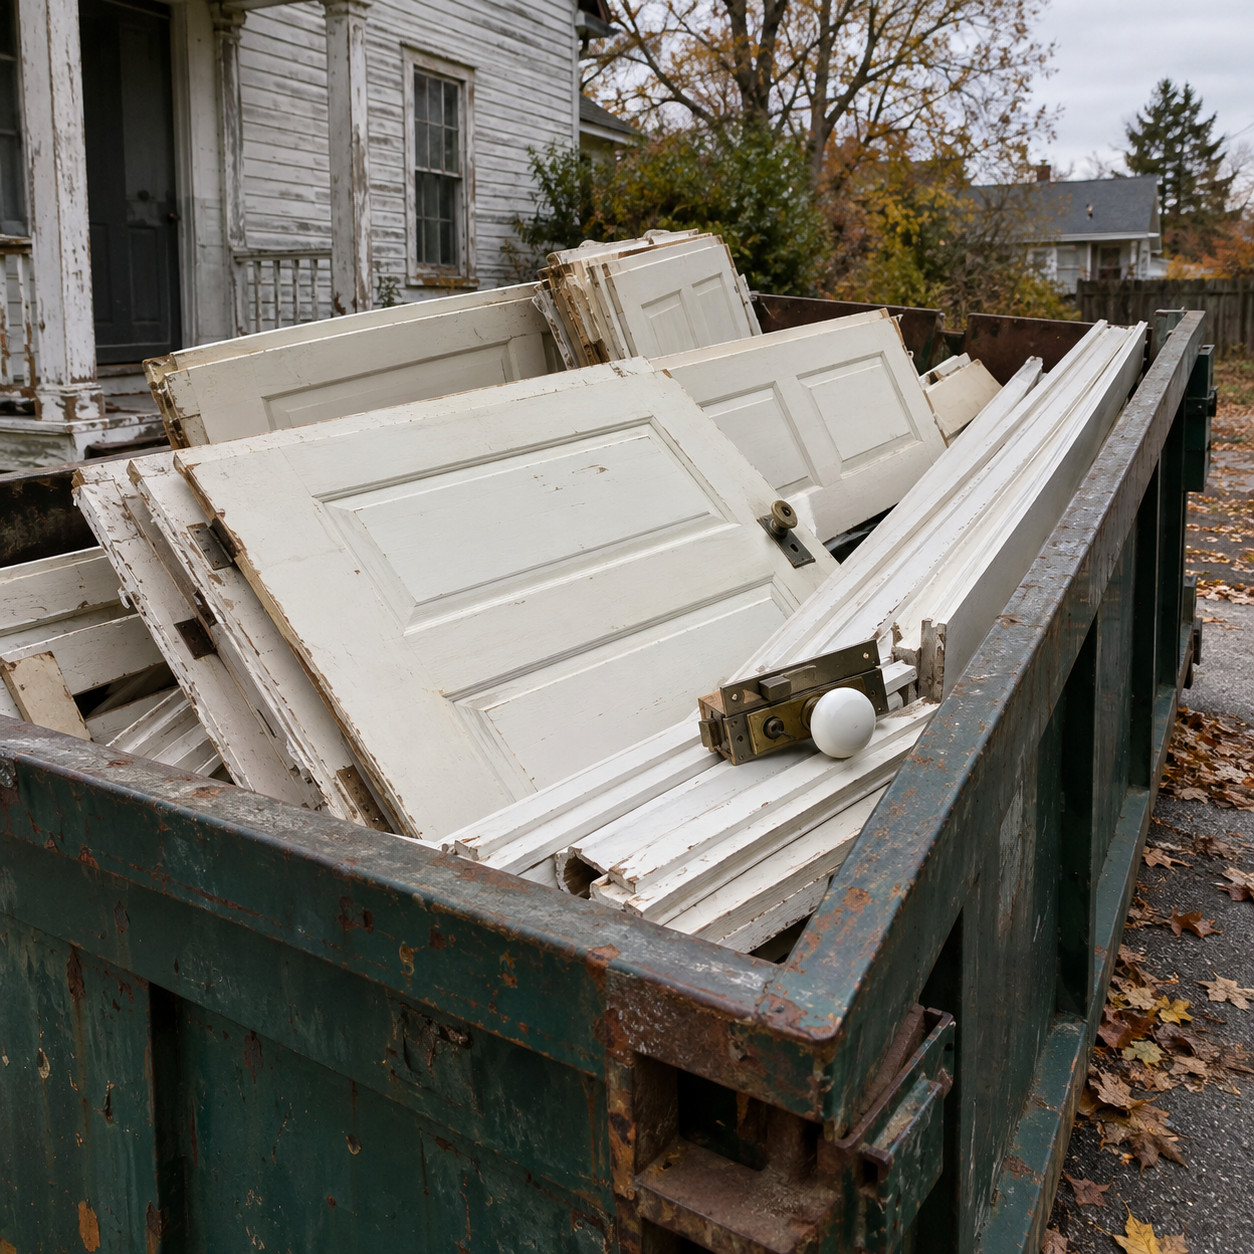
Five-panel doors with solid stiles. Cast bronze mortise locks with porcelain knobs. Baseboard eight inches tall with a separate cap molding, milled from first-growth timber.
It goes into the dumpster in an afternoon.
What replaces it is a hollow-core slab, a stamped passage set, and finger-jointed primed pine with a profile stamped in by a knife that runs forty thousand feet a day.
Reproducing a single original door in matching old-growth stock — if you could even source the lumber — runs well into four figures. Most of the time the lumber doesn’t exist. Those trees were cut a hundred years ago and they aren’t growing back on any timeline that helps you.
Everything else on this list can eventually be reversed. Foam can be cut out. Mortar can be raked and redone. A floor can be re-laid.
This can’t. Even old furniture nobody wants anymore is worth a second look before the truck comes — the millwork in your walls is worth ten.
At minimum, call an architectural salvage yard. Somebody wants it.
29. Powered Attic Ventilator Installed on the Roof
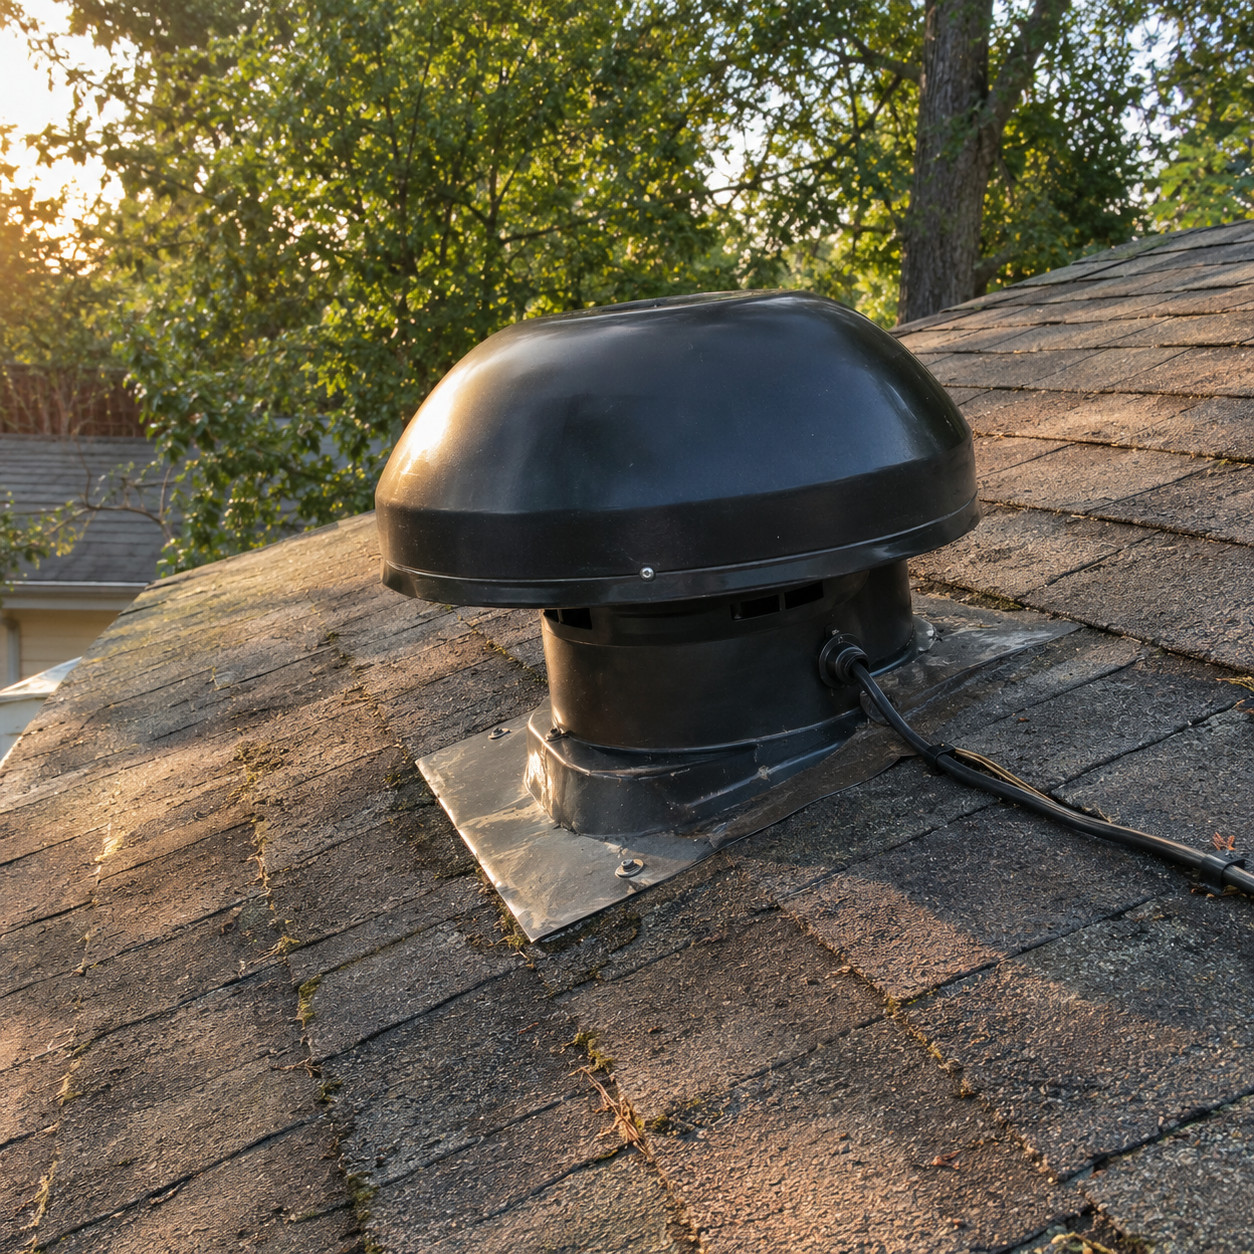
The logic sounds airtight. Hot attic, add a fan, pull the heat out.
What actually happens in a leaky old house is the fan pulls the easiest available air — and that’s conditioned air from inside, straight up through every can light, chase, and gap in the attic floor.
You’re now paying to air-condition the attic.
The serious risk is backdrafting. Depressurize the house enough and a gravity-vented water heater or an old boiler flue can reverse, pulling combustion gases into the living space.
Air seal the attic floor and open the soffits. Passive ventilation has worked on these roofs since the house was framed.
30. Wood Gutters Replaced With Undersized K-Style Aluminum
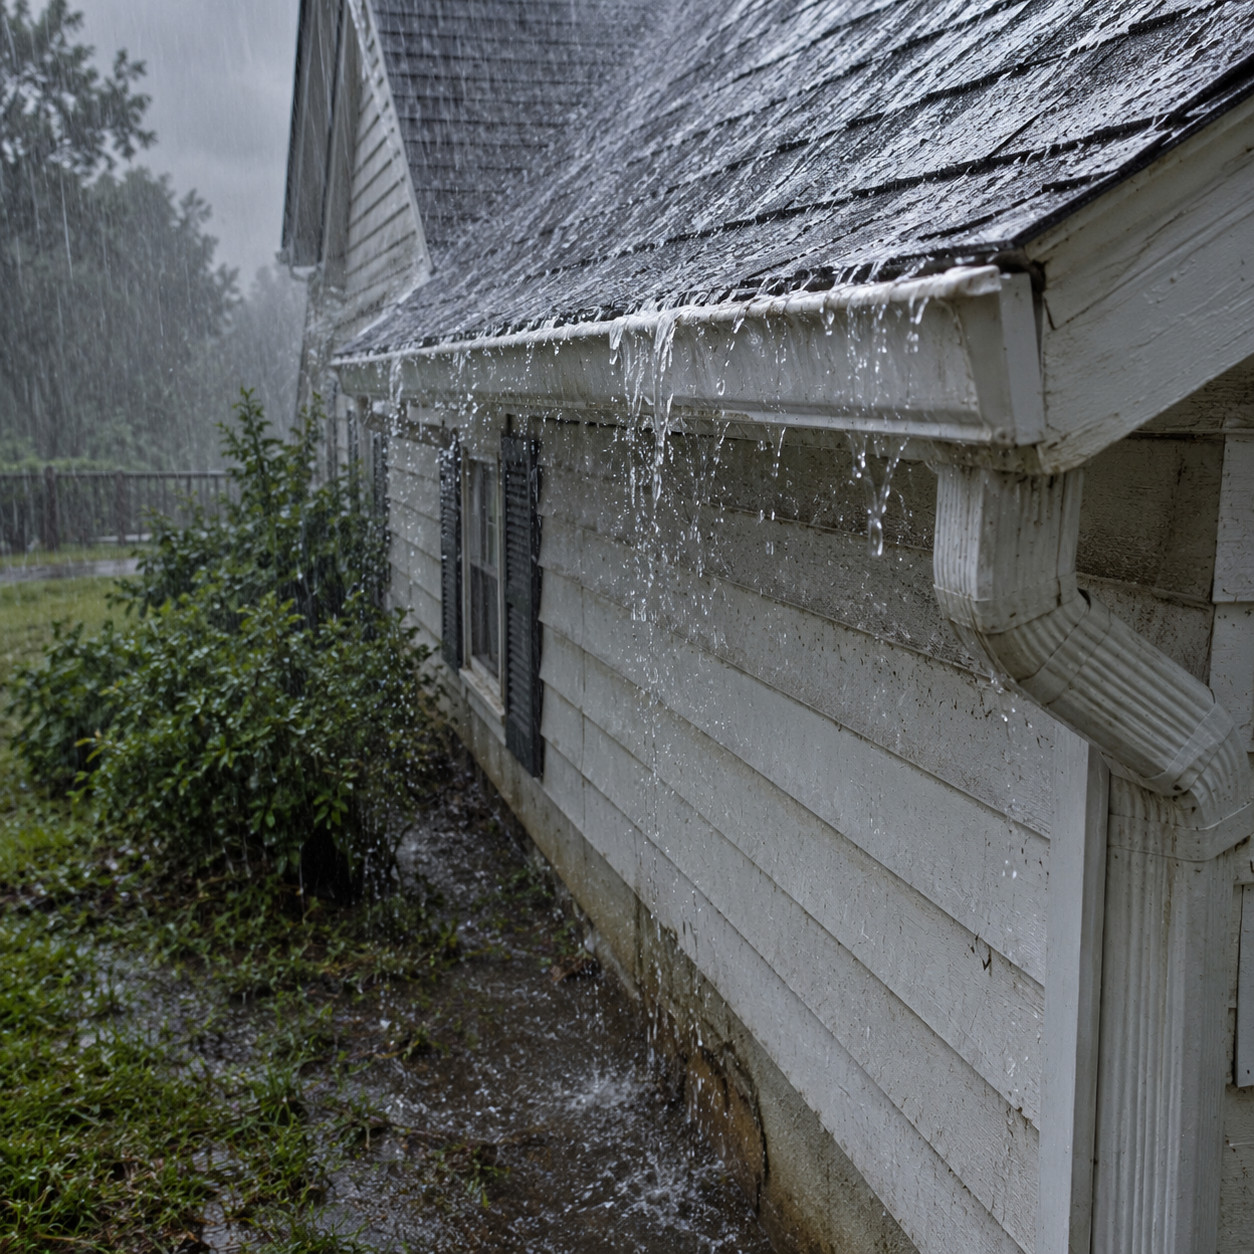
Built-in and hung wood gutters on old houses were big — often the equivalent of six or seven inches of capacity, because steep roofs dump water fast.
Standard five-inch K-style aluminum with two-by-three downspouts can’t keep up with a 10/12 pitch in a hard rain. It overflows at the front edge in sheets.
That water lands right at the foundation, which brings you back to entry 11.
Six-inch gutters with three-by-four downspouts cost maybe 20% more and handle roughly double the flow. Spec the size, not just the color.
Nearly every item here was sold as protecting the house. The owner wasn’t careless — they were sold a solution to a problem their house didn’t have, by someone whose experience started around 1985.
The pattern underneath all thirty is the same. Old buildings manage water by letting it move. Modern construction manages water by stopping it. Apply the second strategy to a building designed around the first and you get failure, slowly, in places you can’t see.
Before any upgrade on a house older than you are, ask one question: does this let the building keep drying out?
It stood a hundred years without your help. Most of what it needs now is maintenance, not improvement.