

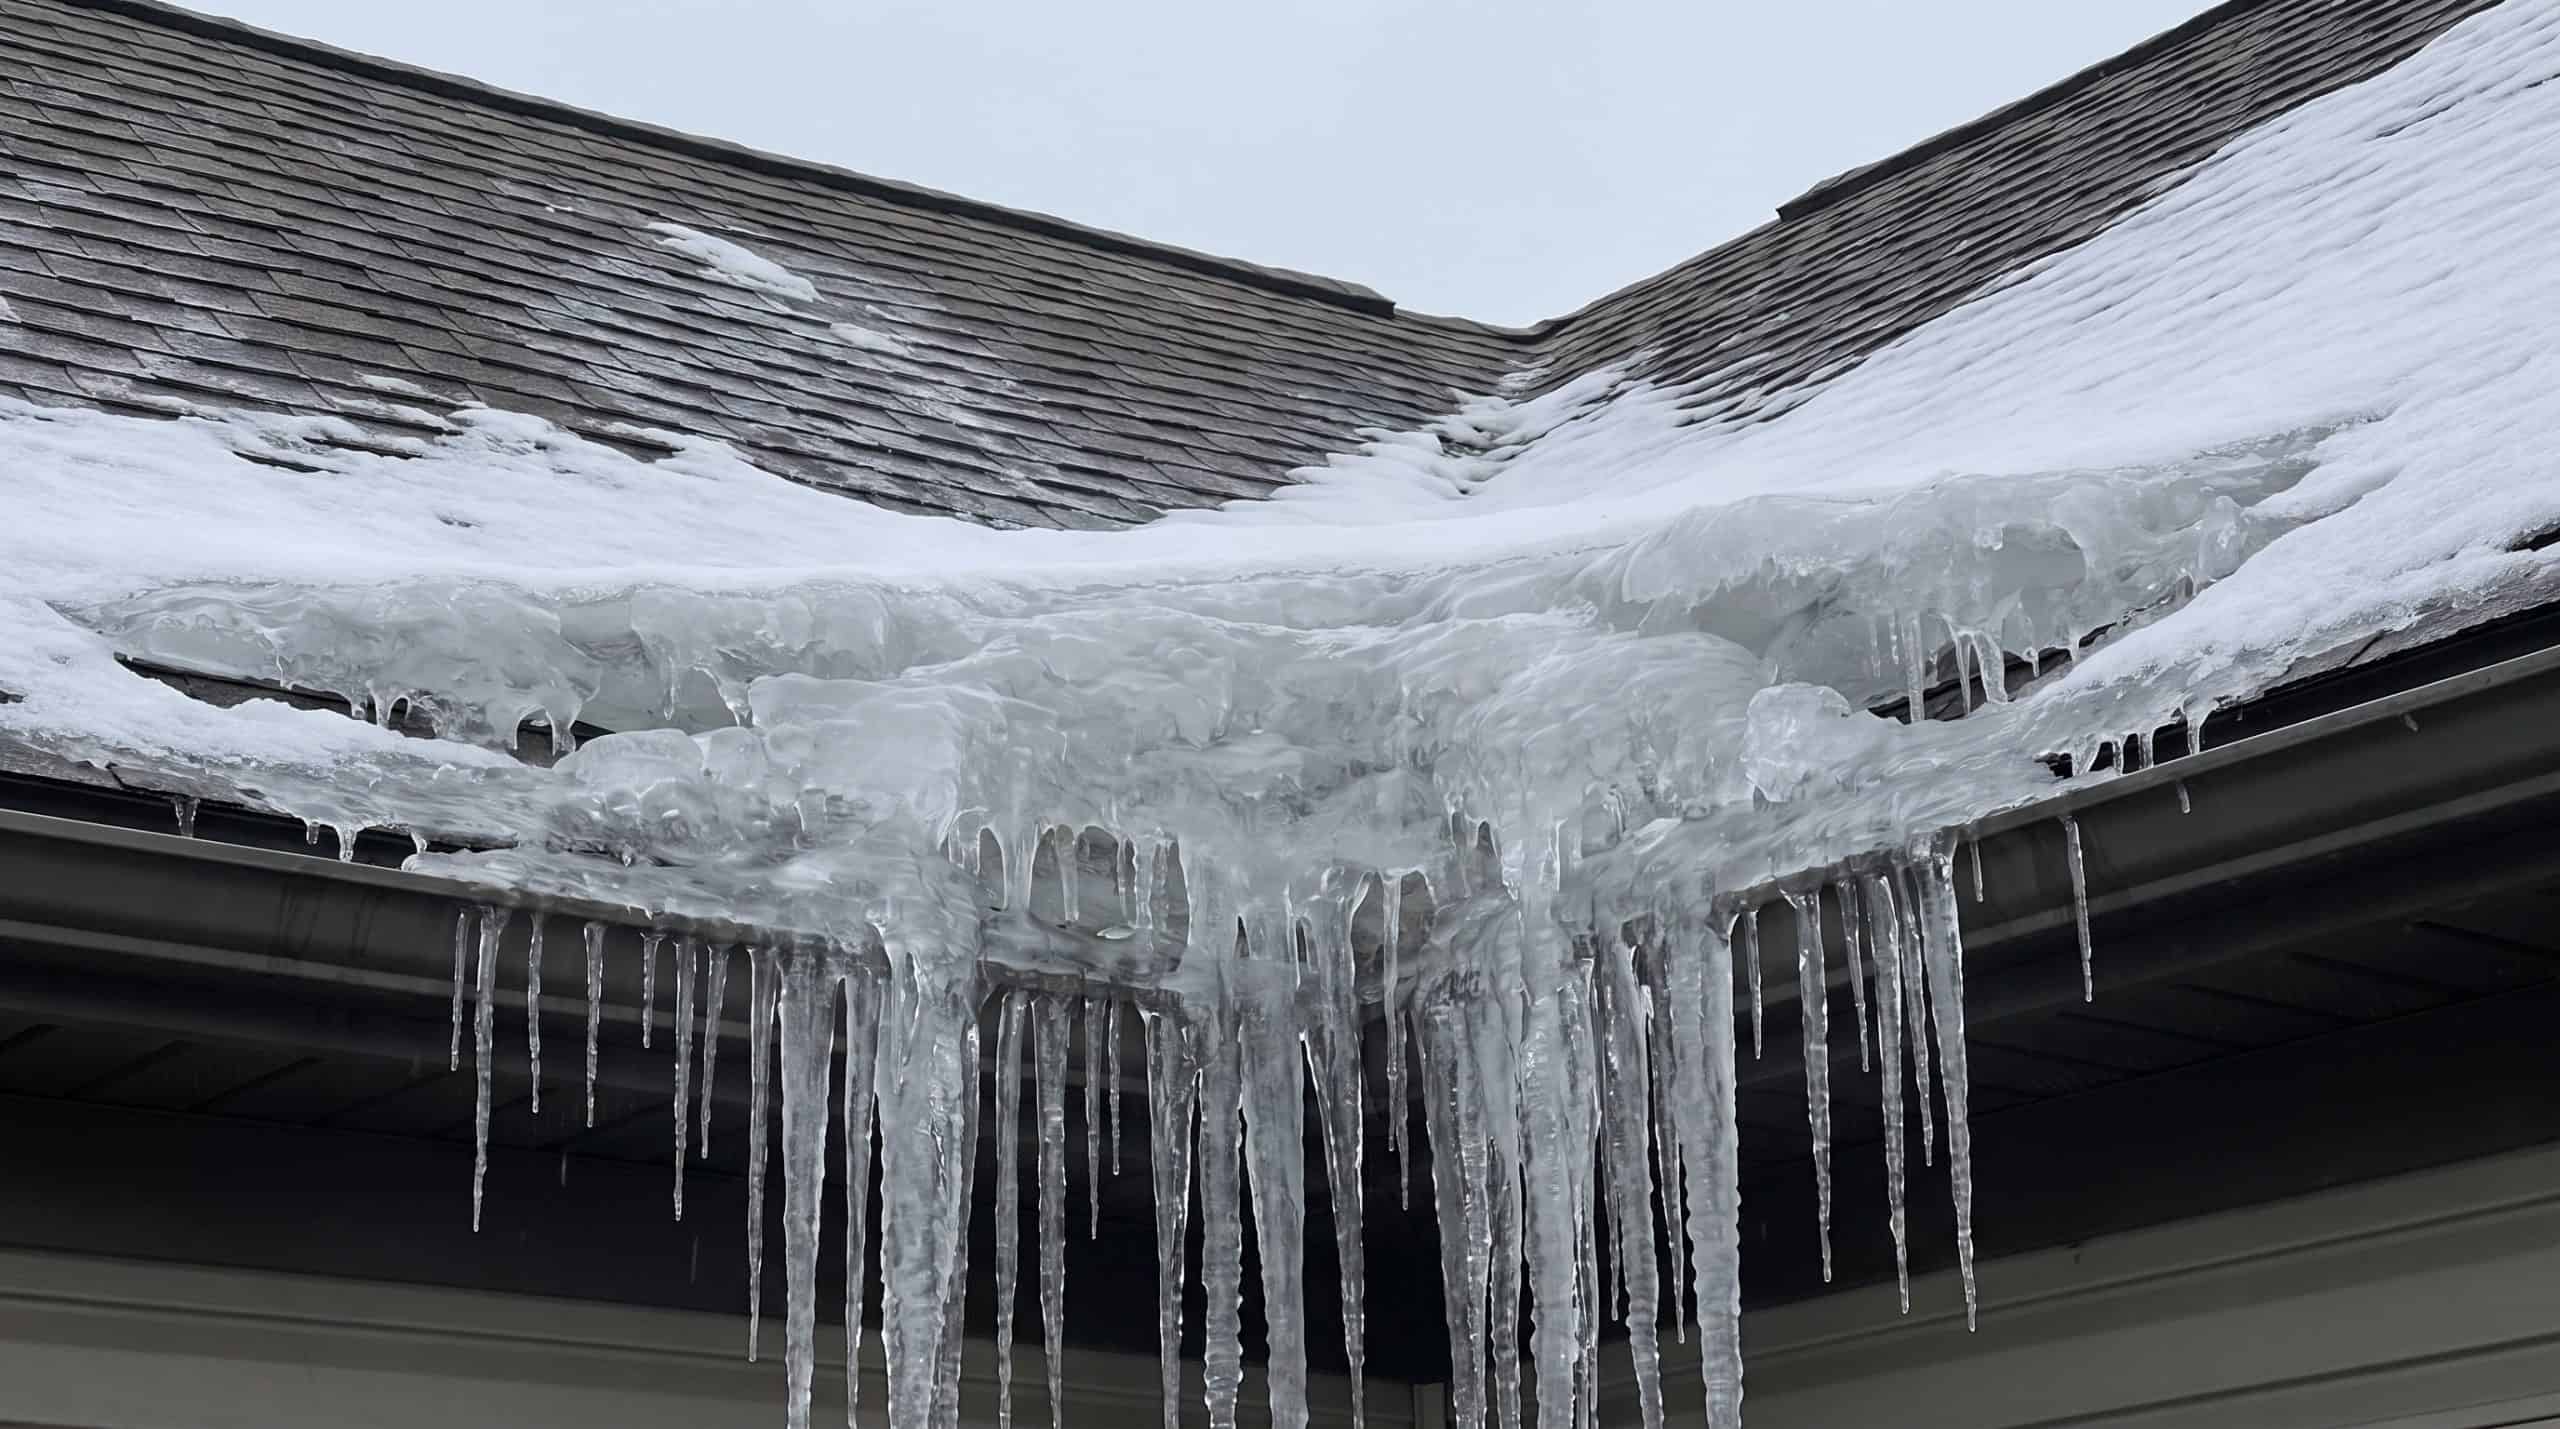
The icicles look charming from the driveway. They’re a symptom of a house bleeding heat.
Here’s the mechanic of it. Warm air escapes the living space, collects under the roof deck, melts the snow above it, and that meltwater runs down to the cold overhang where there’s no heat underneath. It refreezes. A ridge of ice builds at the eave, and every new trickle backs up behind it until water finds its way under the shingles.
Which means the problem almost never lives on the roof. It lives in the attic, usually in a dozen small places at once.
Most of them are fixable in a weekend with a caulk gun, a few cans of foam, and a headlamp. A handful need a contractor. One or two need a licensed specialist and nothing else.
Here are 31 attic mistakes that build ice dams, drive up your heating bill, and quietly wreck your roof deck.
1. Adding Insulation Without Air Sealing First
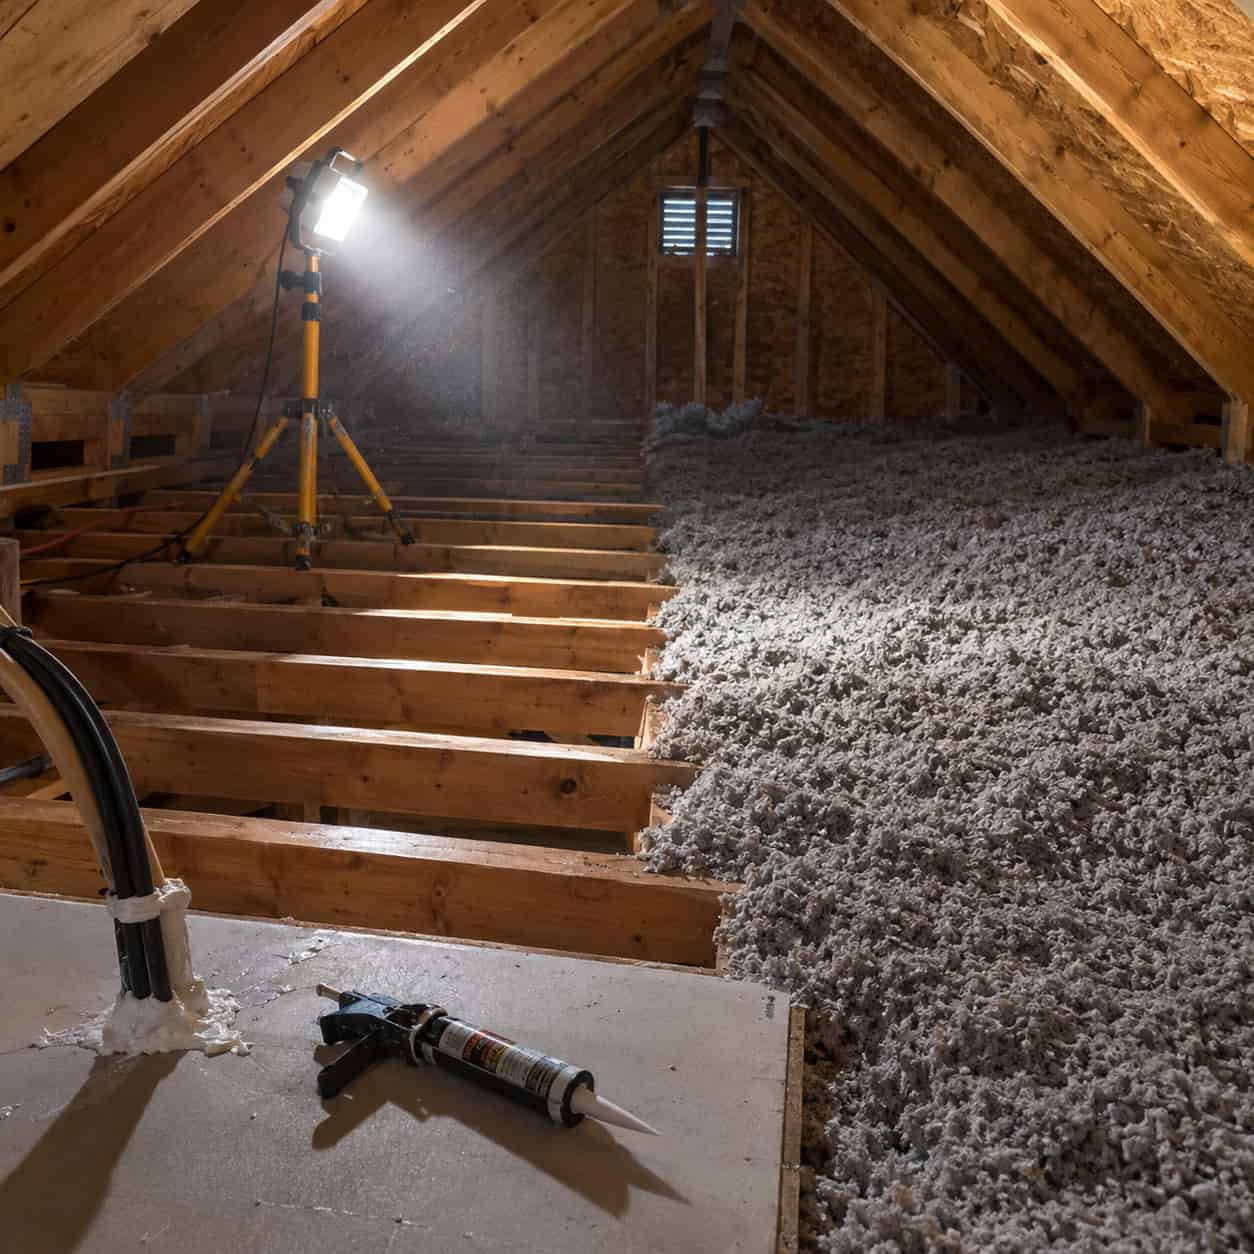
This is the one that matters most. Blown-in insulation is a filter, not a seal — warm air moves right through it.
Dump sixteen inches of cellulose over an attic full of unsealed penetrations and you’ve buried every one of them. Nobody’s finding that wiring hole again without stripping the whole floor back to drywall.
Air seal first. Always. Plumbing stacks, top plates, wire holes, the chase around the chimney, the hatch — all of it gets caulk, foam, or flashing before a single bag goes in.
Crews that skip this step aren’t lazy so much as paid by the bag. Structure Tech has been saying it for years: sealing is the work, insulation is the finish.
2. The Bathroom Fan That Vents Into the Attic
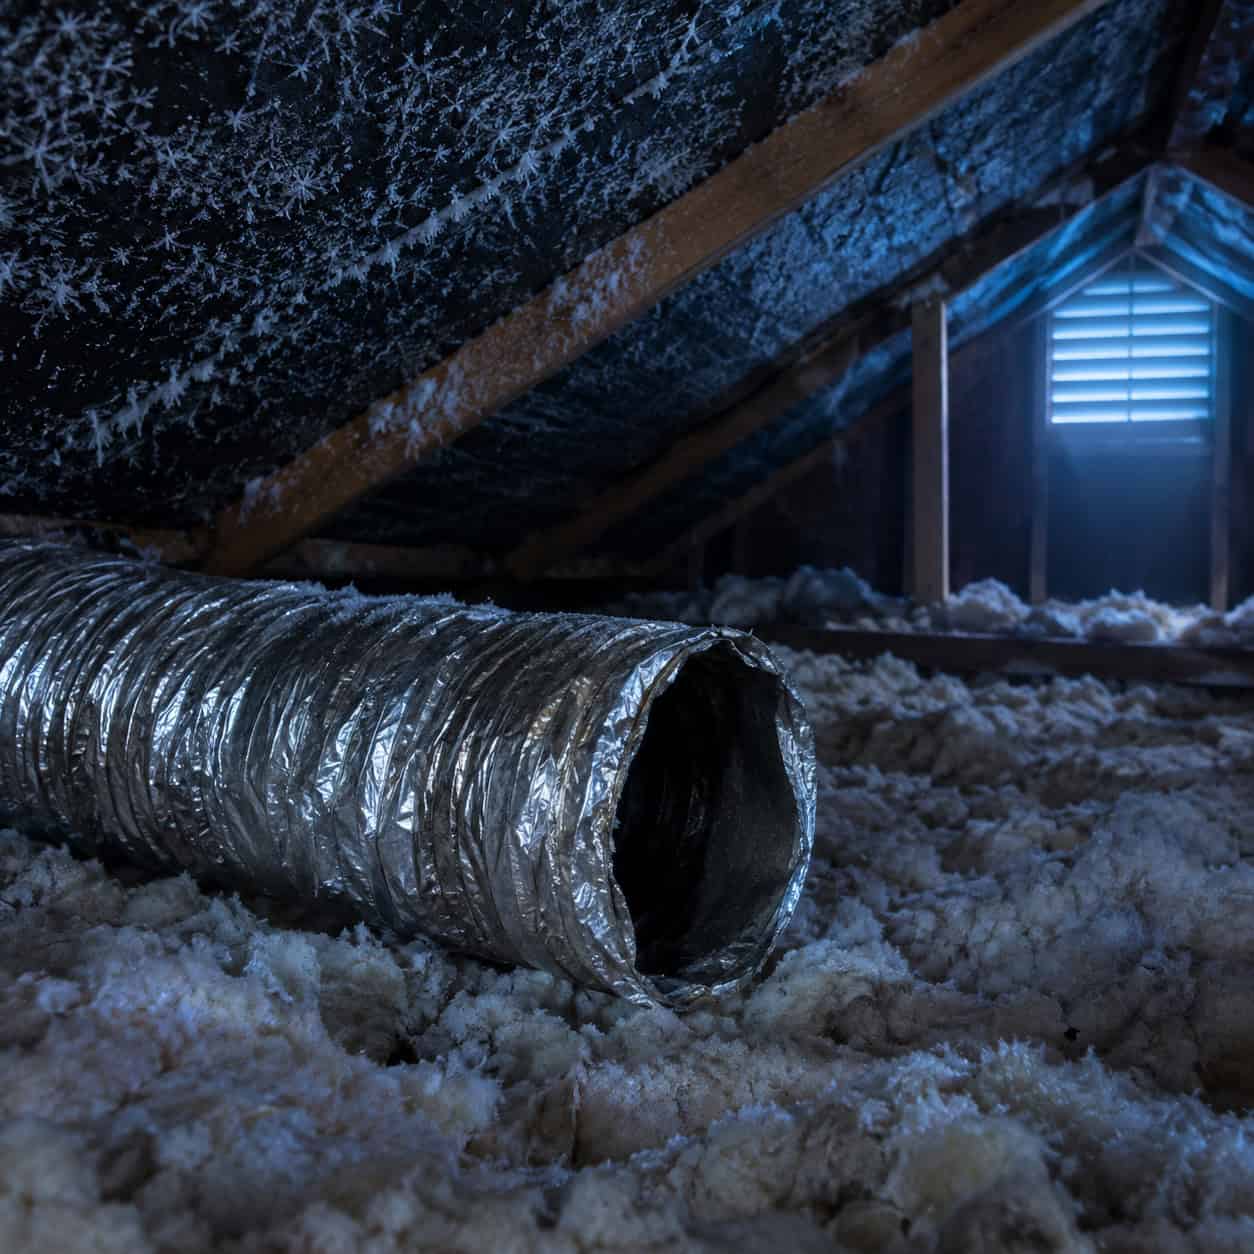
Go look. Right now, with a flashlight.
In houses built before 1990 — and plenty of rushed remodels since — the bath fan blows straight into the attic through a stub of flex duct lying loose on the insulation. Sometimes it isn’t ducted at all.
That’s shower-warm, 100% humid air dumped under a cold roof deck twice a day. It frosts the sheathing in January, melts snow from directly below, and soaks the insulation every thaw cycle.
Duct it through the roof or a gable wall, with a real termination cap and a backdraft damper.
3. Insulation Jammed Into the Eaves With No Baffles
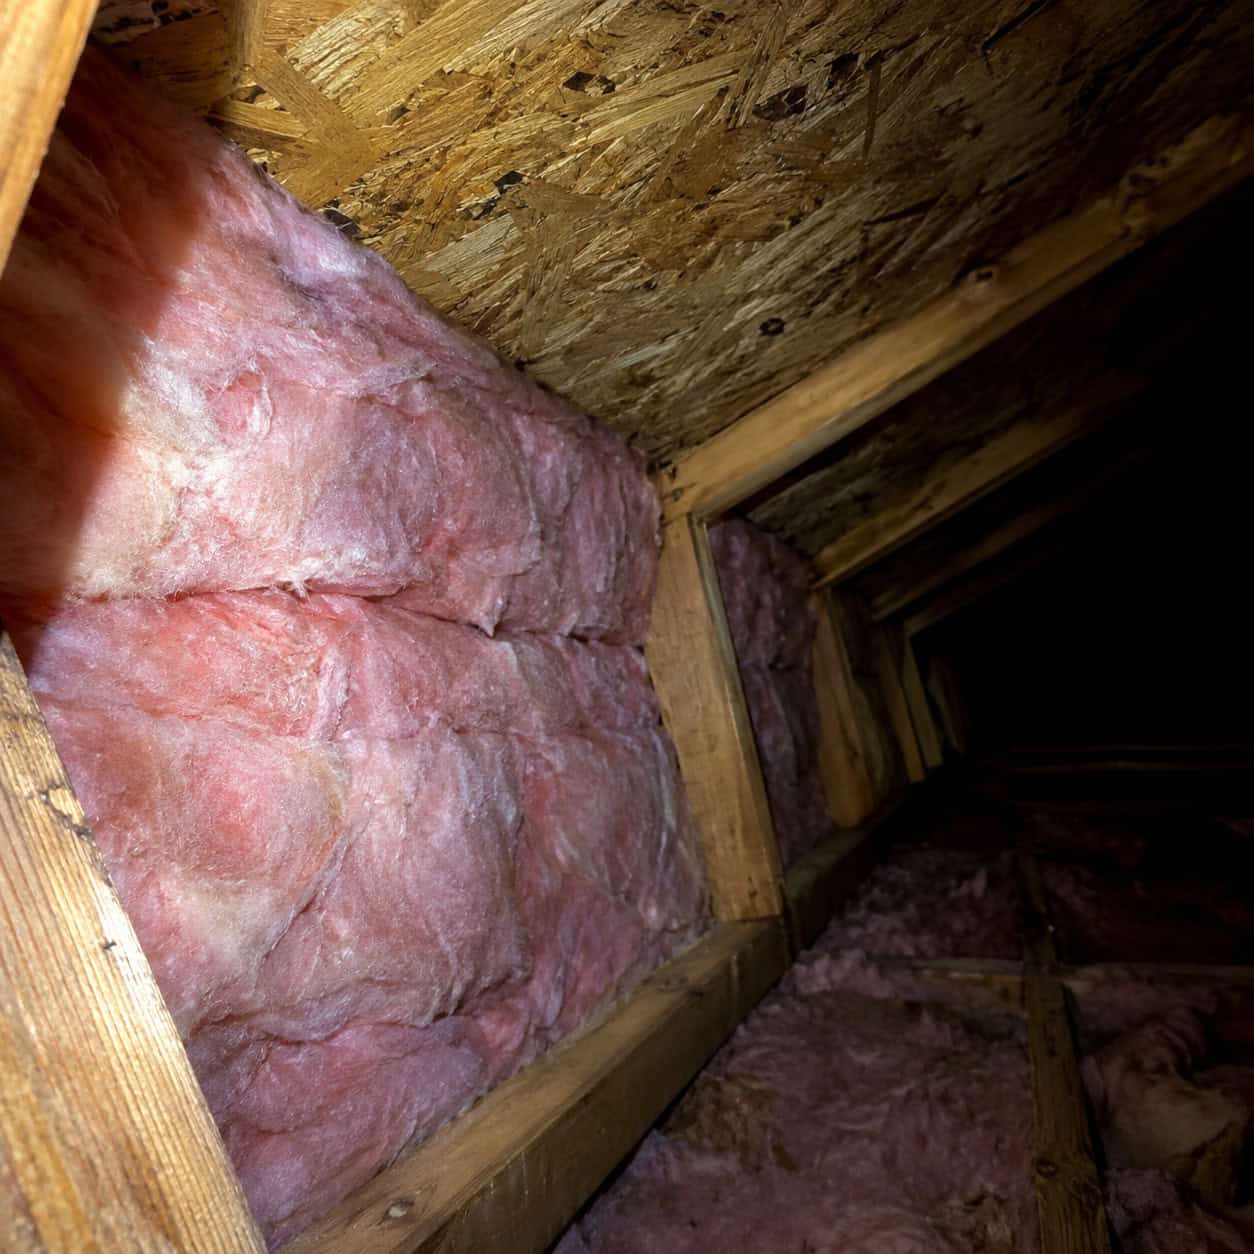
Someone crawled out to the edge and pushed the batts tight to the roof sheathing, thinking coverage equals performance.
They just plugged the soffit vents. No intake air reaches the underside of the roof, exactly at the eave where the ice forms.
Baffles — cardboard, foam, or plastic chutes stapled between the rafters — exist to hold insulation back and keep a clear channel from soffit to ridge. The DOE Building America Solution Center treats them as standard practice for ice dam prevention, not an upgrade.
4. Recessed Can Lights Punched Through the Ceiling
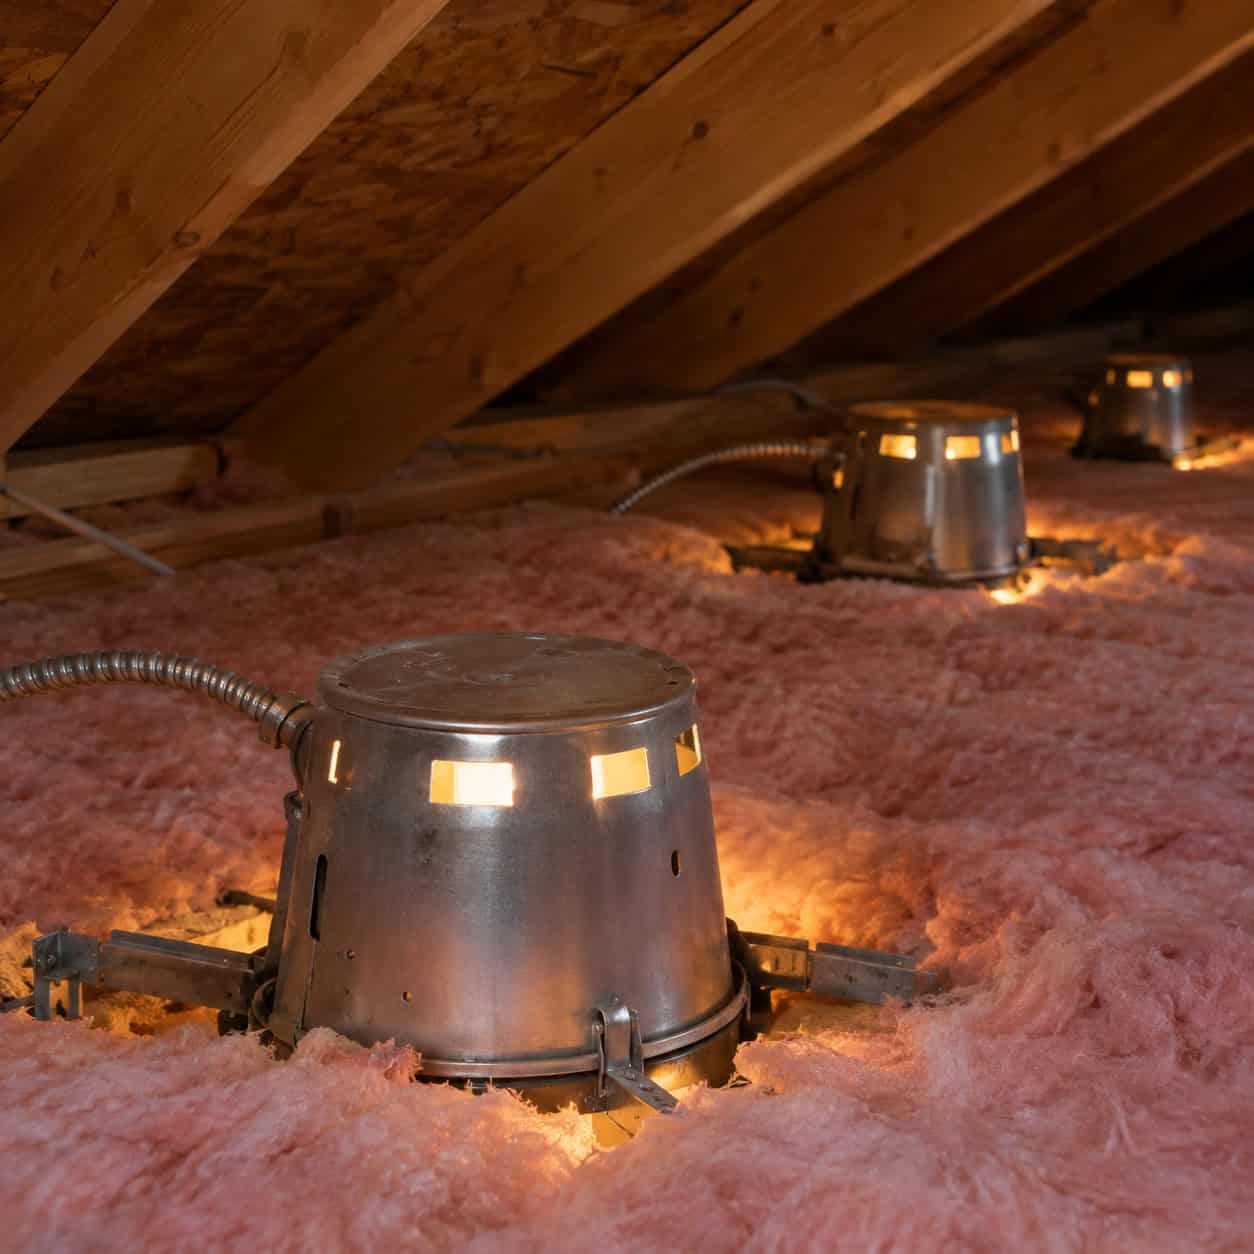
A kitchen with twelve recessed cans has twelve holes in its thermal boundary.
Older non-IC-rated housings are vented by design — they shed heat upward through slots in the can. That heat goes straight into the attic, and code requires insulation be kept three inches back from the fixture, so each light is also a deliberate cold spot in your blanket.
Fixes, in order of cost: swap to sealed LED retrofit modules, or build airtight boxes over the housings, or replace with IC-rated airtight cans. ENERGY STAR puts recessed lights near the top of its attic air sealing priority list.
5. The Bare Attic Hatch or Pull-Down Stairs
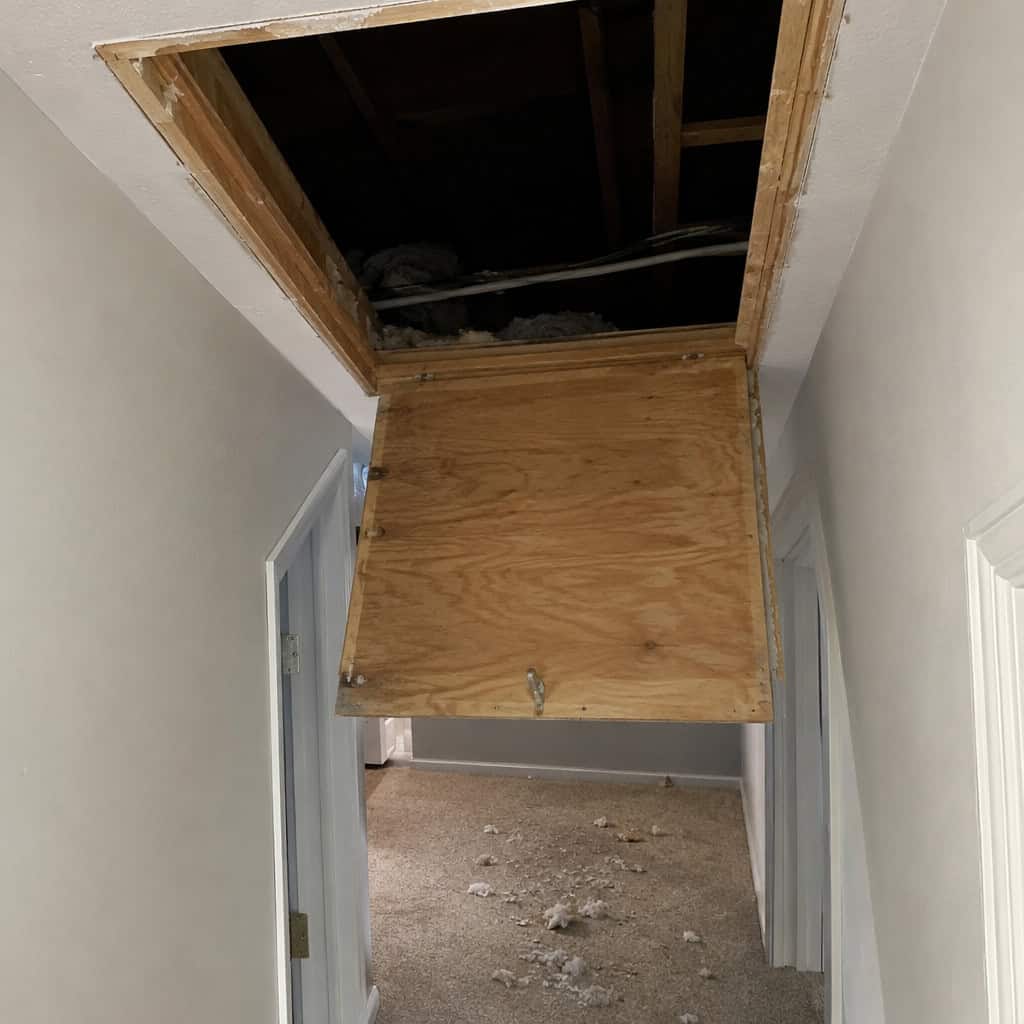
A sheet of quarter-inch plywood in the middle of an R-49 ceiling. That’s it. That’s the whole assembly.
It’s the biggest hole most homeowners can see with their own eyes and fix in an afternoon.
Treat it like an exterior door. Weatherstrip the perimeter, glue 4 inches of rigid foam to the back side, and add two hook latches that pull the lid down tight against the stripping.
Pull-down stairs get a zippered insulated tent or a rigid foam box built over the opening. About $60 in materials.
6. Insulation That Thins Out Where the Roof Meets the Wall
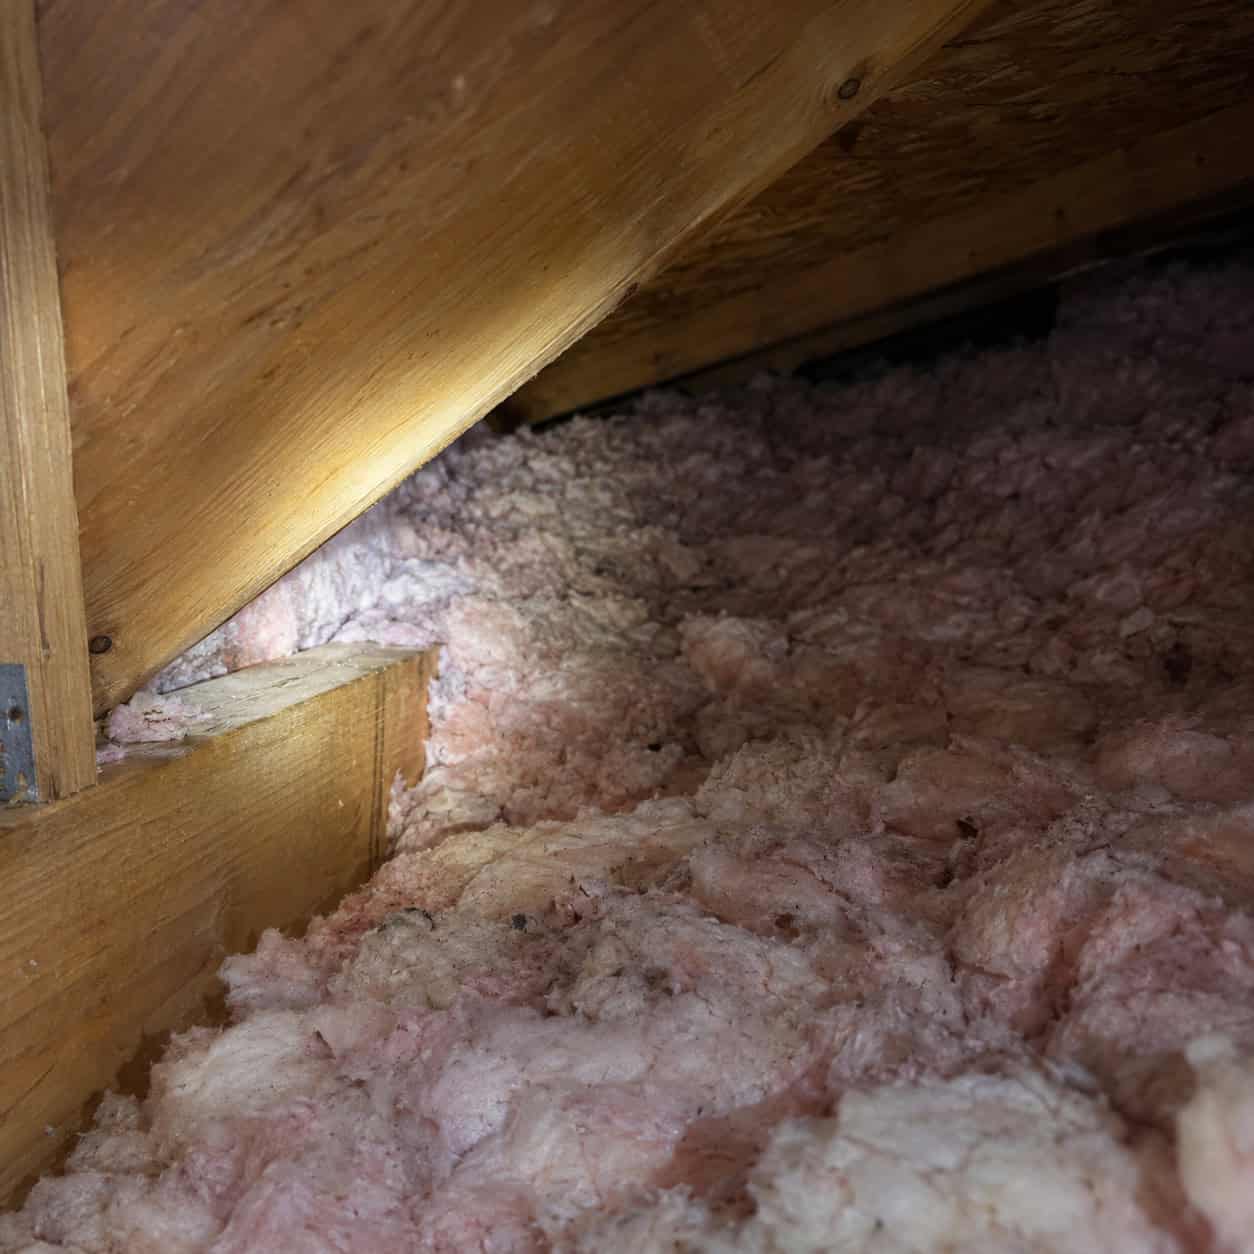
The hardest place to insulate in the whole attic is the exact spot the ice forms.
A standard truss or rafter sitting on the top plate leaves two or three inches of vertical space at the eave. You can’t stack 16 inches of cellulose into a 3-inch slot.
So heat concentrates right at the wall line, the roof edge runs warm, and the snow above it melts first.
Raised-heel trusses solved this, but they didn’t become common until the 2000s. In an existing house, the workaround is rigid foam at the top plate plus baffles holding the channel open above it. MSU Extension flags this eave-line thinning as a primary ice dam driver in older framing.
7. Leaky, Under-Insulated Ducts Running Through the Attic
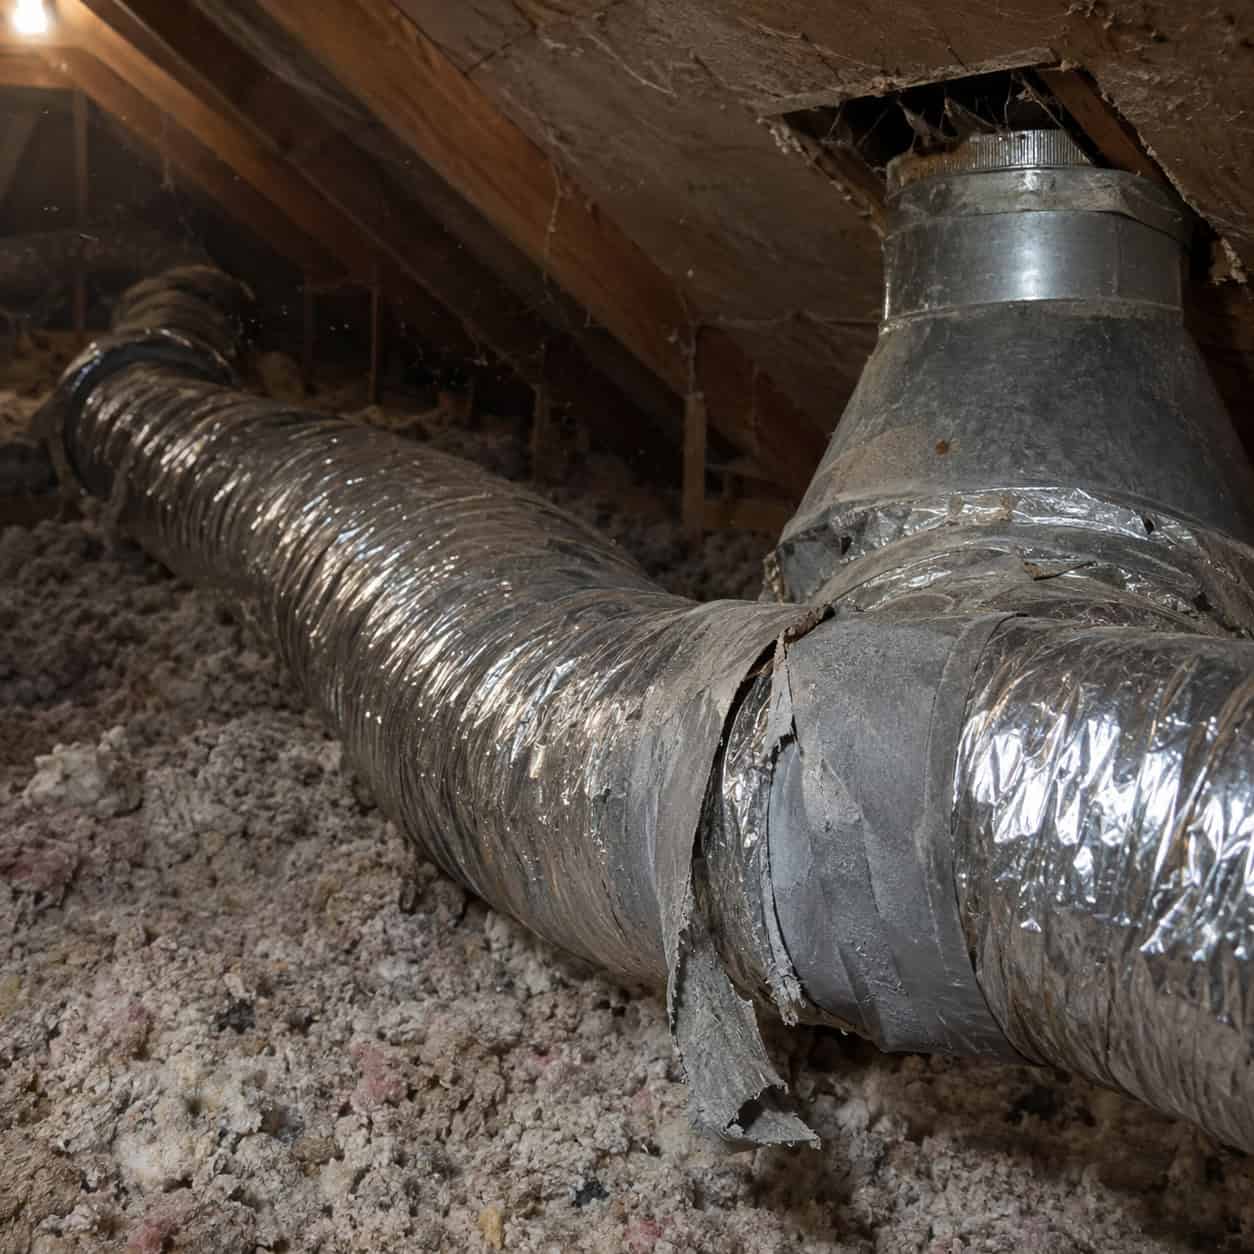
Pull into your driveway after a light snow. If you see melted stripes running across the roof in straight lines, you’re looking at your ductwork.
Supply ducts in an unconditioned attic are the single most wasteful thing in a lot of houses. Typical duct systems lose 20 to 30 percent of the air they move through leaks at joints, boots, and seams — and in an attic, every bit of that loss heats the roof deck instead of your bedroom.
The old gray cloth duct tape is the usual culprit. It dries out, the adhesive releases, and the tape hangs off the joint like a bandage.
A proper sealing job means mastic — gray, gloopy, brushed on thick over fiberglass mesh at every seam, every take-off, every boot where the duct meets the ceiling register. Then R-8 insulated sleeve over the whole run, not the R-4 silver bubble wrap that came with the house.
Expect roughly $800 to $2,500 for a manual seal-and-wrap on an average home, depending on how much duct is up there and how accessible it is. Aeroseal-style injected sealing runs $1,500 to $4,000 and reaches joints a technician’s hands can’t. Both typically pay back in 3 to 7 heating seasons in a cold climate.
The better long-term answer is to stop running ducts through unconditioned space at all. GreenBuildingAdvisor has argued for decades that attic ducts are a design failure we normalized because it was cheap to frame.
8. Dropped Soffits Above Kitchen Cabinets and Vanities
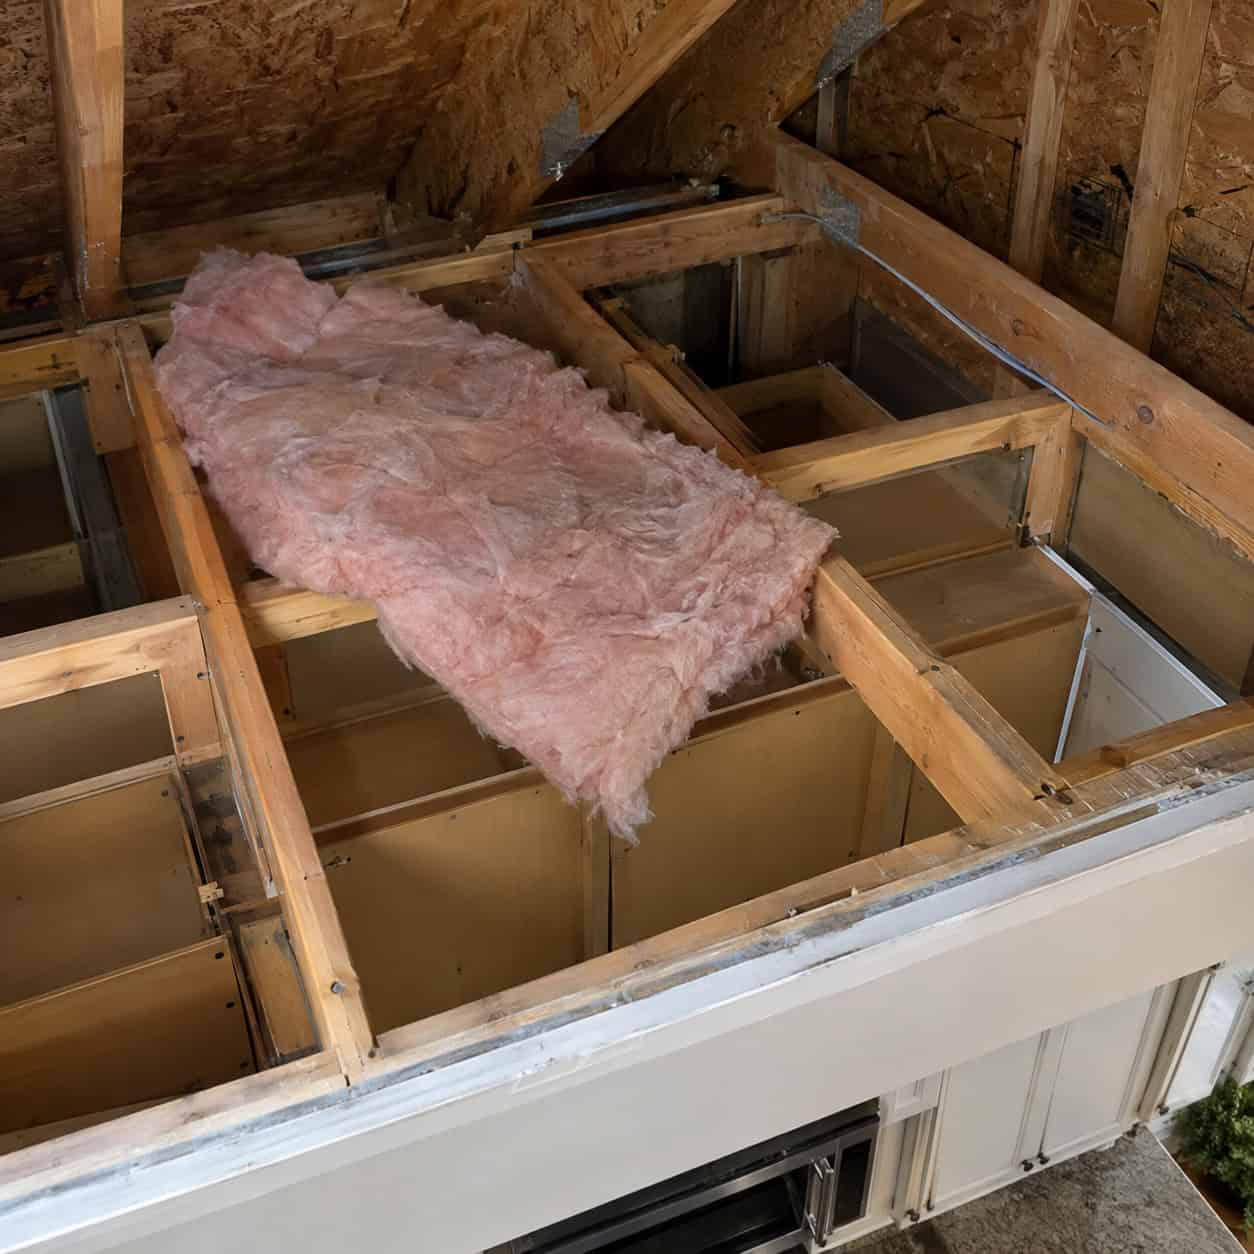
That boxed-out bulkhead above your upper cabinets isn’t solid. It’s a framed void, and in most houses the top of it is wide open to the attic with nothing over it but a batt somebody tossed down.
Same story over bathroom vanities and in dropped ceilings above tubs.
The fix is unglamorous: cut rigid foam to fit the opening, set it in place, foam the perimeter, then insulate over the top. ENERGY STAR ranks dropped soffits among the largest concealed air leaks in a typical house.
9. Vermiculite Insulation Nobody Has Touched Since 1960
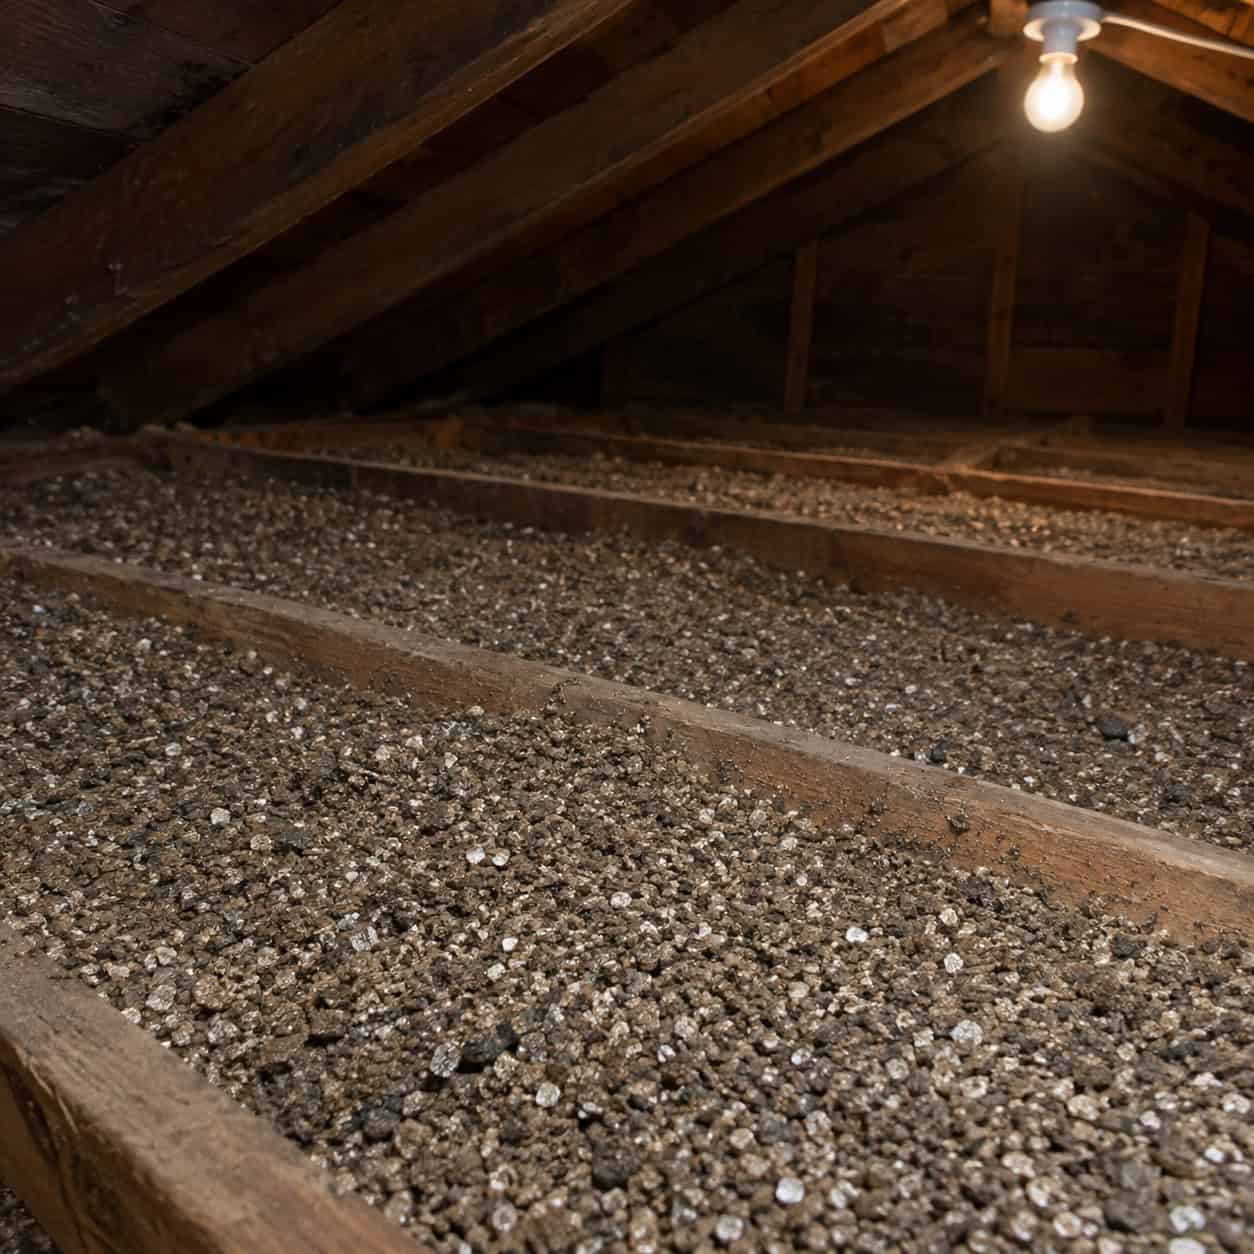
Pebbly. Gray-brown. Pours like gravel and glitters a little under a flashlight.
If your attic has it, stop reading and stop crawling. Most vermiculite sold in the U.S. between 1920 and 1990 came from a mine in Libby, Montana that was contaminated with asbestos. The common brand name was Zonolite.
The EPA’s position is blunt: assume it contains asbestos and leave it alone.
This matters doubly for ice dams, because vermiculite settles, packs down, and performs badly — maybe R-2.1 per inch when new, less after sixty years of compaction. Homeowners look at a thin, tired layer and reach for a rake.
Don’t. The fibers only become dangerous when disturbed.
- Never vacuum it, ever — a shop vac aerosolizes the fibers into the whole house.
- Don’t store boxes up there or walk across it.
- Seal around the attic hatch so attic air stays in the attic.
- Have a certified lab test a sample taken by a licensed inspector, not by you.
Testing runs roughly $50 to $150 per sample. Professional removal is a different universe — $2 to $8 per square foot is typical, so $3,000 to $12,000 for an average attic, with containment, negative air, and disposal manifests.
Some homeowners encapsulate instead, sealing the material in place and insulating above it. That’s a conversation for a licensed abatement contractor, not a message board.
10. Kneewall Attics in Capes and Story-and-a-Halfs
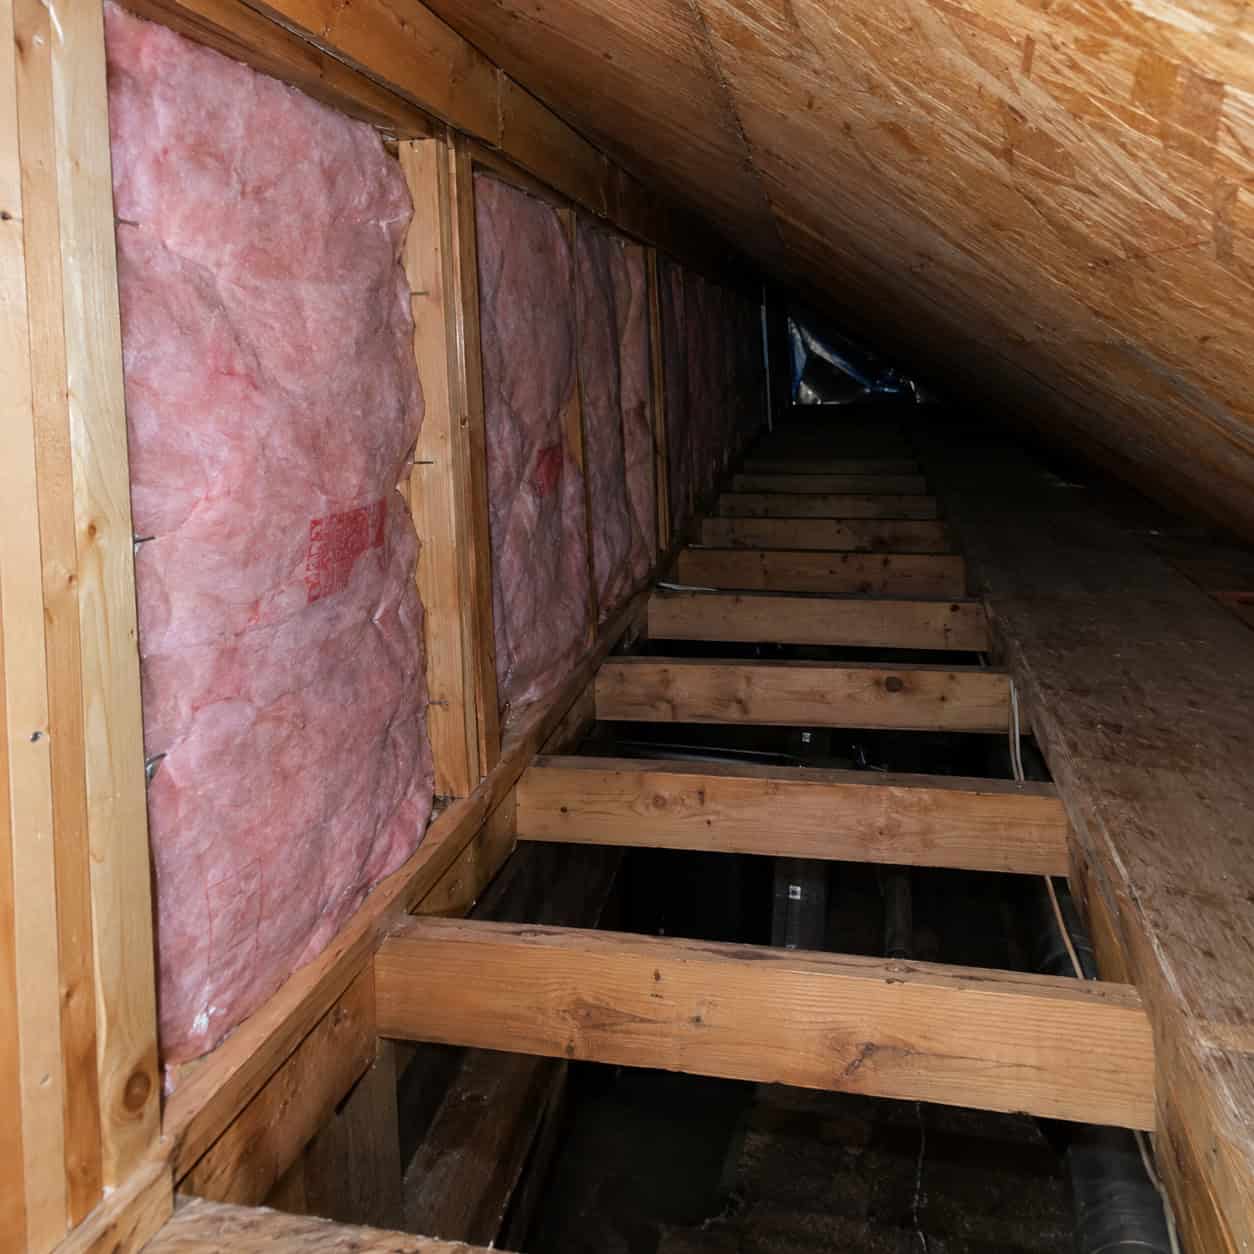
Cape Cods are ice dam factories, and the kneewall is why.
Walk into the little triangular storage space behind an upstairs bedroom. You’ll usually find batts stapled to the back of the kneewall — and the floor joist cavity behind it running wide open, straight under the bedroom floor.
Heated air pours into those joist bays, travels under the finished floor, and rises up the sloped ceiling to the ridge. The whole upper roof runs warm.
Insulating the kneewall harder does nothing. You have to block the ends of the floor cavities with rigid foam, seal them, then insulate — and keep a vent channel in the slope above.
11. Open Wire and Plumbing Holes in the Top Plates
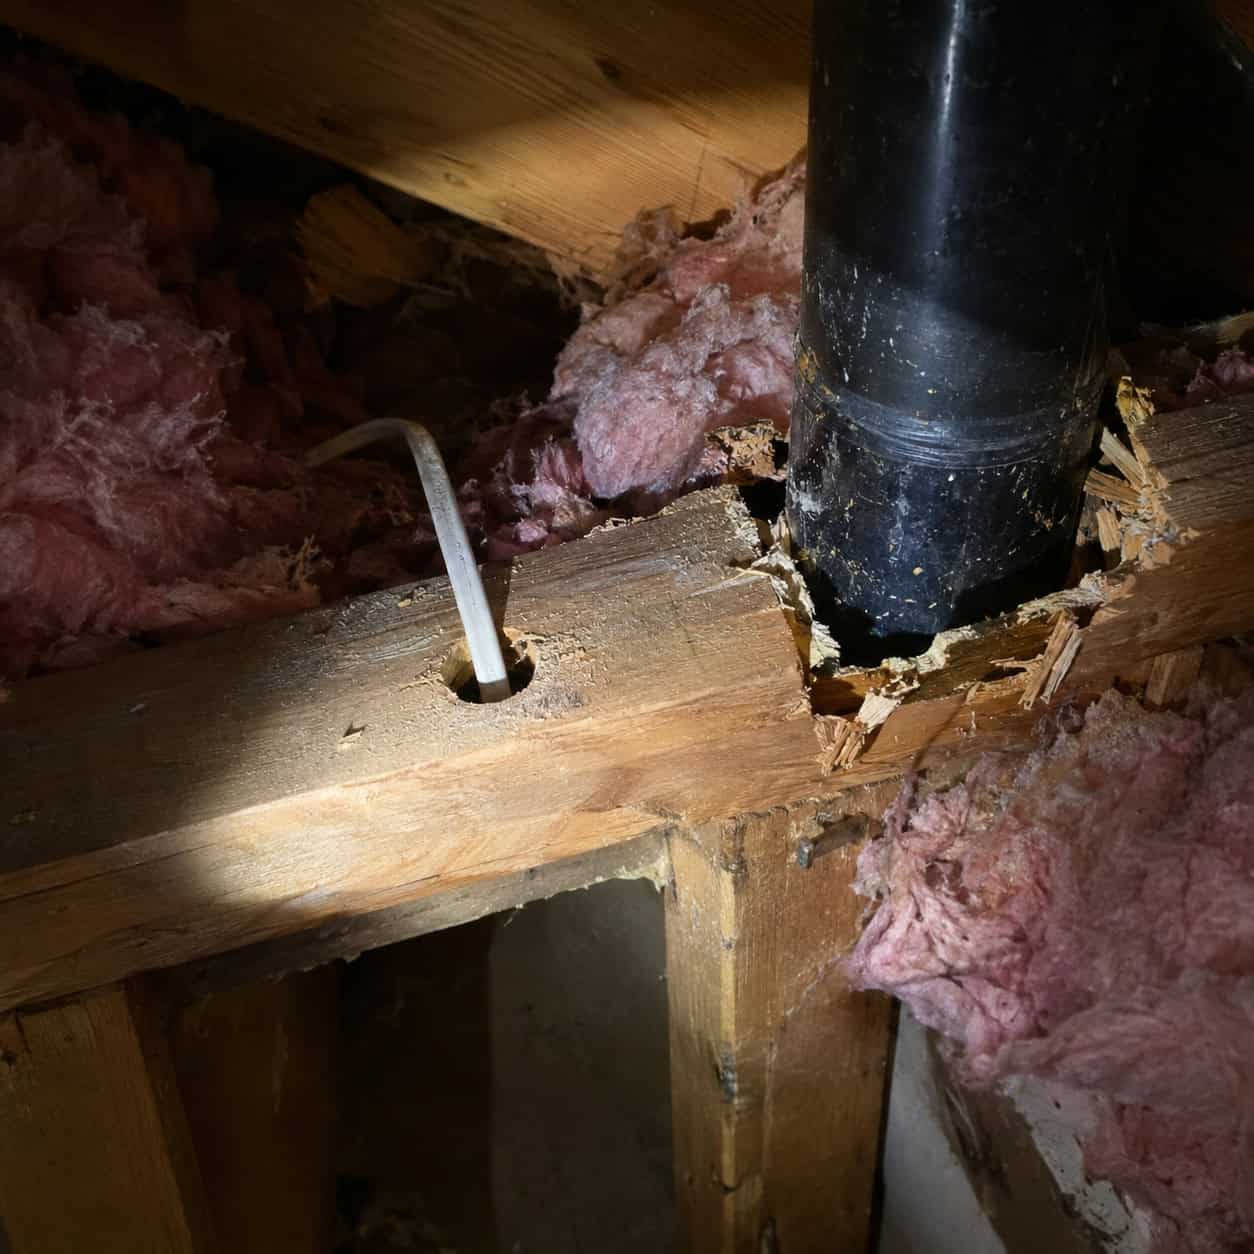
An electrician drills a 1-inch hole through the top plate for a cable. A plumber cuts a 4-inch ragged square around a vent stack.
Nobody comes back to seal them. Multiply by forty years of renovations.
Add up every bore hole, stack gap, and chase in a typical house and you get the equivalent of leaving a window open all winter. They’re invisible once insulation covers them, which is exactly why home inspectors find them with infrared cameras and blower doors instead of eyeballs.
Small holes get fire-rated caulk. Anything over half an inch gets canned foam.
12. The Powered Attic Fan Installed to ‘Fix’ the Ice
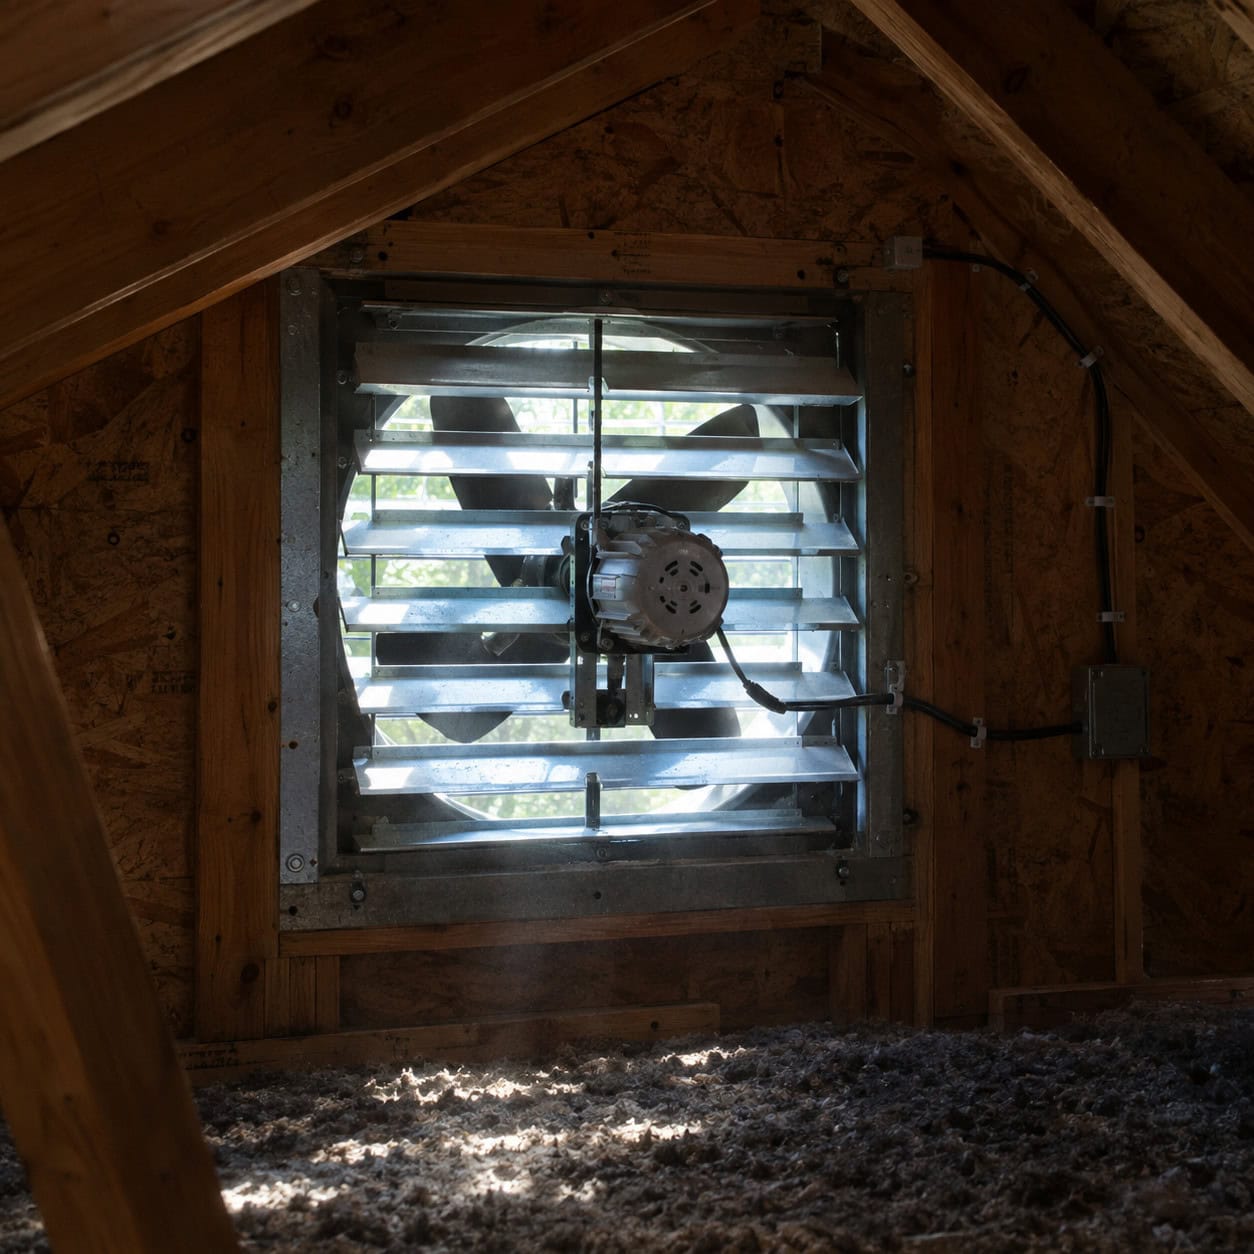
Somebody sold a lot of these. They’re still being sold.
A powered attic ventilator pulls air out of the attic. In a house with a leaky ceiling plane — which is every house with ice dams — most of that makeup air comes from inside your heated rooms, pulled up through the same bypasses you’re trying to stop.
You’ve just motorized the problem. Plus you’re paying to run it.
The University of Minnesota Extension does not recommend mechanical attic ventilation as an ice dam fix. Unplug it.
13. Wet, Matted Insulation From a Leak Nobody Replaced
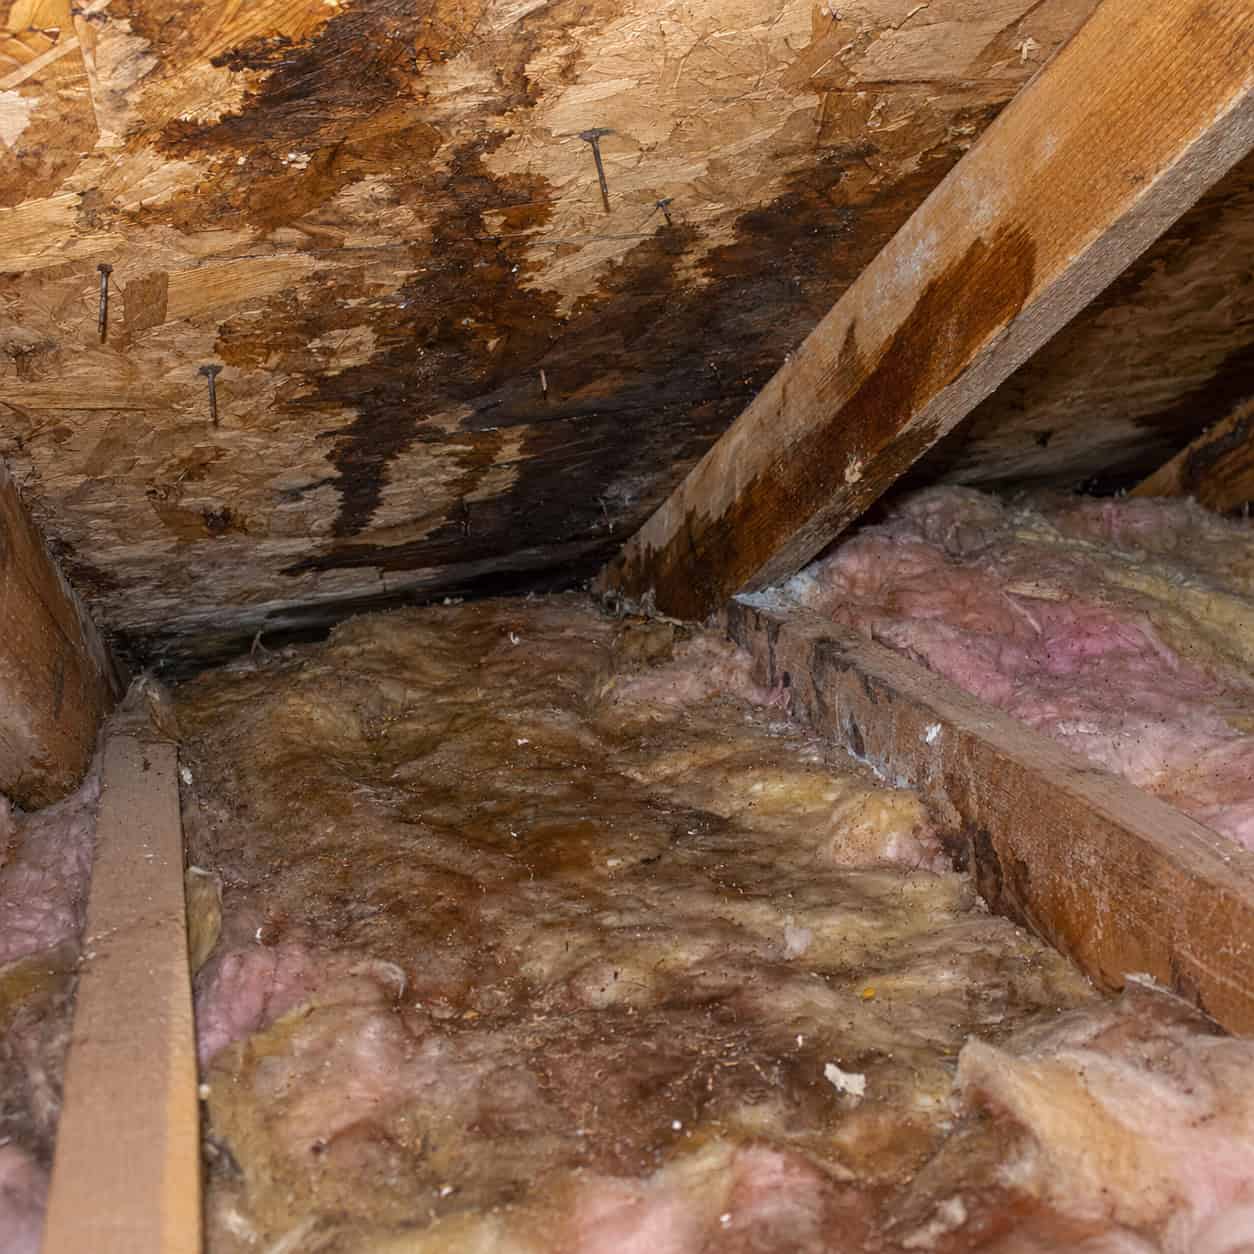
Last winter’s dam guarantees next winter’s. Here’s the loop.
Water backs under the shingles, soaks the fiberglass, and the fiberglass stays compressed permanently. Wet insulation loses the overwhelming majority of its R-value, and even after it dries, matted batts never loft back up.
Now you’ve got a warm stripe running under the roof in the exact spot the ice formed. The dam comes back bigger.
Go up with a flashlight after any ice event and look for the tells:
- Dark staining or tide lines on the sheathing and rafters
- Rusty nail points poking through the roof deck
- Insulation that’s flat, gray, and sits like a wet towel
- A musty smell that gets stronger near the eaves
- Any fuzzy or speckled growth on the underside of the sheathing
Fiberglass that got wet once and dried fast can sometimes be fluffed and kept. Cellulose almost never survives — it mats into a dense pad and holds moisture against the framing. Replace it.
Budget roughly $1 to $2 per square foot to remove and dispose of contaminated attic insulation, plus $1.50 to $3 per square foot to re-insulate to R-49. If there’s visible mold on the sheathing, remediation adds $1,500 to $6,000 depending on area and access.
Dry the deck before you re-insulate. Covering damp sheathing seals the moisture against the wood, and that’s how you go from a stained ceiling to replacing roof framing. The same trap shows up downstairs — it’s the identical mechanism behind finished basements that grow mold, just with gravity running the other direction.
14. The Chimney and Furnace Flue Chase, Sealed Wrong or Not at All
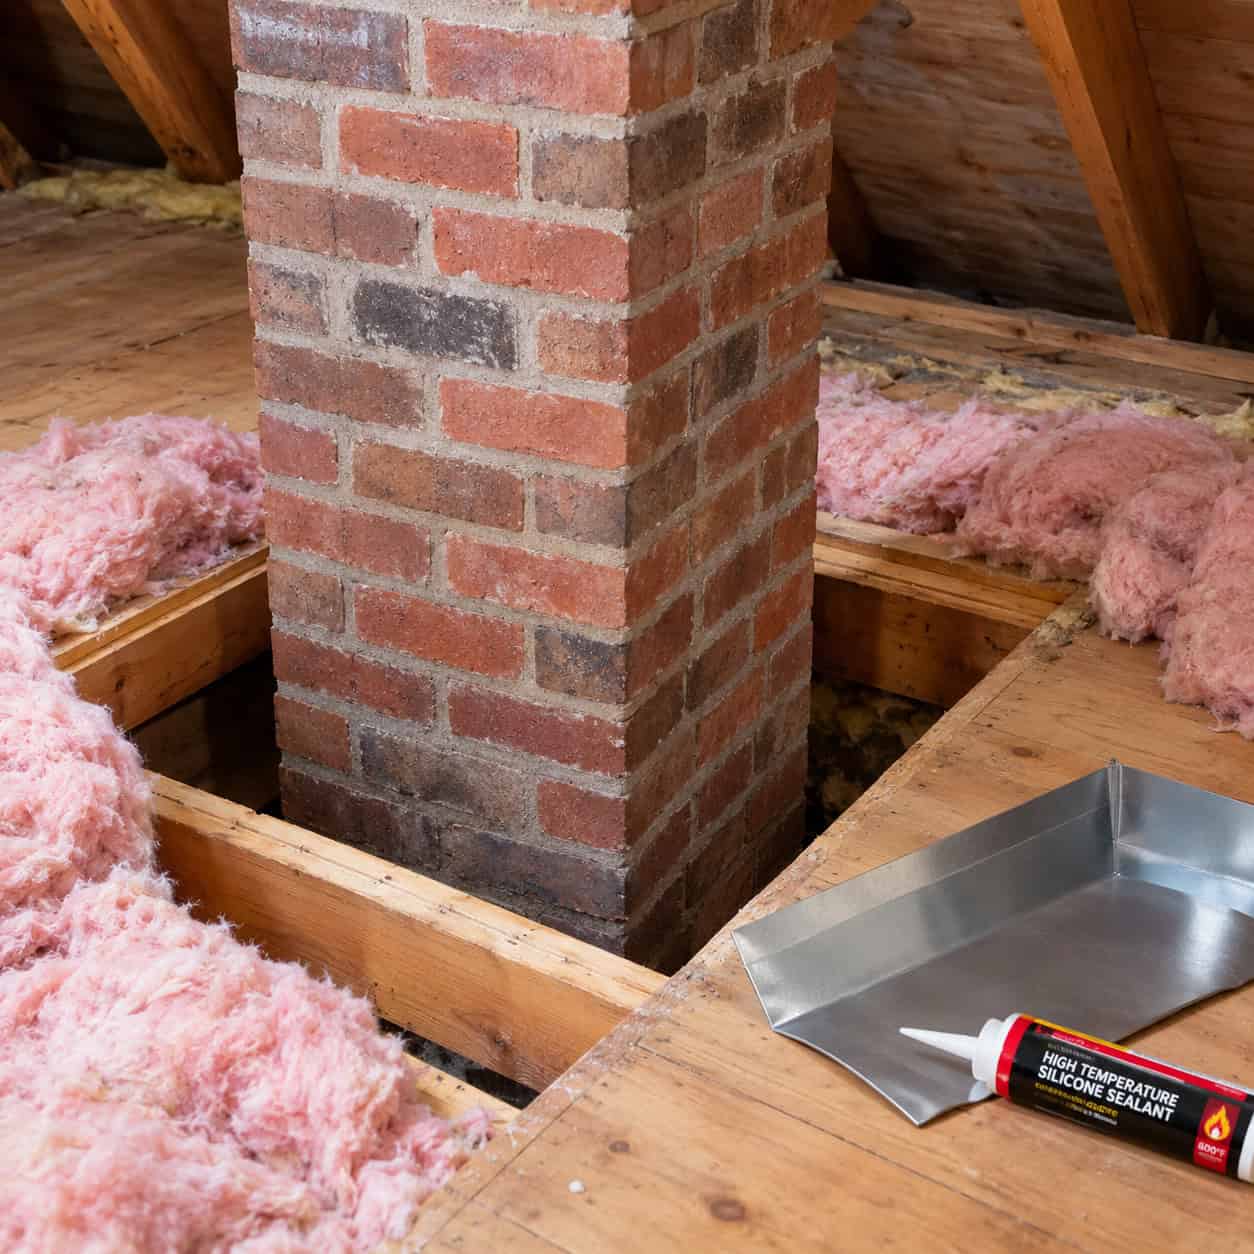
Look at where your chimney or metal B-vent passes through the attic floor. There’s a gap around it — code requires one, for clearance to combustibles.
That gap is a chimney in its own right, drafting heated air upward all winter. In older homes it’s often the largest single bypass in the building.
You cannot foam it shut. Canned foam is combustible and so is most caulk.
The correct detail: cut aluminum flashing to fit around the flue, leaving the required air gap — 1 inch for metal vents, 2 inches for masonry — fasten it to the framing, and seal the metal-to-metal and metal-to-wood joints with high-temperature silicone rated to 500°F. The ENERGY STAR DIY guide walks through the exact dimensions.
15. The Plywood Storage Platform Crushing the Insulation
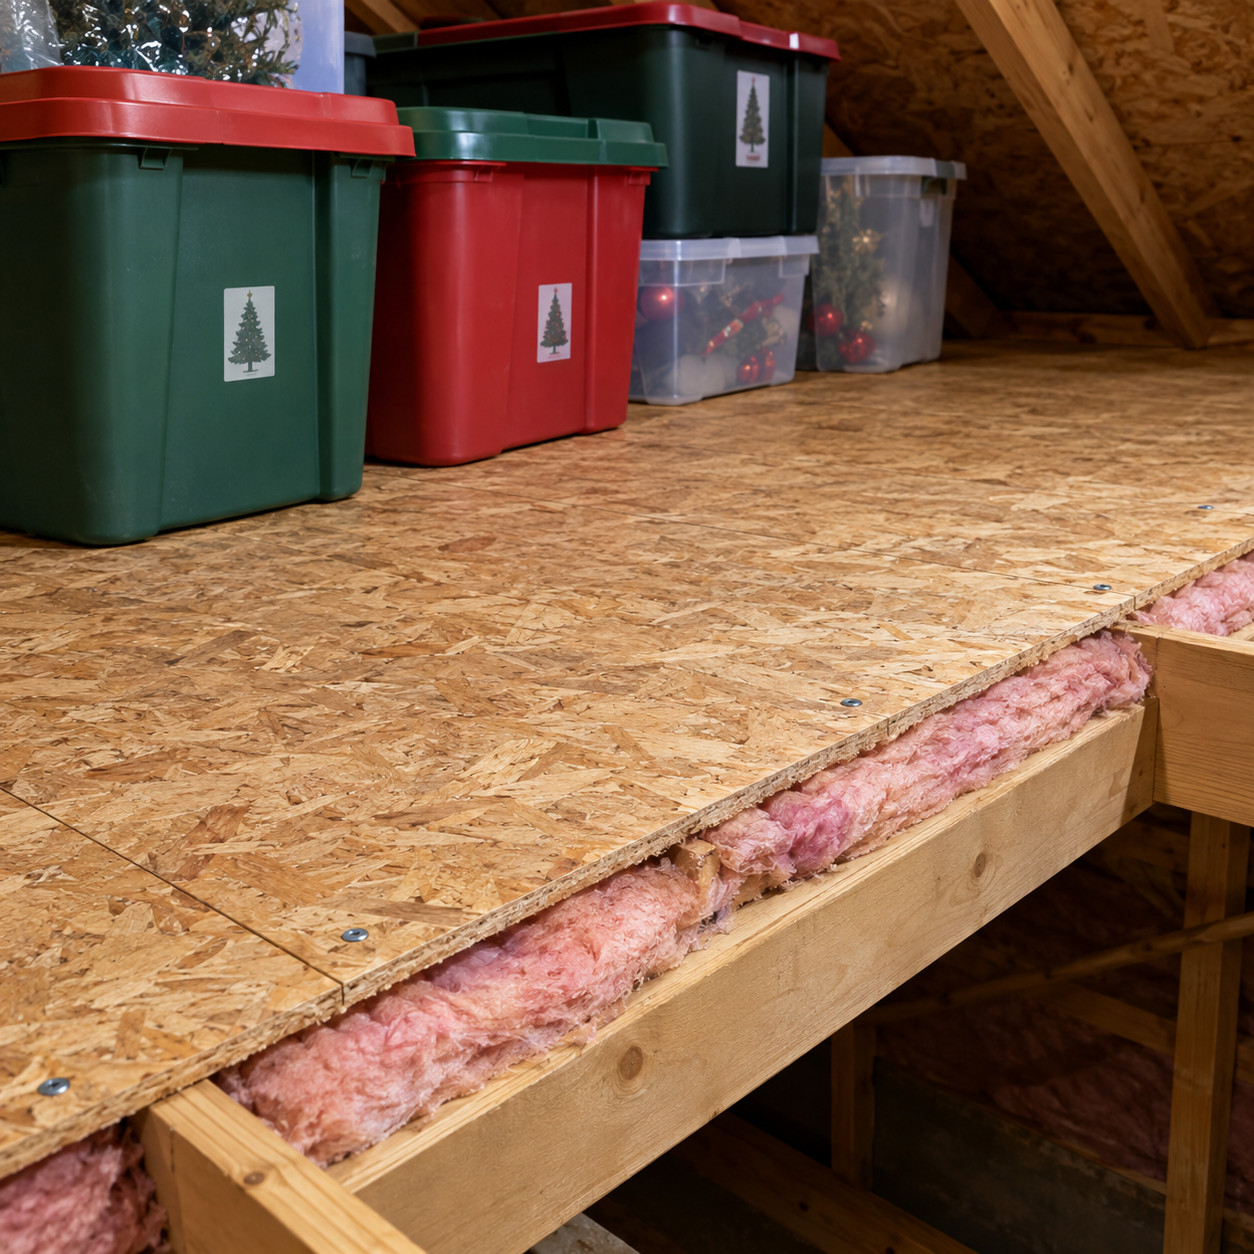
Sheets of OSB screwed directly to the joists, with the holiday bins stacked on top.
Insulation under that decking is compressed to joist depth — call it R-19 inside an R-49 attic. And compressed fiberglass loses R-value faster than the thickness loss alone suggests.
Watch the snow after the next storm. There’s a flat melted rectangle up there, exactly the size of your storage platform.
Build the deck on 2×4 or 2×6 standoffs running perpendicular to the joists, so full-depth insulation runs underneath. Costs maybe $80 more in lumber. Nobody at the home center mentions it.
16. A Ridge Vent Doing All the Work With No Intake Below
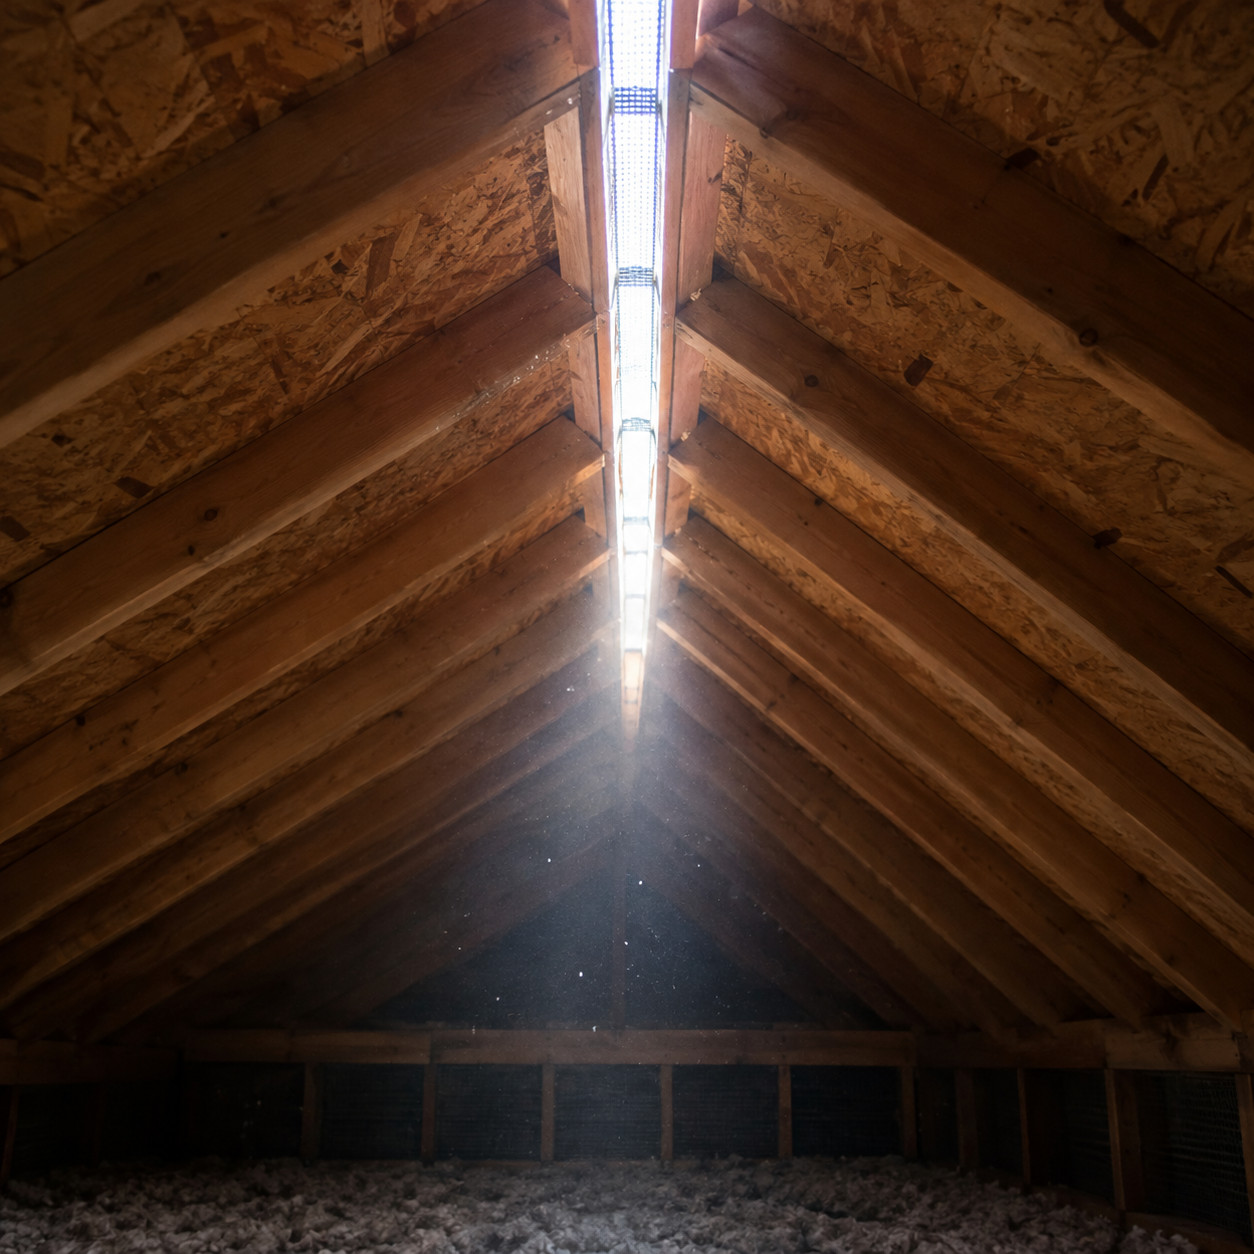
Ridge vents only work as half of a system. Air has to come in at the soffits and exit at the peak.
Roofers install the ridge vent during a reroof because it’s fast and it’s on the spec sheet. Hardly anyone goes down to the eaves to confirm the soffit intake is actually open — and in a lot of houses the soffit panels were never perforated, or the baffles were never installed, or paint sealed them shut forty years ago.
A ridge vent with no intake just pulls its makeup air from inside your house, through every ceiling leak you have.
Gable vents left open alongside a new ridge vent cause a related short-circuit: air takes the easy path gable-to-ridge and never washes the roof deck at the eave. The Building America guidance is to close the gables when you go to a soffit-and-ridge system.
17. Still Living With 1975’s Insulation Depth
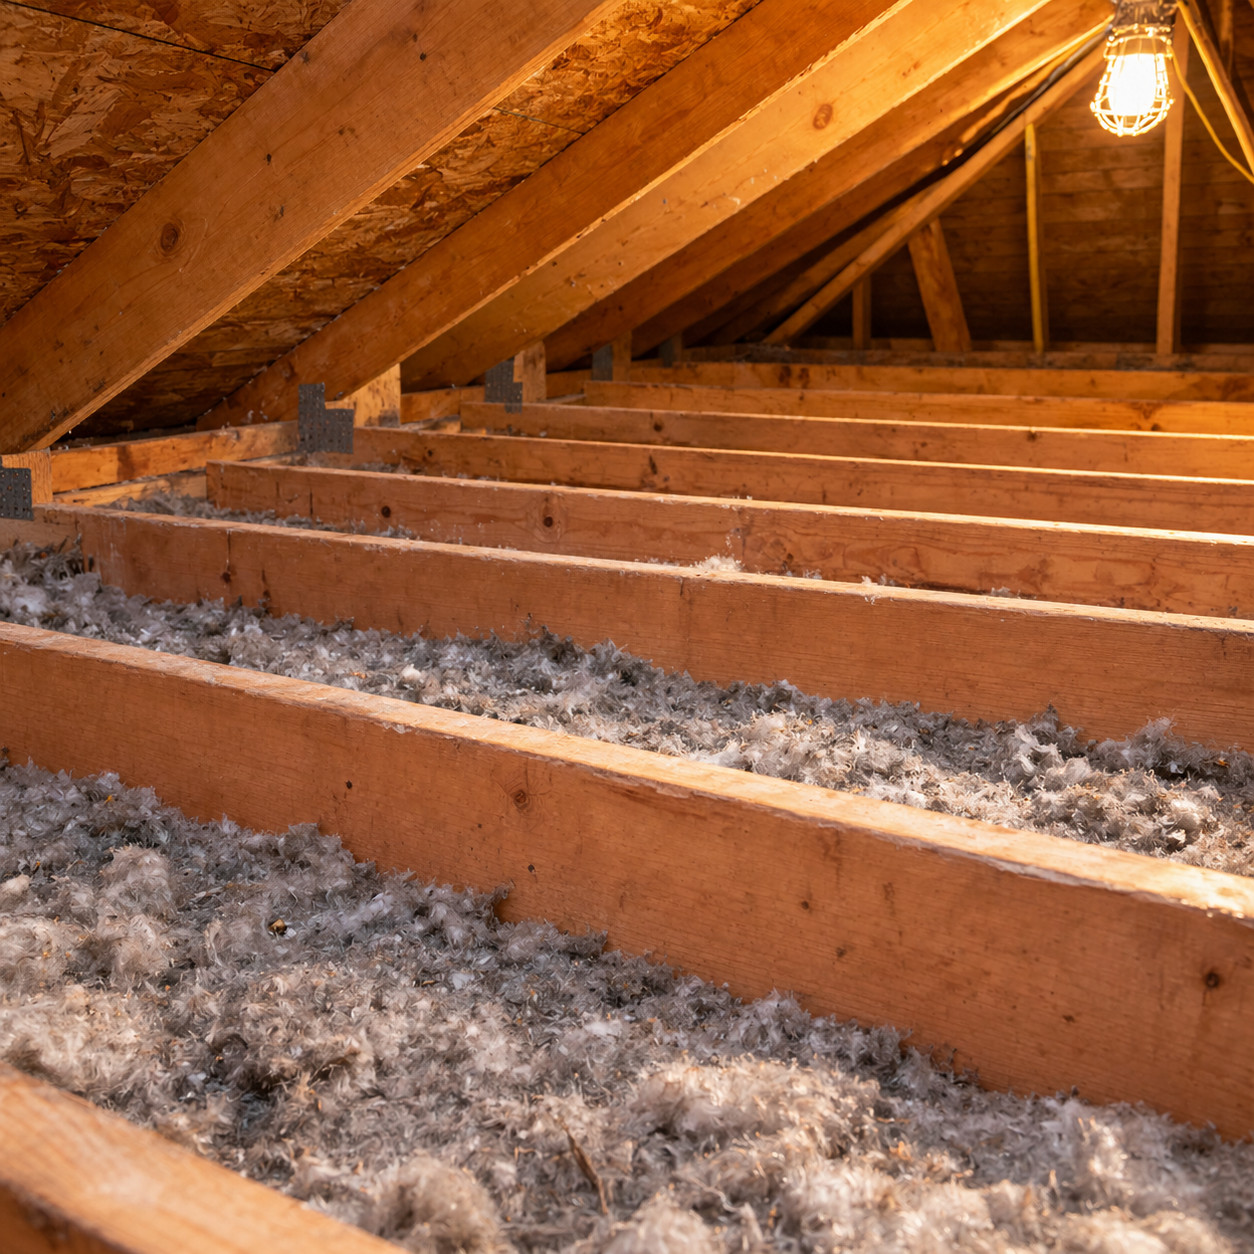
Six inches of fiberglass was generous in 1975. It’s about R-19.
Current DOE recommendations for cold-climate attics run R-49 minimum, R-60 where winters are serious. In blown cellulose that’s roughly 15 to 20 inches — deep enough to bury the joists completely.
Most homeowners open the hatch, see insulation, and assume they’re fine. If you can see the tops of your ceiling joists, you’re at about a third of modern depth.
Topping up is cheap — $1,500 to $2,500 for a typical attic blown to R-49. Just don’t do it before entry number one on this list.
18. Balloon-Framed Walls Open From Basement to Attic
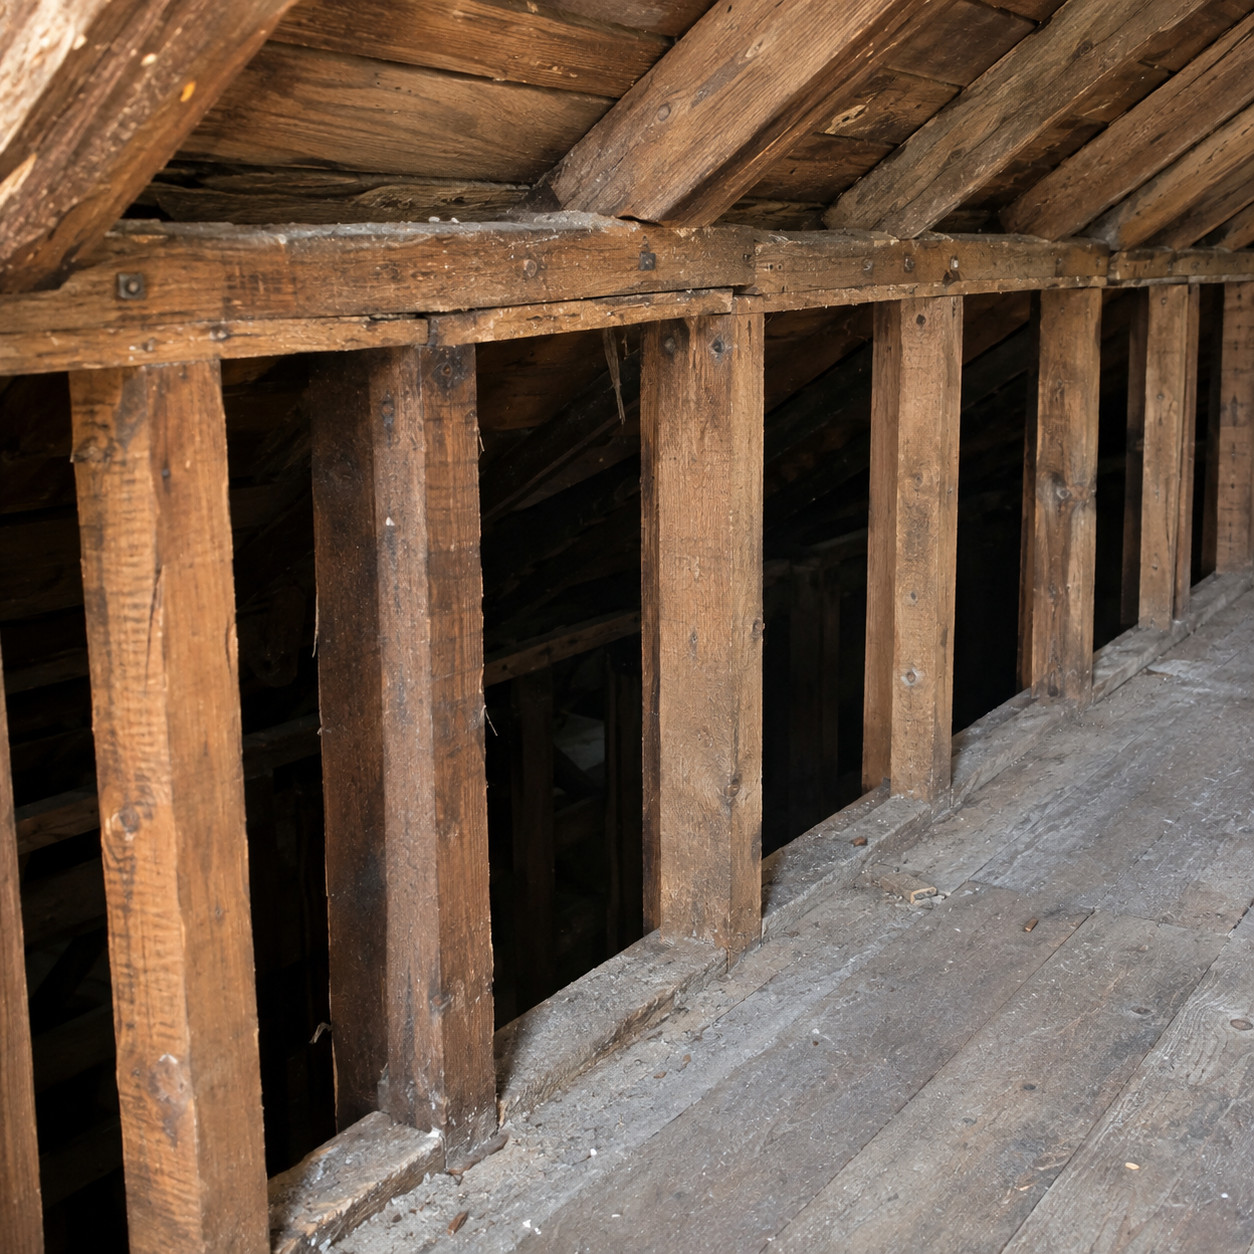
Pre-1930 houses were framed differently. Studs ran continuous from the sill plate all the way to the roof, with no horizontal fire blocking in between.
Every exterior wall cavity in the house is a vertical duct connecting the basement to the attic.
Warm basement air rises inside the walls and vents out the top, right into the attic floor. You can pile two feet of cellulose on that ceiling and it won’t matter — the air is bypassing it entirely.
Blocking and sealing the tops of those stud bays does more for an old-house ice dam than any amount of blown-in. It’s tedious work on hands and knees along the perimeter, and it’s the single highest-value thing you can do in a Victorian. If you’ve been cataloging the details that date a house to before 1960, balloon framing is the one with real money attached.
19. The Uninsulated Bath Duct — and the One Dumping Into the Soffit
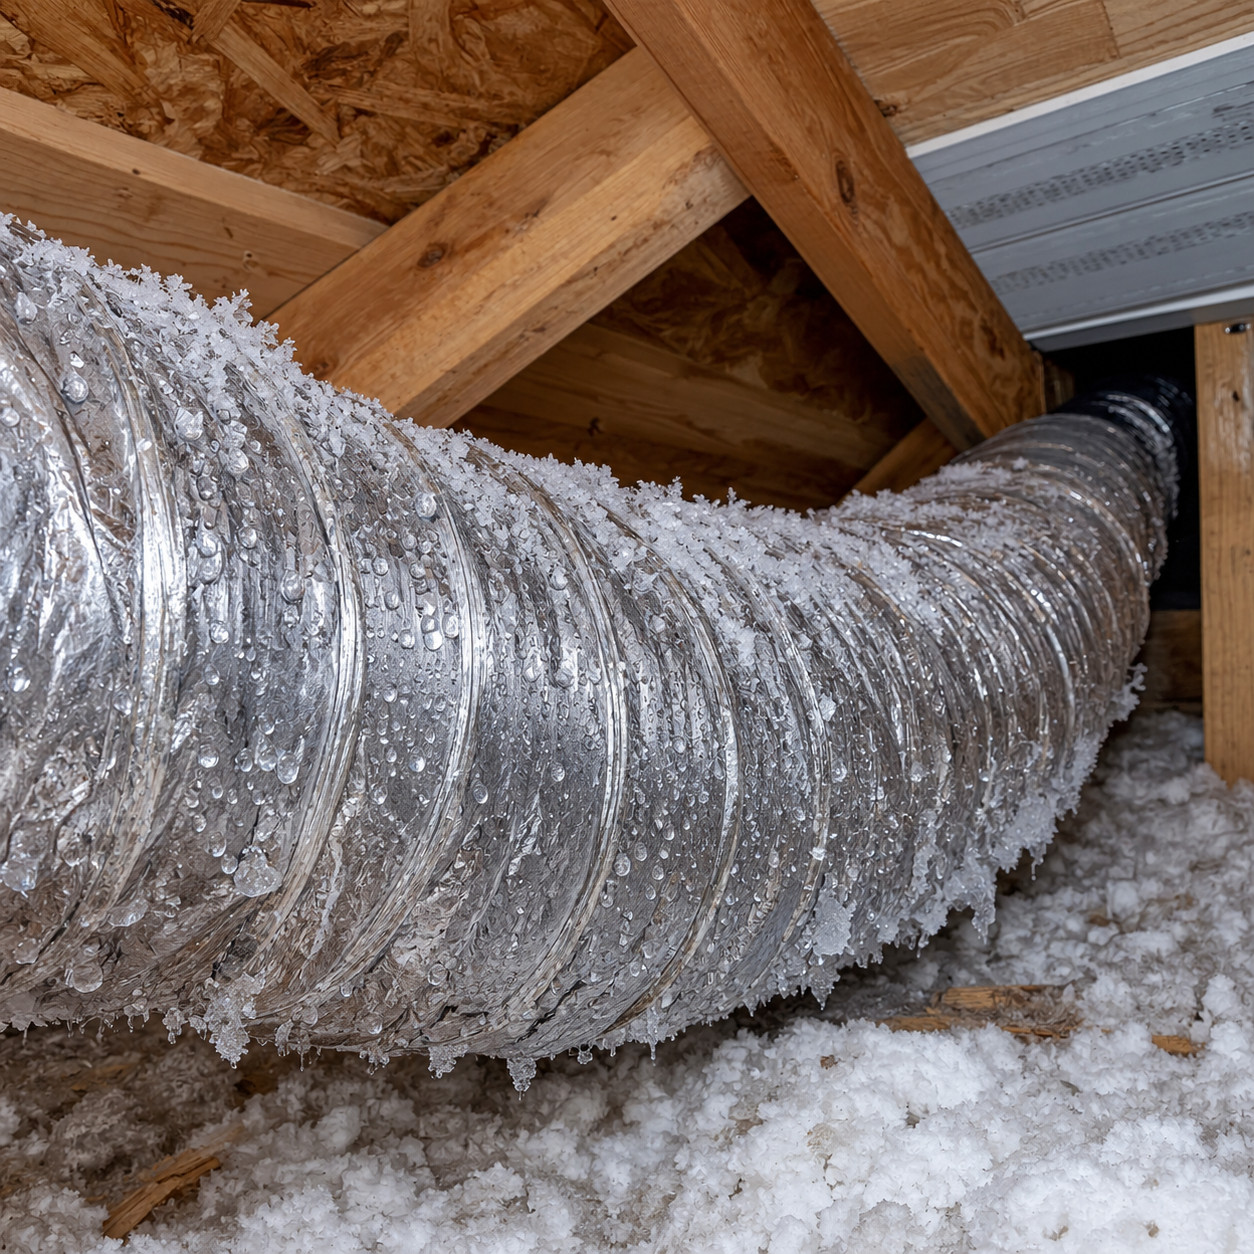
Venting the fan outdoors isn’t enough on its own.
Bare flex duct crossing a cold attic acts like a condenser. Humid air hits the chilled wall of the duct, water beads up inside, and on a January night it freezes into a plug. The duct becomes an ice tube that drains back down through the fan housing when it thaws — which is why people find water stains on the bathroom ceiling and blame the roof.
Use insulated duct, keep the run short, and slope it downhill toward the exterior so condensate drains out.
Terminating into the soffit is worse than useless. You’re feeding warm, wet air directly into the intake vents, where it gets pulled right back into the attic.
20. Knob-and-Tube Wiring Buried Under Blown-In
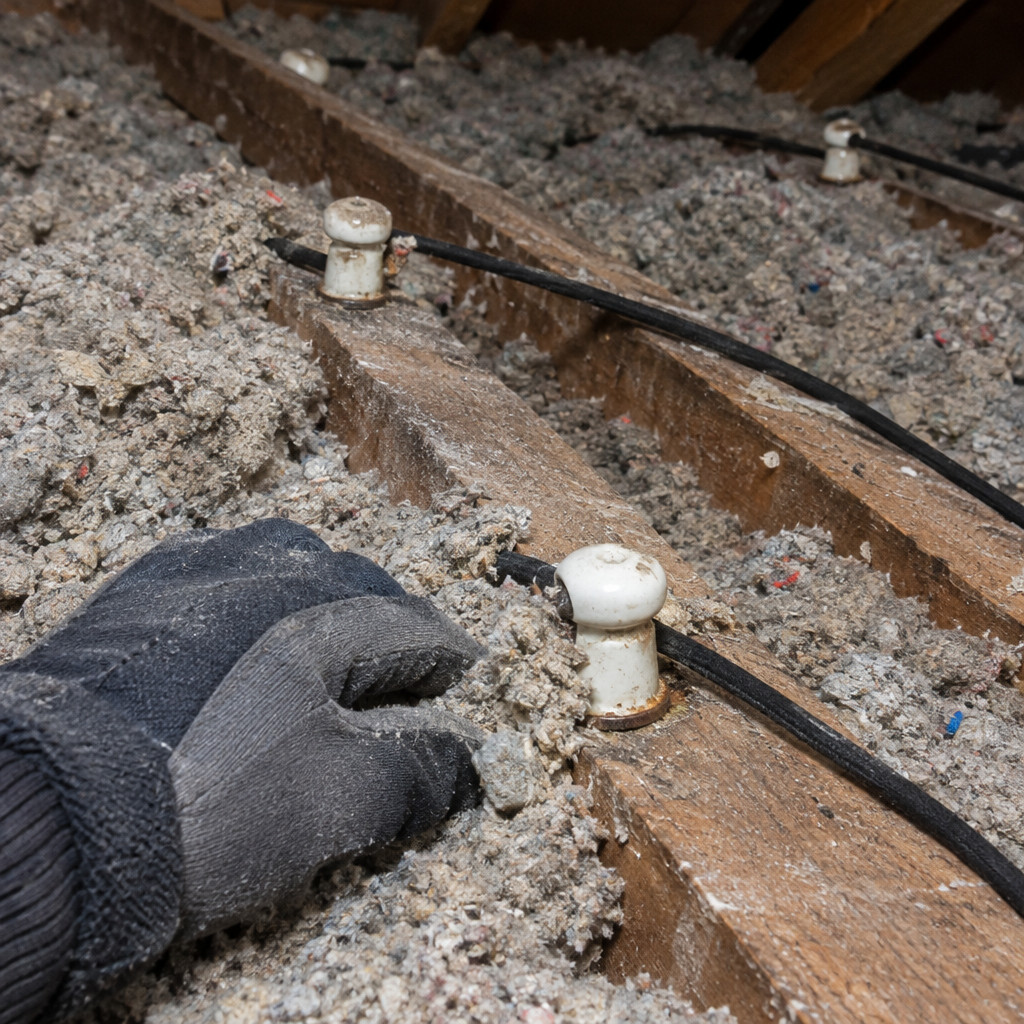
Those white ceramic knobs with black cloth-covered wire strung between them are a pre-1930 system, and plenty of it is still energized.
Knob-and-tube was engineered around a single assumption: the conductors would always sit in open air, spaced apart, free to shed heat. The ceramic tubes through the joists and the knobs holding the wire off the wood exist for exactly that reason.
Bury it in insulation and that heat has nowhere to go. The rubber and cloth insulation on the conductors embrittles, cracks, and eventually flakes off the copper.
Most jurisdictions adopting the National Electrical Code prohibit covering active knob-and-tube with thermal insulation. This isn’t a gray area.
The insurance angle is just as real. Many carriers refuse to write a new policy on a home with live knob-and-tube, and some will non-renew an existing one when it surfaces during an inspection. Others will cover it only after a licensed electrician certifies the circuits. Call your agent before you call an insulator — the answer determines your whole plan.
Rewiring an average house runs $8,000 to $20,000 and often more in plaster homes where every access point means repair work. It’s the reason some old attics sat deliberately under-insulated for fifty years, and the reason those houses grow spectacular icicles.
Partial approach: a licensed electrician can disconnect and abandon the attic runs, feed those circuits with modern cable, and then the attic insulates like any other. Cheaper than a whole-house rewire and it unlocks everything else on this list.
21. Faced Batts Laid Over Existing Insulation
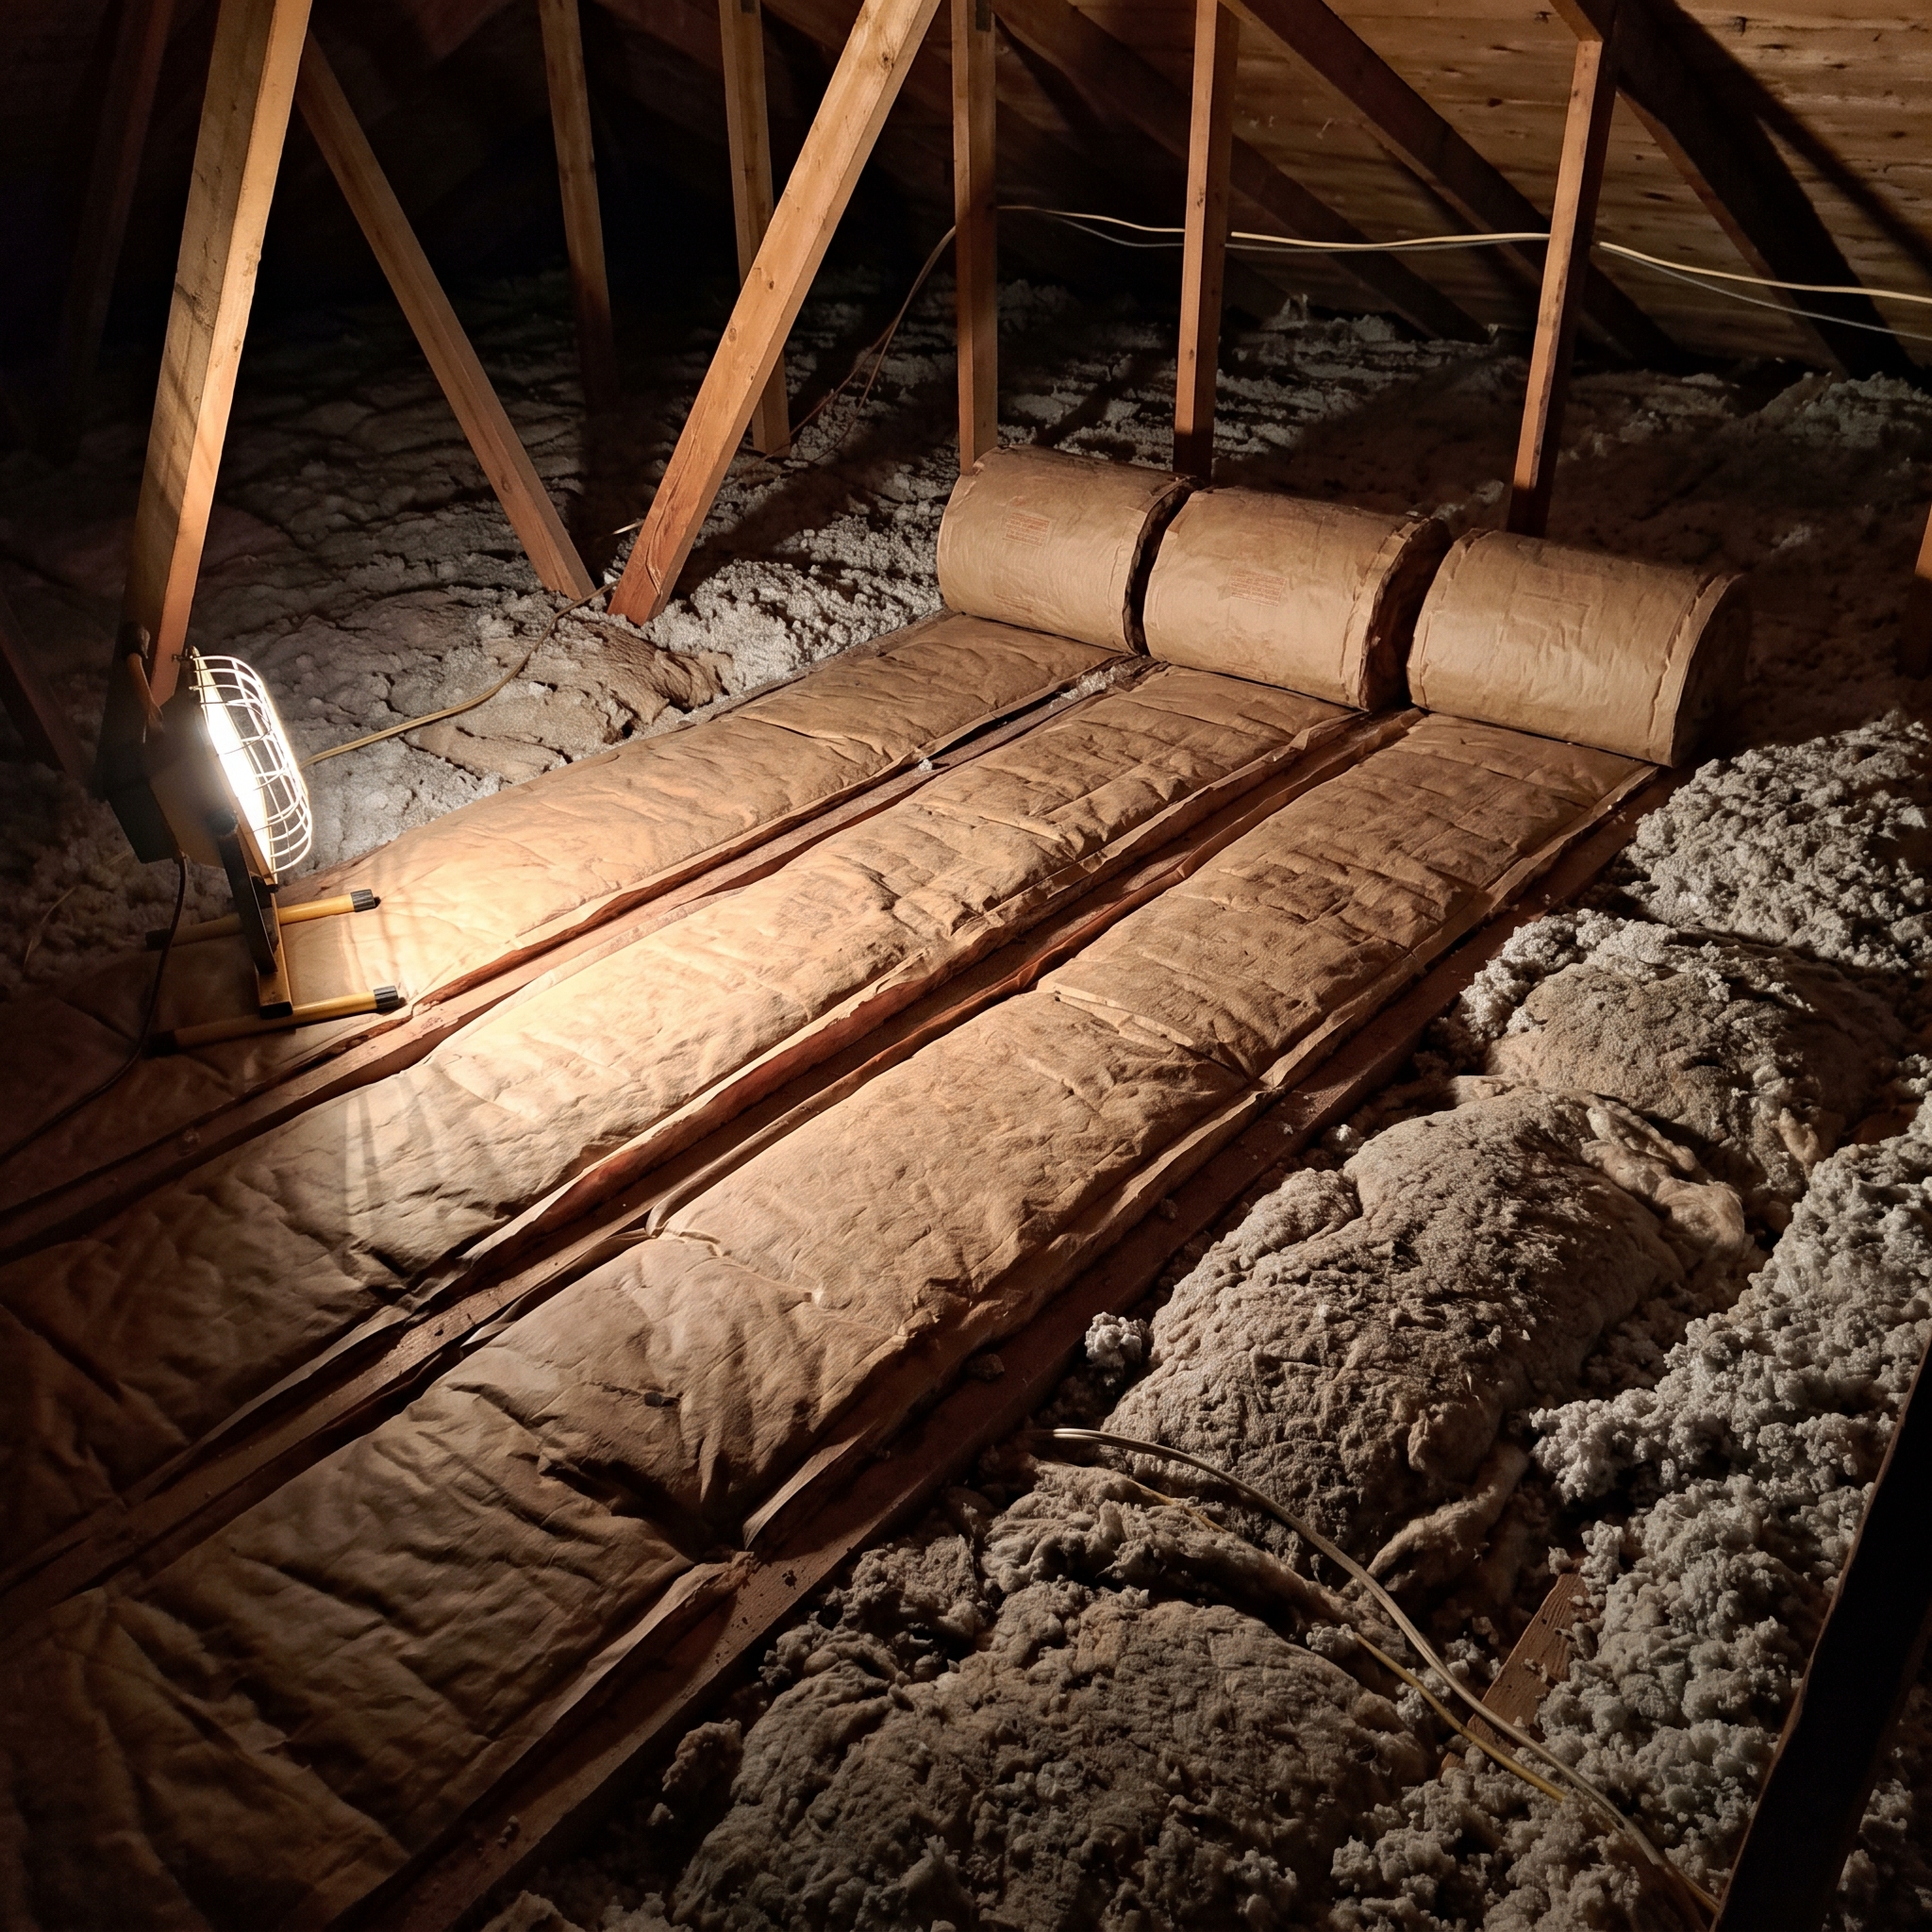
The kraft paper or foil facing on a batt is a vapor retarder. It belongs on the warm side of the assembly, against the drywall, and nowhere else.
Lay faced batts on top of your existing insulation and you’ve stranded a vapor barrier in the middle of the sandwich. Moisture moving up from the house hits that paper, condenses, and quietly soaks the layer beneath it.
Wet insulation, compressed insulation, mold on the joists. Same ending as entry 13.
New layers go down unfaced, running perpendicular to the joists so they break the thermal bridge over the framing. If all you can find is faced, slash the paper every few feet before you lay it.
22. The Slanted Ceiling Over the Stairwell
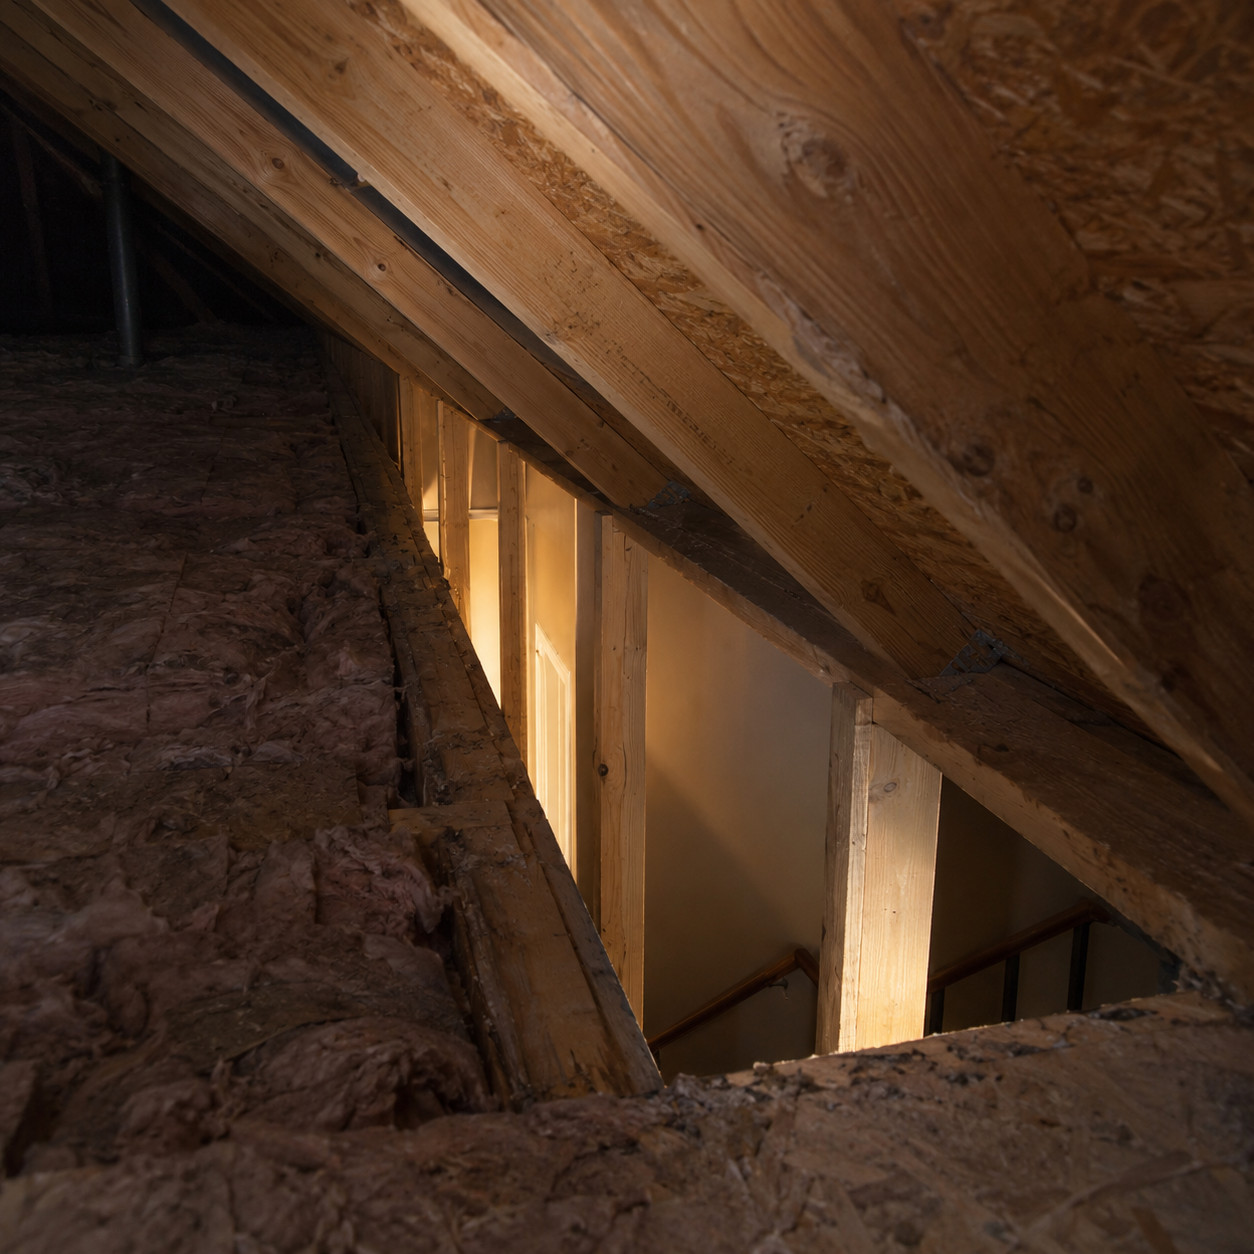
Stairwell air is the warmest air in the house — stack effect pushes it up and parks it at the ceiling.
And the sloped soffit above the top of the stairs is almost always open framing, with the attic on the other side of a thin piece of drywall or nothing at all.
You’re venting the hottest column of air in the building straight into the attic, continuously.
ENERGY STAR groups the stairwell soffit with dropped ceilings as a priority seal. Rigid foam cut to fit the opening, foamed at the edges, insulation over the top.
23. Skylight Shafts and Dormer Cheeks Left Bare
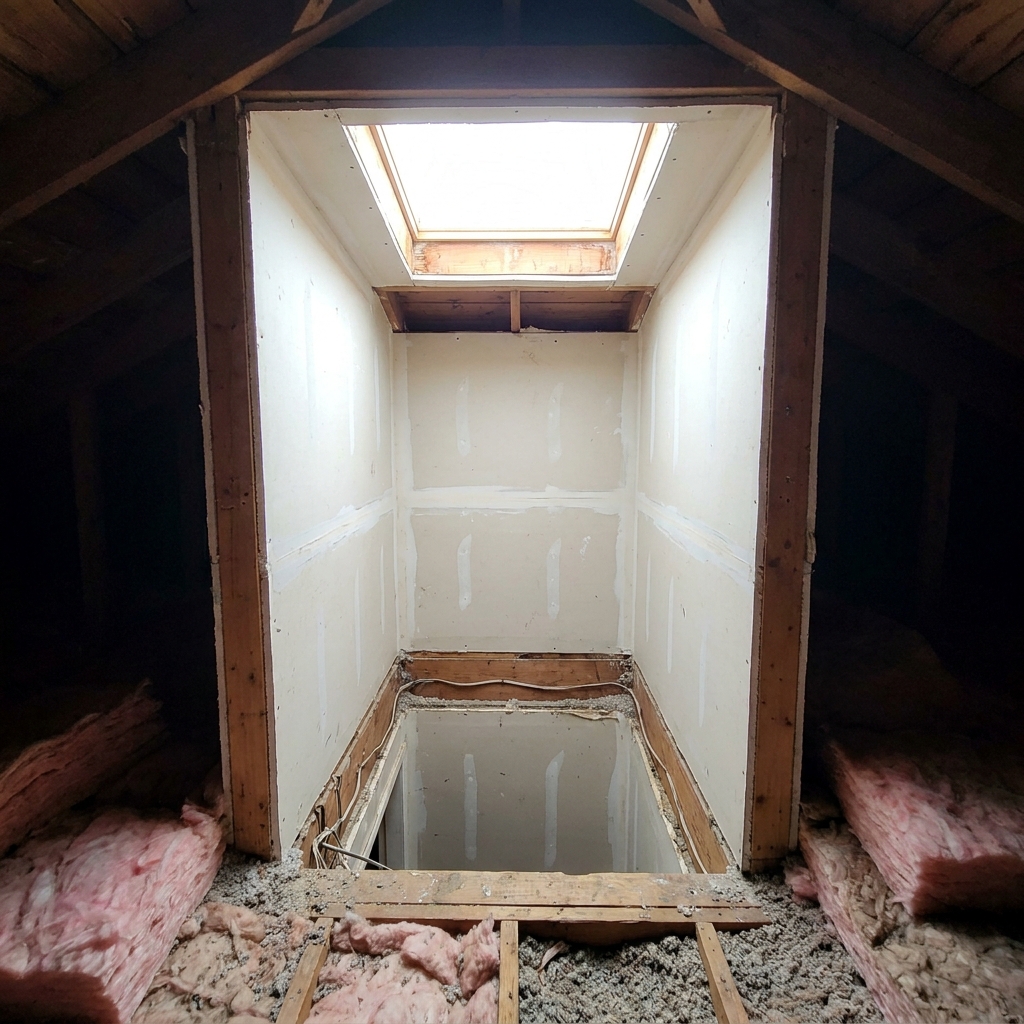
A skylight well is a four-sided shaft running from your ceiling up to the roof. Those walls are exterior walls — and in a surprising number of houses, they’re uninsulated drywall with nothing behind them but attic.
Snow melts in a neat ring around every skylight. That’s the tell.
Dormer cheeks are the same oversight. The triangular side walls of a dormer face into the attic and get forgotten by every crew that insulates the flat ceiling and leaves.
The valleys beside dormers are where ice dam water most often gets in. Two surfaces meeting at a low point, with debris, with snow piling deep — and bare drywall radiating heat on both sides of it.
24. Cathedral Ceilings With No Vent Channel
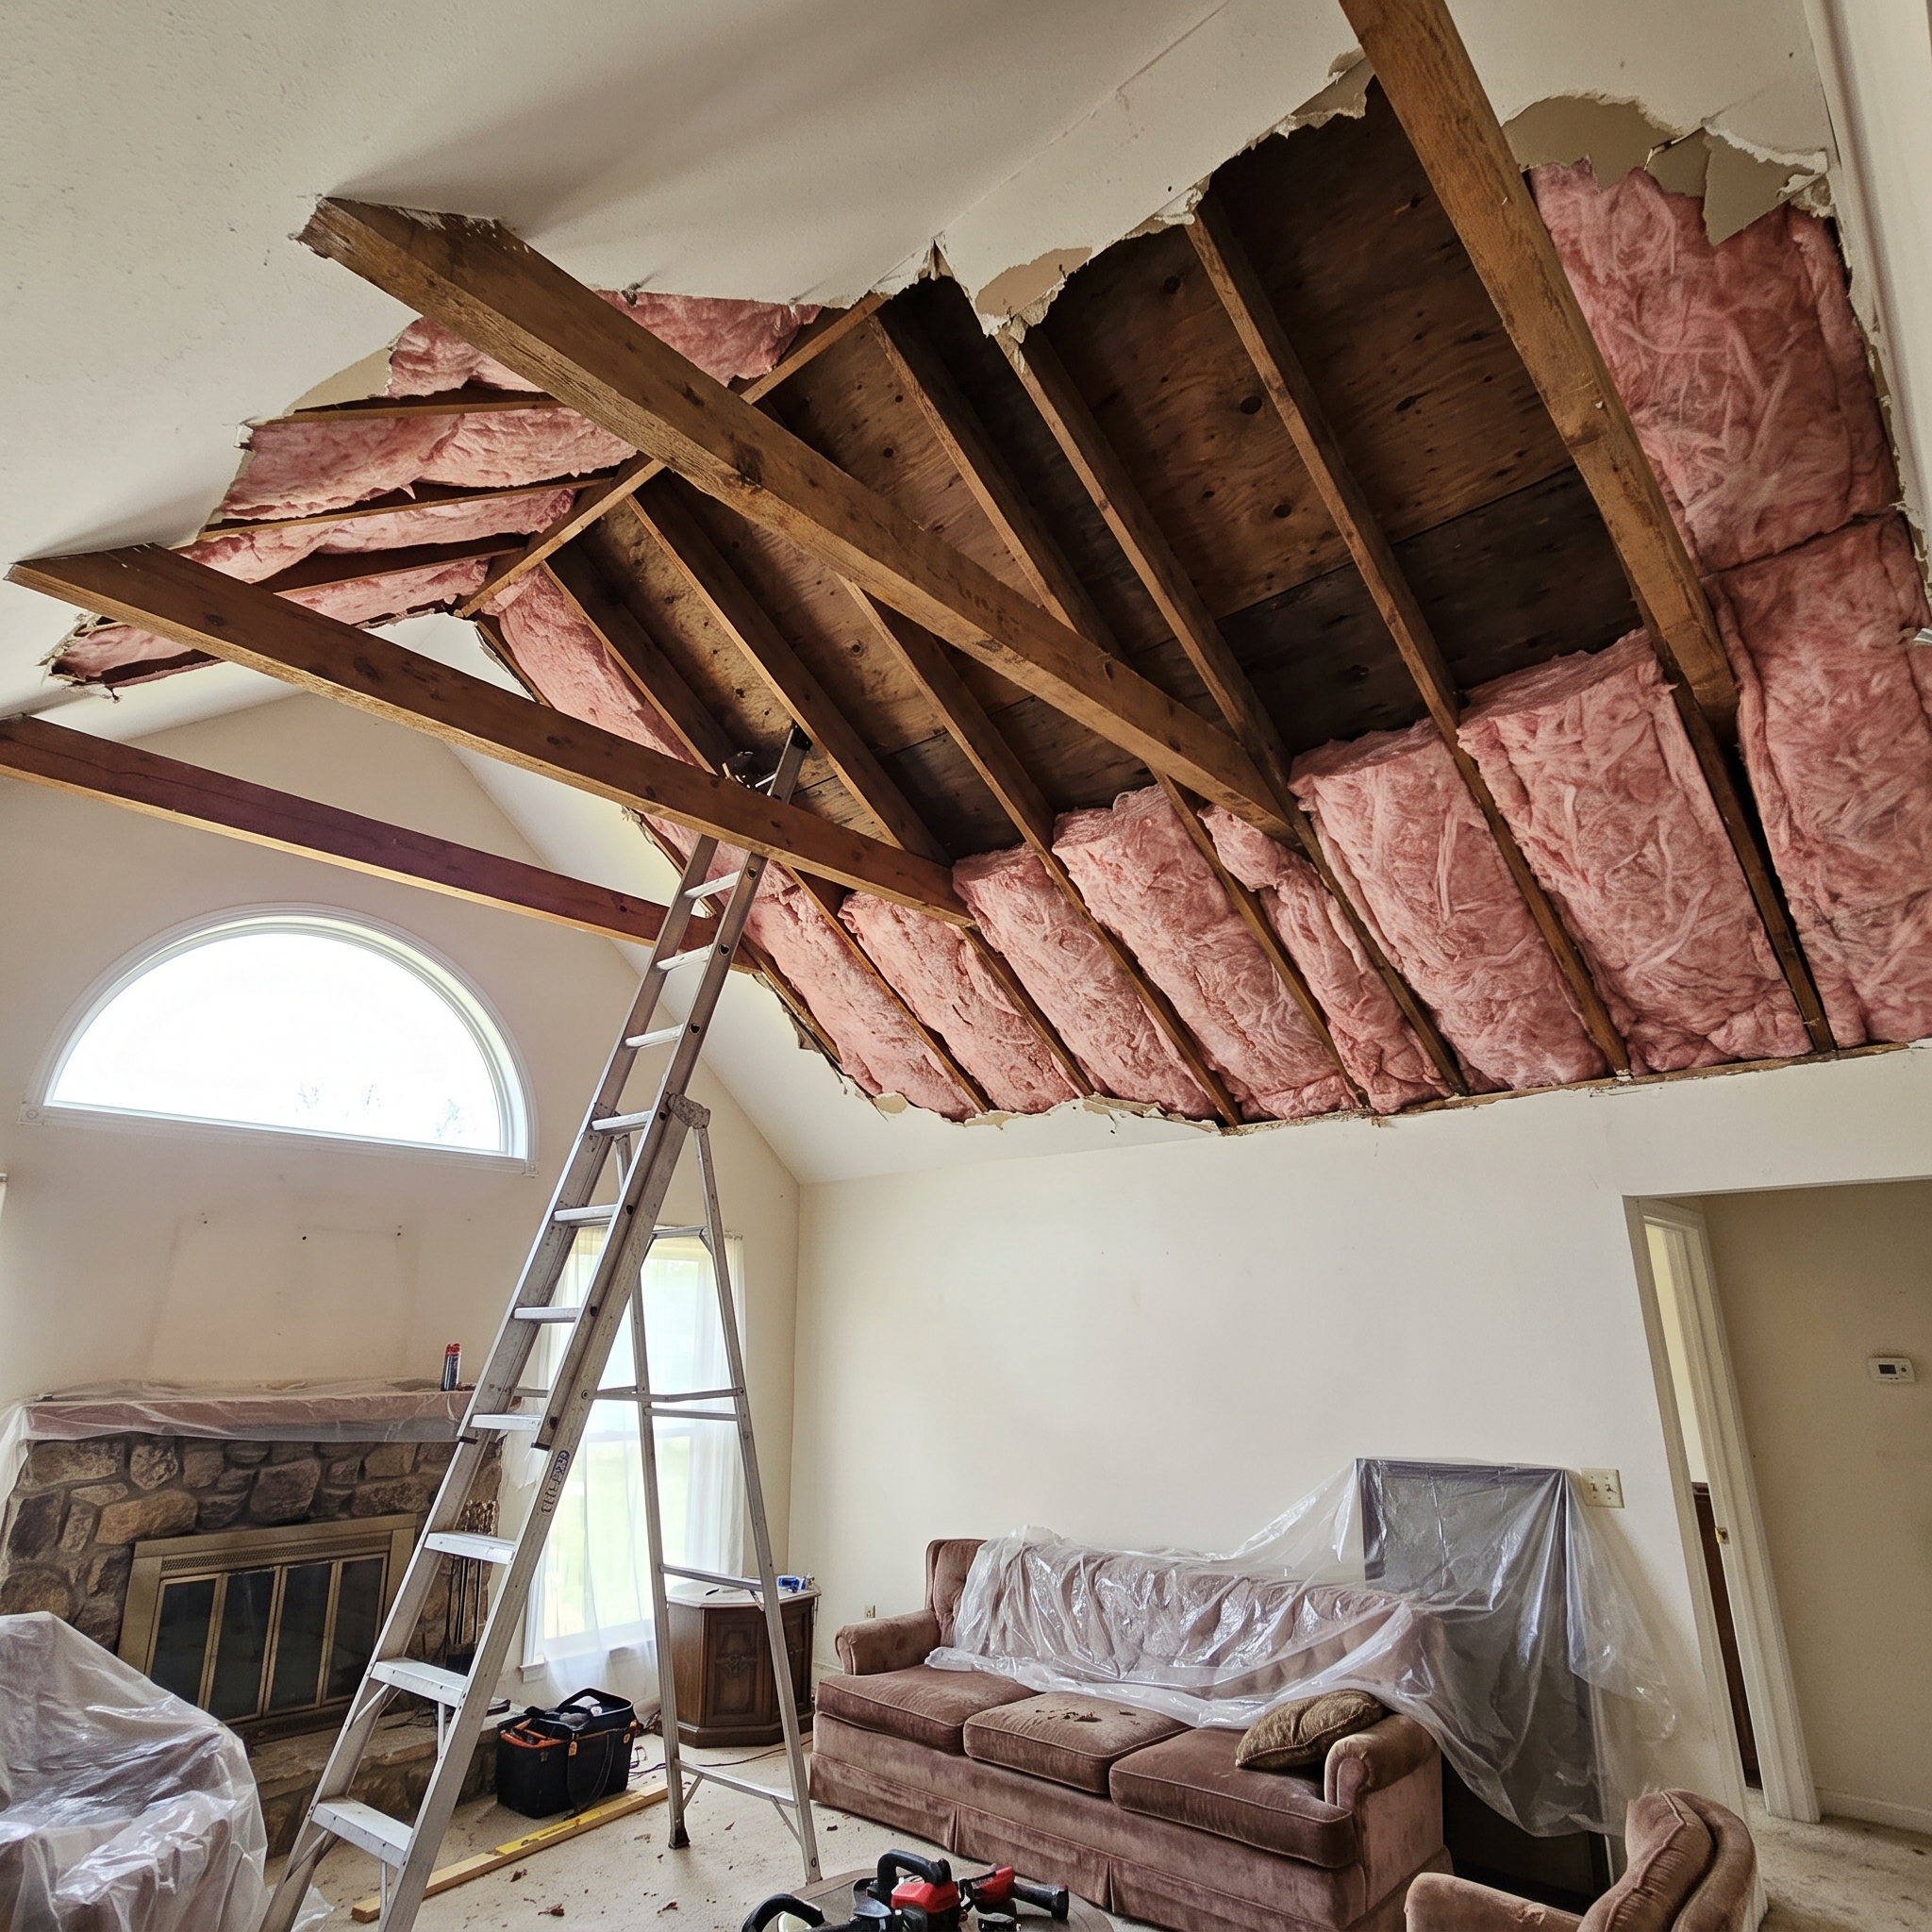
That dramatic 1978 great room with the open beams is a maintenance problem waiting to surface.
A vaulted ceiling built with 2×8 rafters packed solid with batts leaves zero air gap under the sheathing. The roof runs warm from ridge to eave, and any moisture that gets into the assembly has no path out.
These produce the hardest ice dams to solve. There’s no attic to crawl into and no simple place to add depth.
Real fixes mean either opening the ceiling from inside and rebuilding the assembly with vent chutes or closed-cell foam, or stripping the roof and adding rigid foam above the deck. Both are five-figure projects.
Which is why ignoring it is expensive — rot in an unvented vault is discovered during a reroof, not before.
25. The Furnace or Air Handler Sitting in the Attic
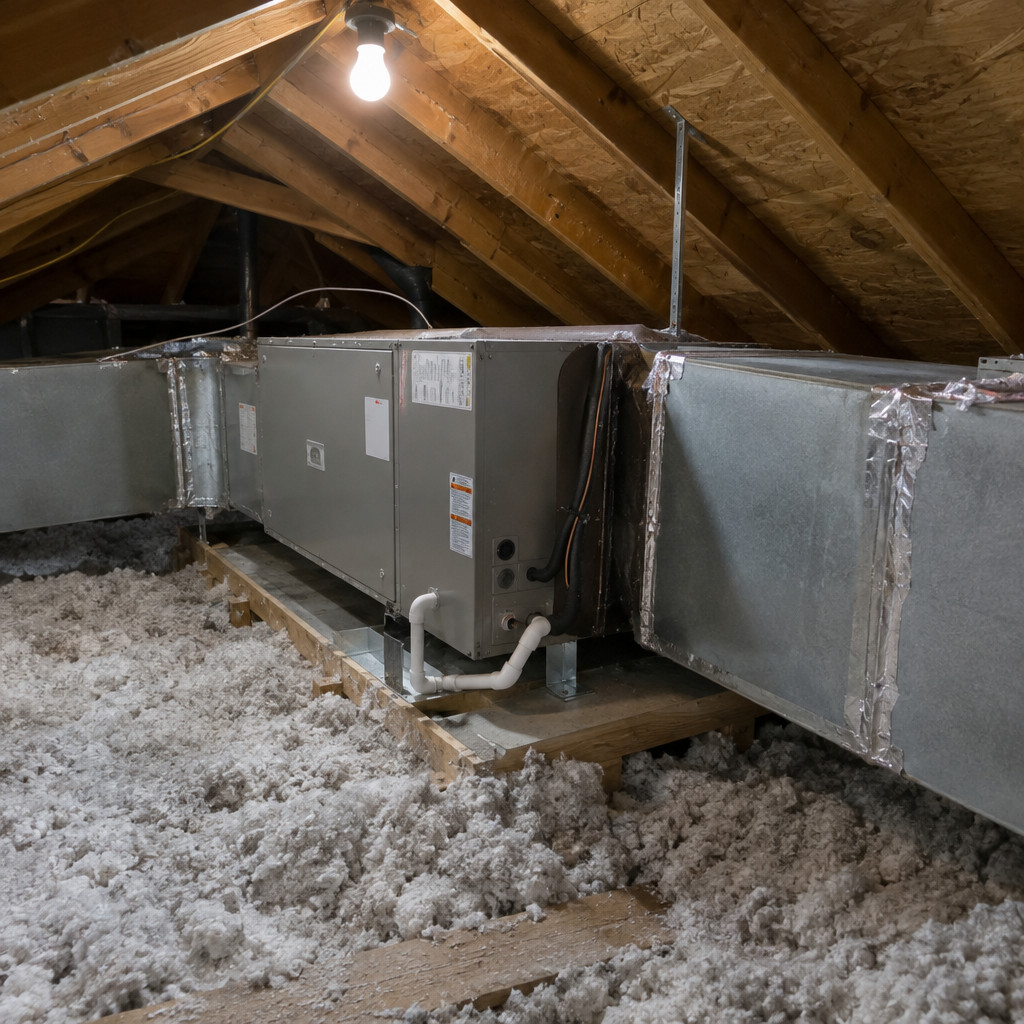
Builders started parking HVAC equipment in attics in the 1970s because it freed up a closet and cost nothing to frame around.
An air handler in unconditioned space is a heat source bolted to the underside of your roof. The cabinet itself radiates. The plenum connections leak. Return-side leaks pull attic air into your living space, and supply-side leaks push conditioned air into the attic.
Industry testing has found cabinet and plenum leakage alone running 5 to 10 percent of total airflow on typical residential equipment.
On a cold morning, the roof over that air handler melts first.
Three options, cheapest first. Seal and insulate the cabinet, plenums, and all connections with mastic and rigid board — $500 to $1,500, meaningful improvement, doesn’t solve the core problem. Bury the ducts and equipment in deep blown insulation with a sealed, encapsulated enclosure, following the PNNL buried-duct guidance — this requires careful attention to condensation risk and runs $2,500 to $6,000. Or convert the attic to conditioned space with closed-cell foam at the roof deck, bringing everything inside the thermal boundary — $4 to $8 per square foot of roof area, so $8,000 to $20,000, and it ends ice dams permanently.
That last one sounds extreme until you price a roof deck replacement.
26. The Whole-House Fan Nobody Covers in Winter
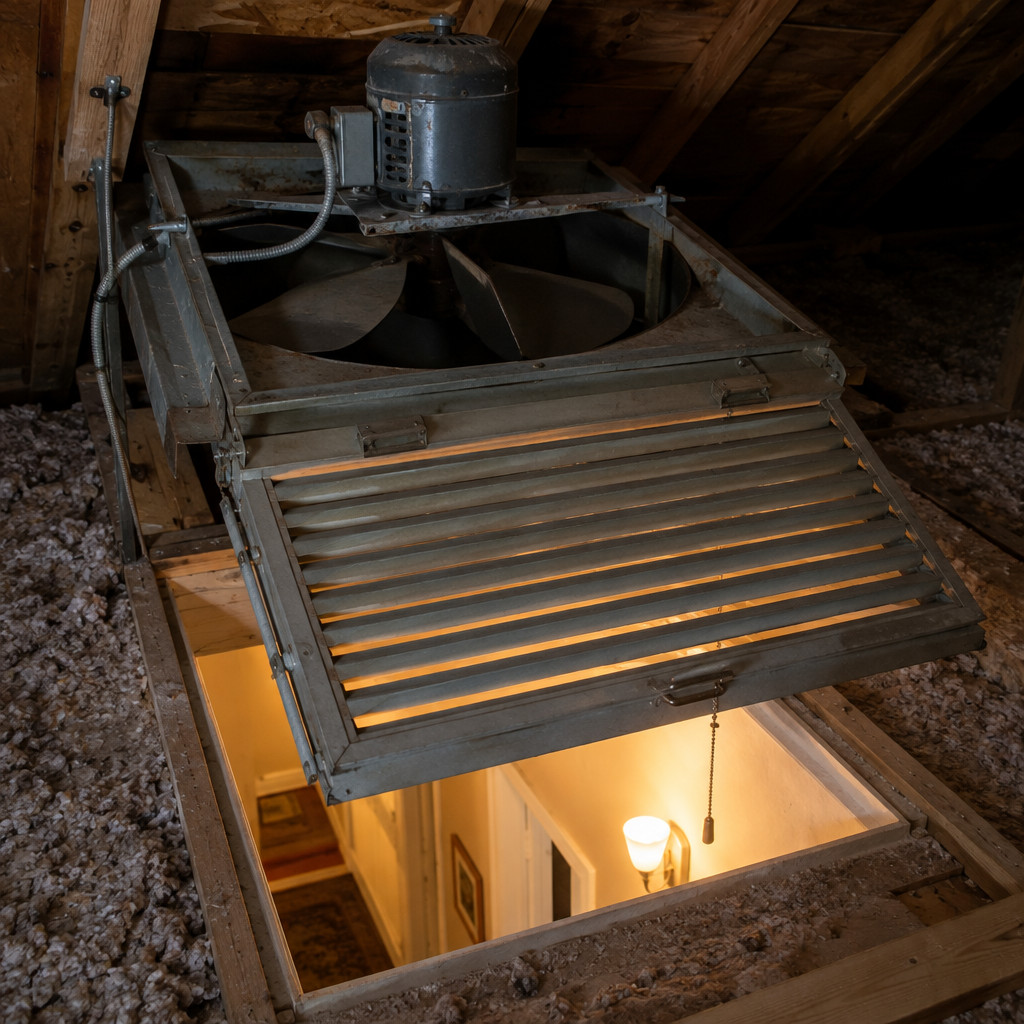
Mid-century houses across the Midwest and Northeast got these — a 30- or 36-inch fan in the upstairs hallway ceiling with gravity louvers that flop open when it runs.
Those louvers don’t seal. They’re thin aluminum slats resting on each other.
From October to May that’s a three-foot hole in your ceiling, open to the attic, with nothing covering it. It is frequently the single largest bypass in the entire house.
Insulated winter covers run $40 to $120, or you can build a rigid foam box and set it over the opening from the attic side. Almost nobody does either.
27. Gaps, Voids, and Pinched Batts
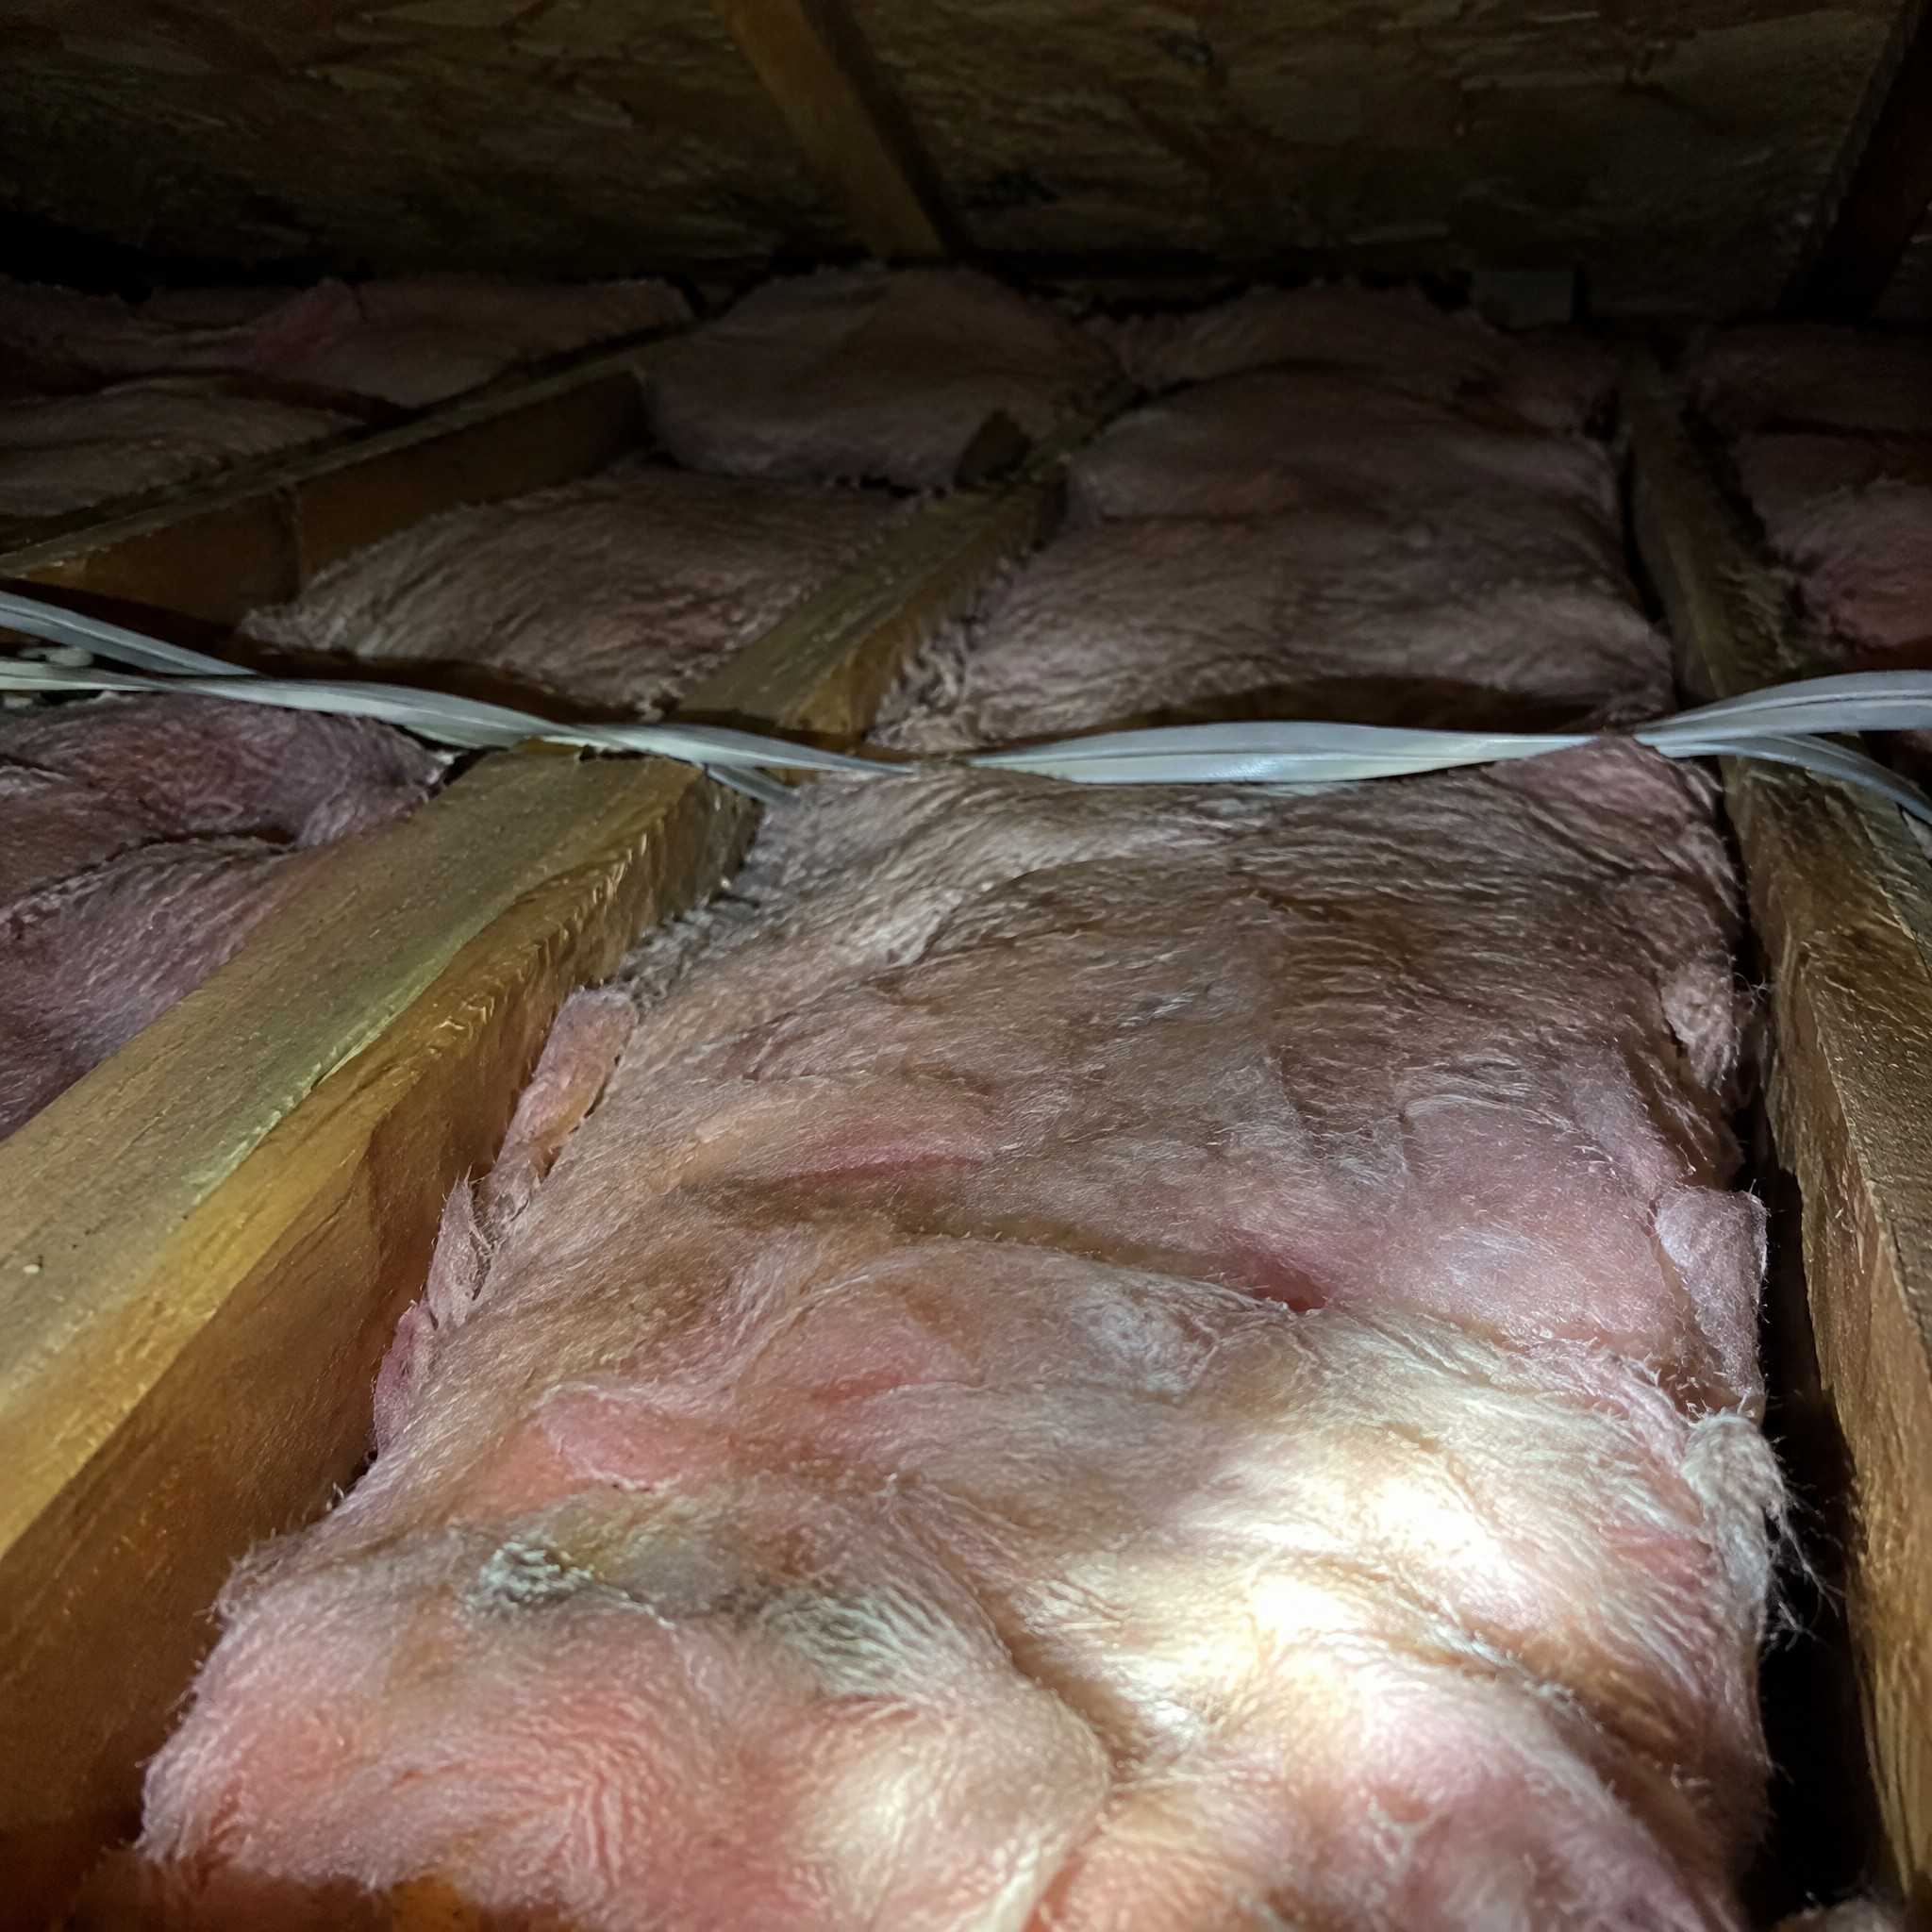
Batts cut an inch short at the end of a run. Batts squashed under a wire. A finger-width gap between two pieces, repeated across a hundred joist bays.
Fiberglass only delivers its rated R-value installed in full contact with the surrounding surfaces and no voids. Grade III installation — gaps and compressions throughout — can cut effective performance by 30 percent or more against the number on the bag.
Cut batts long and friction-fit them. Split the batt around wiring instead of compressing it over the top.
Small gaps, big ceiling, warm roof.
28. Closing the Soffit Vents to ‘Keep the Attic Warm’
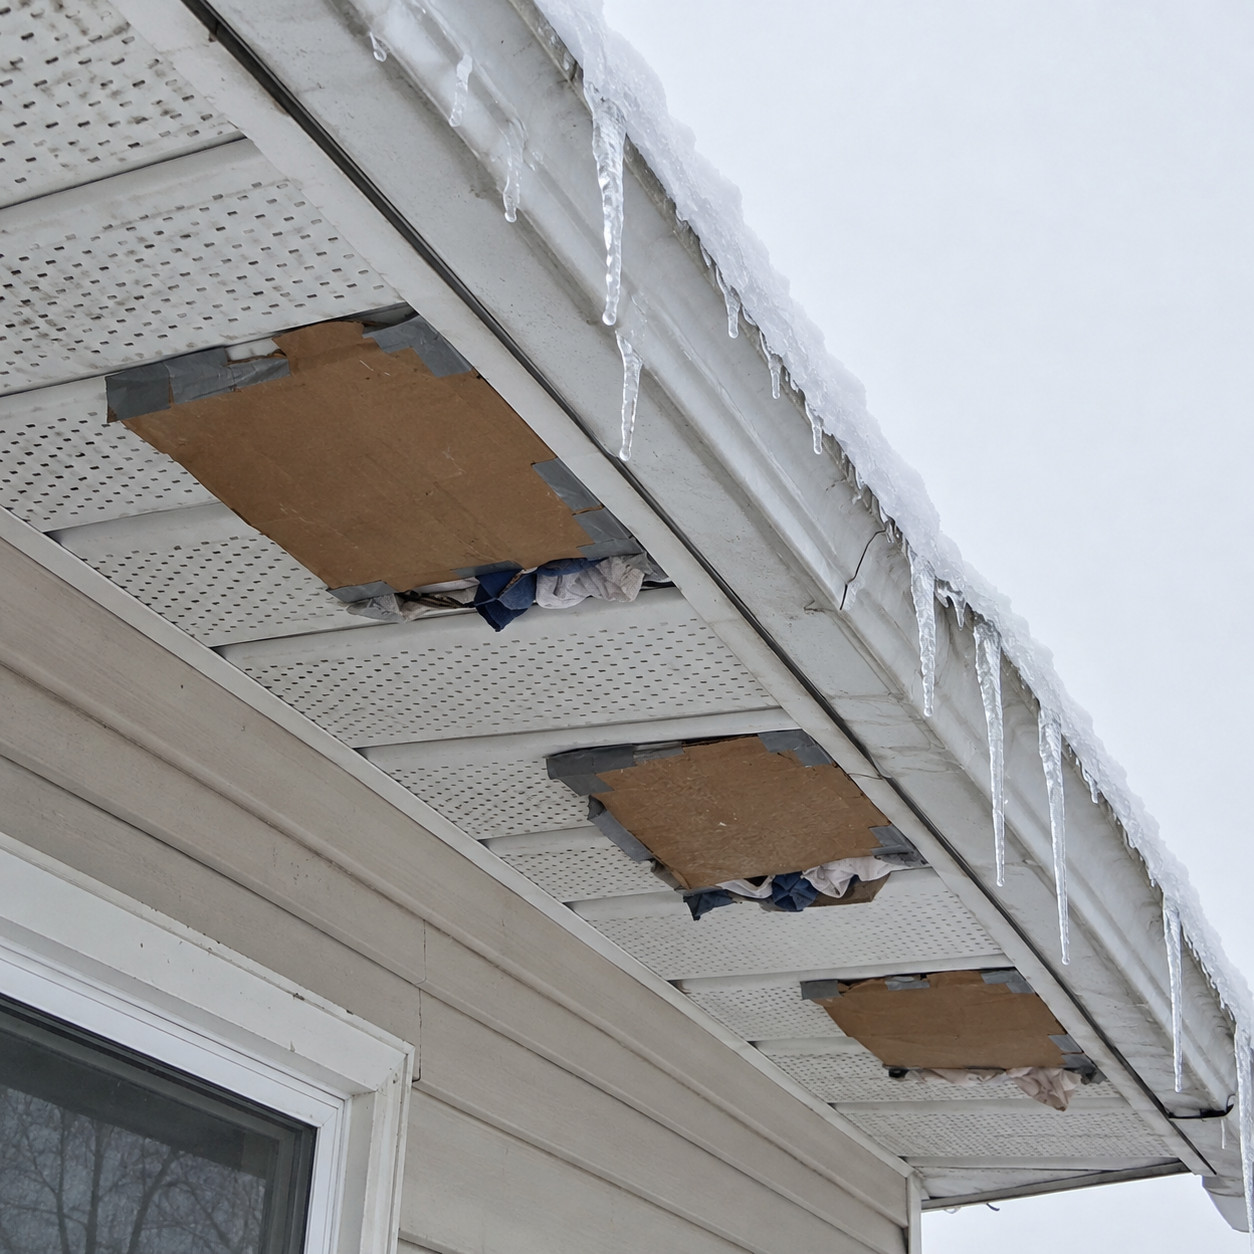
It feels right. Cold air is the enemy, so stop the cold air.
It’s exactly backwards. A warm attic is what melts the snow that refreezes at your eaves.
The goal is an attic that runs within a few degrees of the outdoor temperature. Cold attic, cold roof deck, snow stays snow, no meltwater reaches the overhang to freeze.
Every piece of cardboard, every stuffed rag, every blocked soffit panel is making your ice dam worse. Open them back up.
29. The Gap Where an Addition Met the Old House
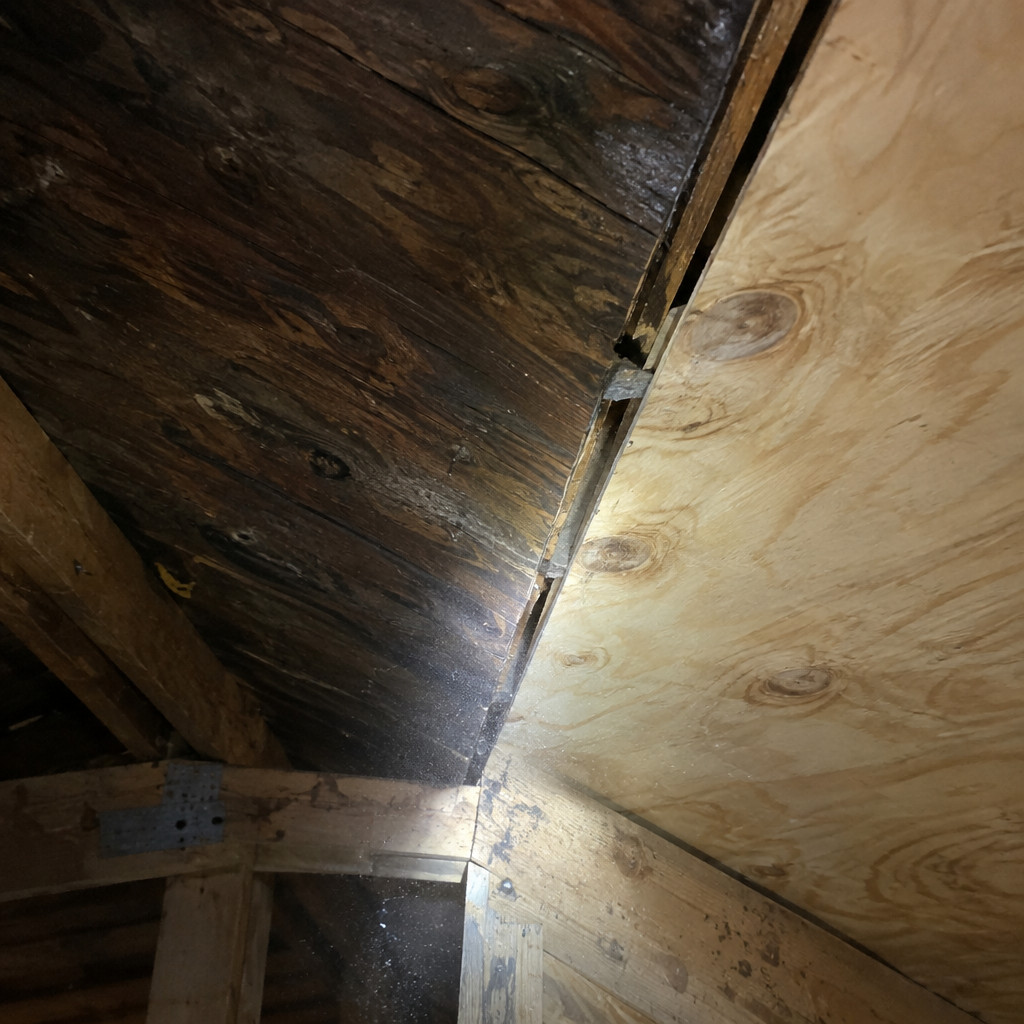
Enclosed porches, bump-outs, second-floor additions, converted garages. Wherever new framing met old framing, there’s a seam.
Roof plane transitions are the worst of them. The old roof’s sheathing ends, the new one begins, and the cavity between them connects to the attic in a way nobody drew on the plans.
Once insulation covers it, the gap is essentially unfindable by hand. Inspectors locate them with an infrared camera on a cold day; homeowners locate them when a stain appears on the ceiling below.
If your ice dam forms in the same spot every single year and that spot is near an addition, you’ve found it.
30. Hanging Heat Cables Instead of Fixing the Attic
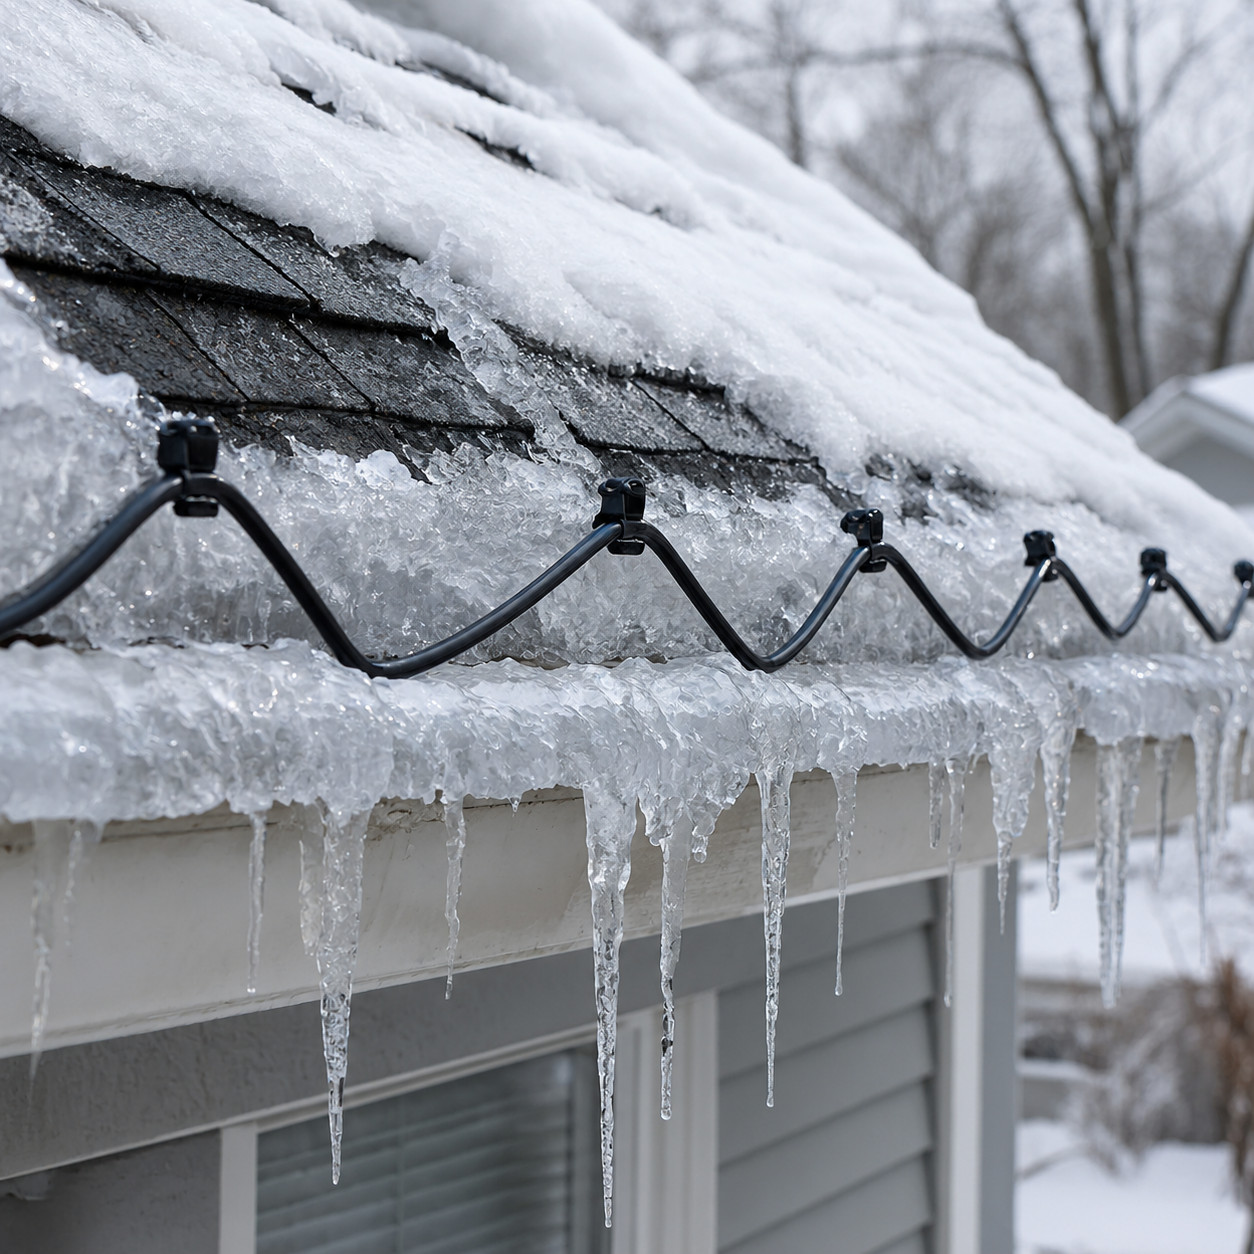
Zig-zag cables along the eave, plugged in from November to March.
They melt a channel through the ice so water has somewhere to go. They do not stop the ice from forming, because they do nothing about the heat escaping your ceiling.
A 100-foot run draws roughly 5 to 8 watts per foot. Left on through a northern winter, that’s $100 to $250 in electricity, every year, forever.
And the first storm that builds a dam taller than the cable, the cable’s useless. You get water behind the ice anyway.
Fix the attic. You cannot solve an attic problem from the roof.
31. Blaming the Gutters
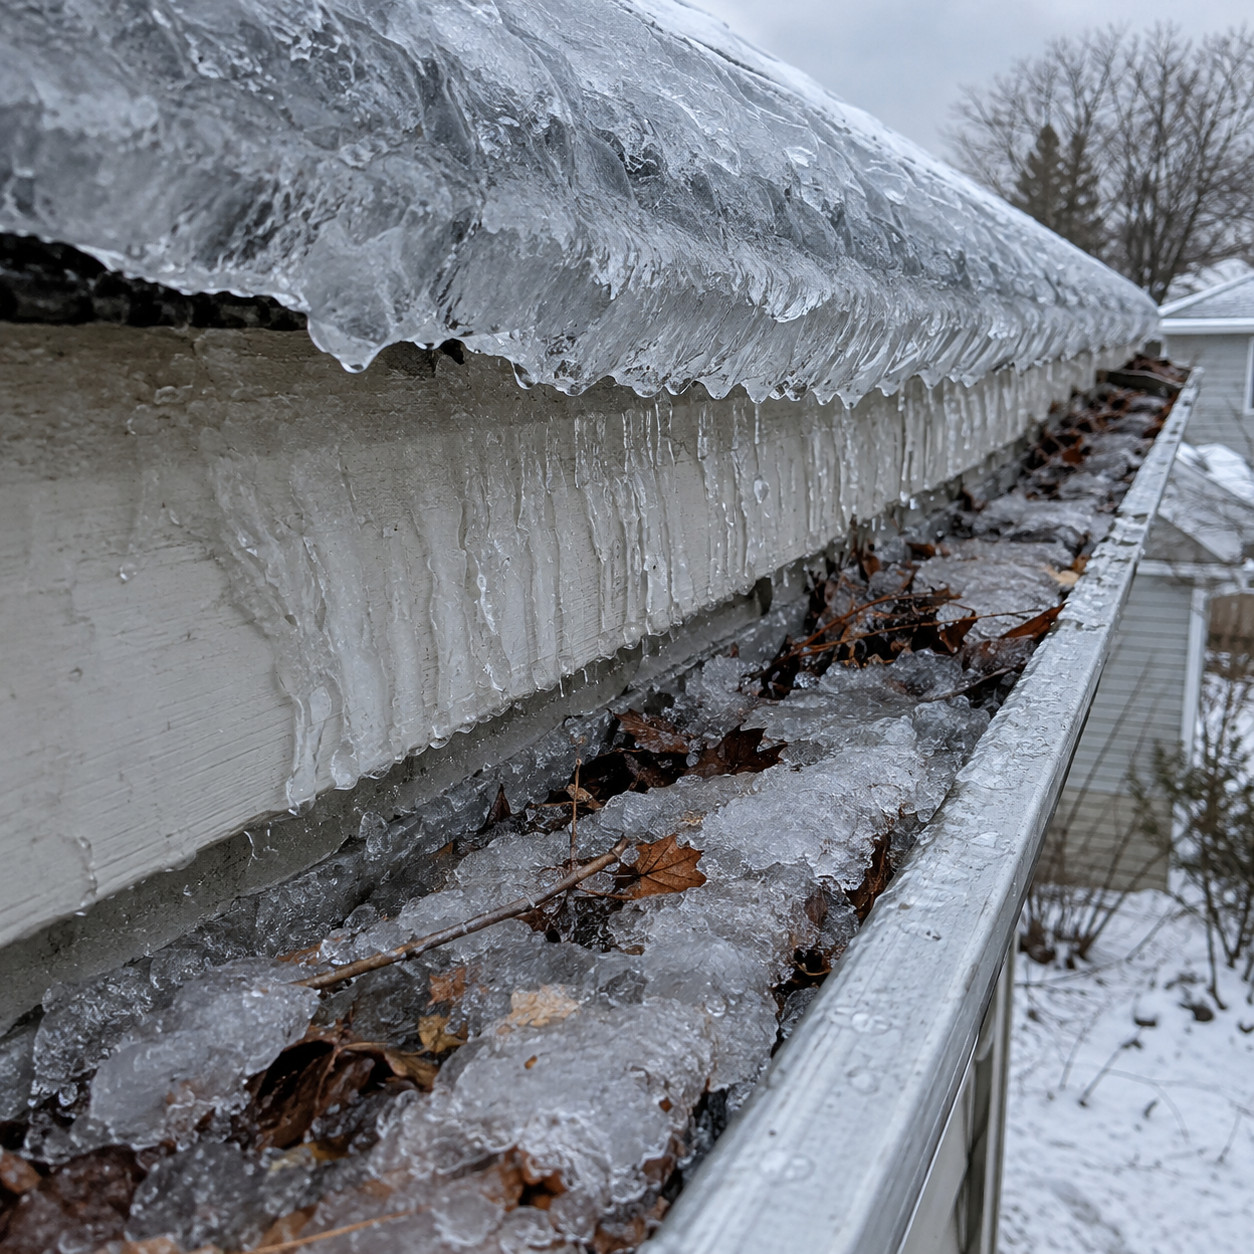
Every winter someone concludes the gutters caused it and schedules a removal.
Gutters don’t create ice dams. The dam forms at the cold overhang whether there’s a gutter there or not — the physics doesn’t care about aluminum.
What gutters do is catch the ice and hold it, which makes the whole mess more visible and occasionally tears the gutter off the fascia. Clogged gutters full of frozen leaves give the ice a head start.
Clean them in the fall. Then go back inside and look up at your ceiling, because that’s where the actual problem is.
Removing your gutters to stop ice dams is like removing your thermometer to cure a fever.
Where to Start Tomorrow
Pick the hatch first. It’s the cheapest, the easiest, and you’ll feel the draft stop the same day.
Then get up there with a bright light on a cold morning and look for frost on the nails, stained sheathing, and anything that penetrates the ceiling plane. Frost patterns are a map — they form directly above the leaks.
A blower door test with infrared runs $300 to $600 and will find in two hours what you’d spend a winter guessing at. In most cold-climate houses, air sealing plus a proper top-up pays for itself in four to six heating seasons and ends the icicles permanently.
The roof is just where the evidence shows up.