


Walk through a production home and a custom build on the same afternoon. They can look identical. Same granite, same shaker cabinets, same gray paint.
Then flush a toilet upstairs and listen. Pull a drawer all the way out. Push on the wall next to a window.
That’s where the two houses stop being twins.
Builders working on volume shave pennies at every hidden stage, because nobody buys a house by looking at the subfloor. The people who build those houses for a living know exactly which corners got cut. And when they build for themselves, they cut none of them.
These are the materials the pros quietly pay double for — the ones you never see, never brag about, and never have to think about again once they’re in. Here are 26 of them.
1. AdvanTech (or LP) Subflooring Instead of Commodity OSB

The first shortcut happens before there’s even a floor to stand on.
Production builders default to cheap 3/4″ tongue-and-groove OSB. It’s fine until it rains on the job site — and it always rains on the job site. The edges drink up water, swell, and never fully flatten again.
That’s where squeaks come from. That’s why a five-year-old floor feels wavy under a rug.
Pros pay roughly double for resin-coated panels like AdvanTech that shrug off standing water for weeks. Builder Matt Risinger tells the story of switching his crews over and watching the squeak callbacks disappear entirely — the panels stay flat, the glue bonds hold, and the floor above them stays silent for decades. LBM Journal breaks down how the dimensional stability is the whole ballgame.
You’ll never see it. You’ll only hear the difference — or rather, you won’t.
2. 2×6 Exterior Wall Framing Instead of 2×4

Two inches of lumber decides how warm your house is in January.
Builders frame exterior walls in 2×4 because it’s cheaper and steals a little more interior square footage on every wall. Pros frame in 2×6.
The deeper cavity holds R-19 insulation instead of R-13. The walls are stronger. And there’s finally room to run plumbing and wiring without notching into a stud and weakening it.
Stand at a window jamb in a 2×6 house and you can feel the depth of the wall. It reads as solid because it is.
3. ZIP System Sheathing Instead of OSB Plus Housewrap

Bare OSB with stapled-on housewrap is the industry standard. It’s also the weak link.
The wrap flaps loose in the wind before the siding goes on. The whole system depends on someone lapping the tape around every window in exactly the right order, and someone always gets it wrong on a Friday.
Pros use Huber’s ZIP panels, which come with the water and air barrier bonded to the panel at the factory. You tape the seams and you’re done.
It costs roughly double the plain-OSB approach. What you buy is a shell that doesn’t leak because someone was rushing. Building Advisor lays out why the taped-seam system is far harder to botch than loose wrap.
4. Closed-Cell Spray Foam Instead of Fiberglass Batts

This is the biggest gap between what a house is rated for and what it actually delivers.
Fiberglass batts are cheap and fast. On paper they hit their R-value. In the wall they almost never do.
Watch a crew install them on a schedule. Batts get stuffed behind wires instead of split around them. They get compressed into corners, jammed around outlet boxes, left gapped at the top plate. Every gap is a hole air pours through, and a compressed batt loses a chunk of its rated performance the moment it’s crushed.
An R-13 wall full of gaps might perform like an R-7 wall. You paid for the label, not the result.
Closed-cell spray foam does two jobs at once. It insulates and it air-seals, expanding into every gap around every wire and box and sealing the assembly tight. The Department of Energy points to air leakage as one of the largest hidden energy losses in a house, and foam attacks it directly — the U.S. Department of Energy covers how much of a home’s comfort rides on stopping that air movement at the envelope.
It’s expensive. Foam can run three to five times the cost of batts in a given wall, and pros know it. So they get strategic — foam the rim joists and the vulnerable assemblies where air-sealing matters most, and use dense-pack or better-installed batts elsewhere.
The payoff shows up on every utility bill for the life of the house. A tight house holds its temperature, runs a smaller HVAC system, and stays quiet and draft-free in a way a leaky one never will.
Skip the batts where it counts. This is the one pros don’t compromise on.
5. Mineral Wool in Interior Walls for Sound and Fire
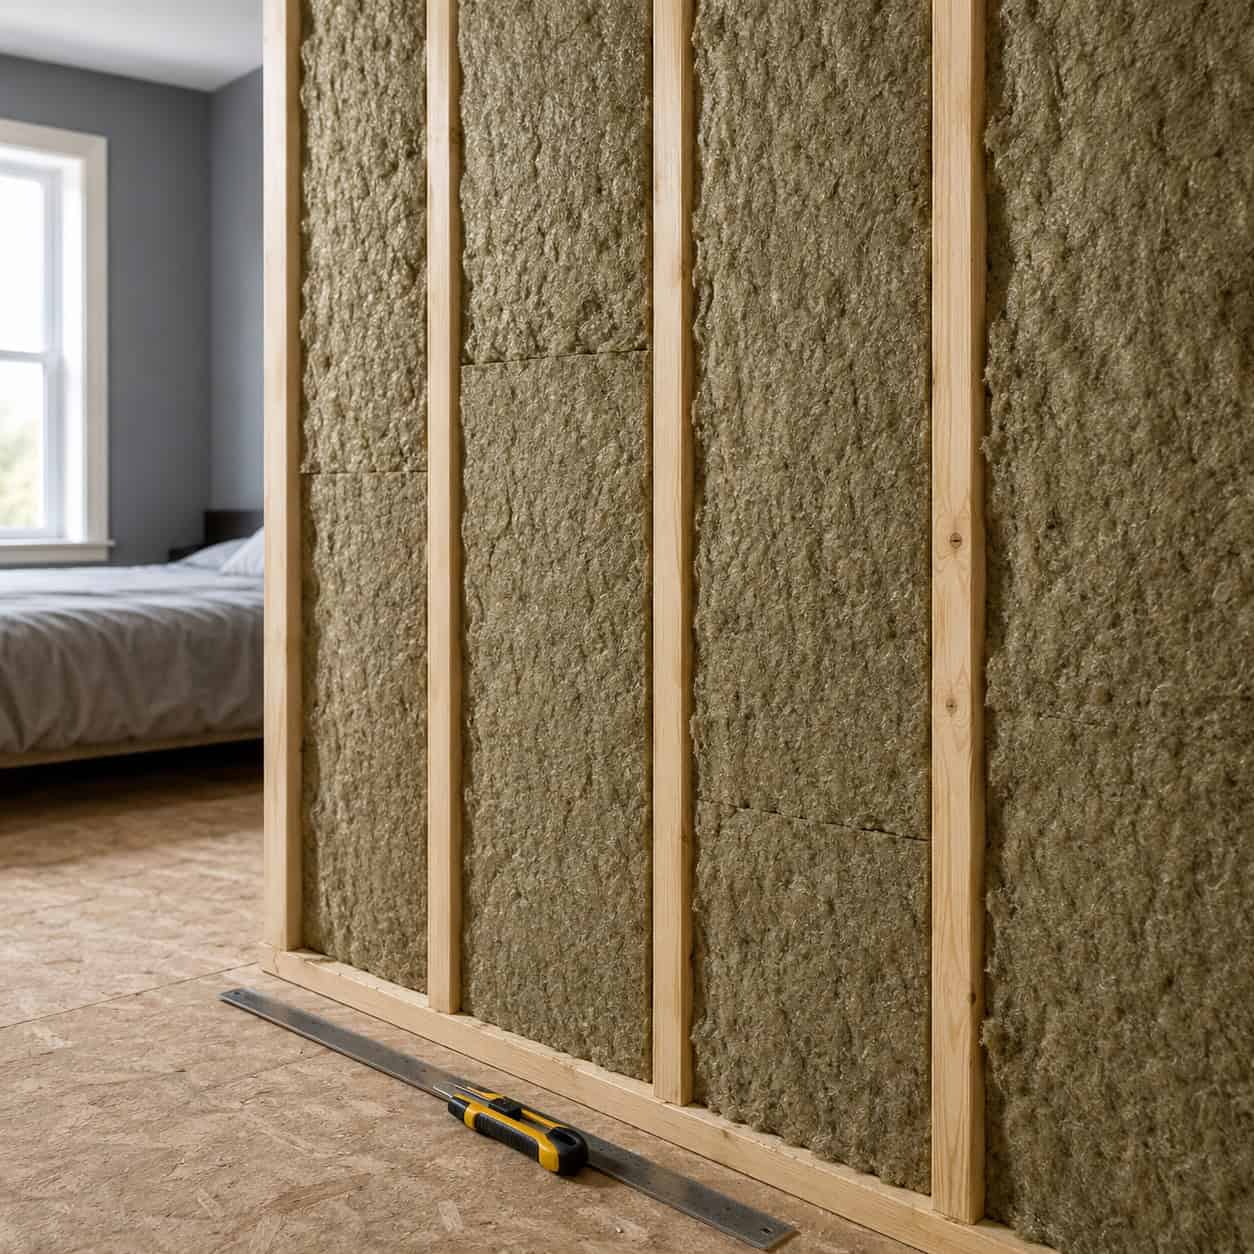
Most builders don’t insulate interior walls at all. Why would they? Code doesn’t make them.
Pros pack mineral wool — Rockwool — into the walls around bedrooms, bathrooms, laundry rooms, and media rooms.
The result is a house where a running washing machine doesn’t broadcast into the living room and a bathroom fan stays a private matter. Mineral wool also resists fire and won’t burn, which buys time in the worst case.
It costs almost nothing at framing. It’s impossible to add once the drywall is up. That’s the whole reason pros do it now and everyone else wishes they had.
6. A Standing Seam Metal Roof Instead of the Cheapest Shingle

Fifty years versus twenty. That’s the choice on the roof.
A builder’s basic asphalt roof needs replacing twice in the time a standing seam metal roof shrugs along untouched. The metal sheds snow, hides every fastener under its raised seams, and lasts 50 years or more.
It’s a serious material cost up front — often two to three times a shingle roof. Pros put it on their own houses anyway because they’ve torn off enough waterlogged asphalt to never want to do it to themselves.
Buy it once. Forget it exists.
7. Architectural or Impact-Resistant Shingles Instead of 3-Tab
If metal’s out of budget, the shingle choice still matters more than the color chart suggests.
The cheap option is the 3-tab shingle — a single flat layer, rated for lower wind speeds, good for maybe 15 to 20 years. It’s the roof most people never notice they’re getting until it starts blowing off in a storm.
Architectural shingles, also called laminated or dimensional, are thicker, built up in layers, and rated for far higher wind. They last 20 to 30 years and up, and they read as a real roof from the curb. Home Genius Exteriors compares the two layer for layer.
Then there’s the upgrade that pays you back. Class 4 impact-resistant shingles are built to survive hail that would shred a 3-tab, and many insurance carriers hand out real premium discounts for installing them.
That discount isn’t a rounding error. In hail-prone states it can knock a meaningful percentage off your homeowner’s policy every single year, which over the life of the roof can offset a big share of the upgrade cost. Ask your carrier before you buy.
The warranties run longer too — often 30 to 50 years versus the 3-tab’s stingy coverage. A pro reads the whole picture: better wind rating, better hail survival, a fatter warranty, and a check back from the insurer. The 3-tab loses on every line.
8. Synthetic Underlayment and Full Ice-and-Water Shield

Roofers have a line they love: the shingle is only about 60% of a roof. The rest is what’s under it.
Builders run the minimum 15-lb felt and dab ice-and-water shield only where an inspector might look. Pros run synthetic underlayment across the whole deck and full membrane in every valley and along every eave.
That membrane is what stops an ice dam from backing water up under the shingles and into the ceiling below. It’s what holds the line in wind-driven rain. Trill Roofing gets into how much of the real waterproofing lives in these hidden layers.
Cheap insurance. Pros never skip it.
9. Cast Iron Drain Stacks Instead of PVC

Here’s the secret behind why some houses feel expensive the second you walk in: you can’t hear the plumbing.
PVC drain pipe is loud. When someone flushes a toilet or empties a tub on the second floor, the rush of water down a plastic stack pours straight through the wall into the room below. PVC rates around STC 25 to 30 — you hear a waterfall.
Cast iron drain pipe rates STC 45 to 55. The mass of the metal swallows the sound. A flush upstairs becomes inaudible in the room below the stack. The Plumber NYC breaks down exactly how big that noise gap is.
Builders choose PVC because it’s a fraction of the material cost and installs in half the time. Cast iron is heavy, awkward, and slow to hang — every reason a volume builder loves plastic.
Pros will at least run cast iron on the stacks that pass through living space, even if the rest of the system is plastic. Wrapping PVC in an acoustic membrane is the compromise for a tighter budget, but nothing matches the dead-quiet of iron.
There’s a durability bonus too. Cast iron doesn’t crack when someone drives a drywall screw near it, and it isn’t going to fail at a glued joint behind a finished wall. When a drain pipe leaks inside a wall, the repair is drywall, insulation, mold remediation, and weeks of your life — the quiet pipe is also the pipe least likely to flood your kitchen ceiling.
10. Home-Run PEX-A Manifold Plumbing (or Real Copper)

Builders run the minimum acceptable supply plumbing. Trunk-and-branch, smallest legal pipe, done.
That’s why the shower goes cold and scalds you when someone starts the dishwasher.
Pros run a home-run PEX-A manifold — every fixture on its own dedicated line straight from a central manifold, so nothing steals pressure or temperature from anything else. Or they spend up for copper, which lasts generations.
The industry remembers poly-B and CPVC failures too well to treat pipe as a place to gamble. Pick the system that won’t be a class-action lawsuit in 20 years.
11. 12-Gauge Wire and Extra Dedicated Circuits
An electrician wiring his own house always over-builds the panel.
Where code allows 14-gauge wire, he runs 12. He adds dedicated circuits for the microwave, the office, the garage, and a future EV charger nobody’s bought yet. More outlets in every room, not the bare minimum spaced to pass inspection.
Builders install exactly enough circuits to get the sign-off. Not one more.
The difference shows up years later, when the space heater and the vacuum on the same overloaded circuit trip a breaker every winter — in the house that was wired to a minimum instead of a plan.
12. 5/8″ Drywall Instead of 1/2″

Push on a wall in a cheap house and it flexes. Push on one in a well-built house and it doesn’t.
Standard practice is 1/2″ drywall. Pros hang 5/8″, often the Type X fire-rated version.
The thicker board blocks more sound, sags less on ceilings, adds fire resistance, and feels genuinely solid when you knock on it. It’s pennies more per sheet.
Pair it with mineral-wool walls and solid-core doors and you’ve built a house that stays quiet room to room — the thing everyone notices and nobody can name.
13. Fiberglass or Fiberglass-Clad Windows Instead of Builder Vinyl

Cheap vinyl windows have a clock running from the day they’re installed.
Vinyl expands and contracts hard with temperature, and over a decade or two the frames warp, the seals fail, and the glass fogs up with permanent condensation between the panes. Then you’re buying windows again.
Pros spend up for fiberglass or fiberglass-clad units. Fiberglass barely moves with temperature, so the seals last far longer and the frames stay true. ENERGY STAR is a good starting point for reading the performance numbers before you buy.
Windows are one of the few hidden-quality upgrades you actually see every day. Buy the ones you won’t be replacing.
14. Fiber-Cement or Cellular PVC Exterior Trim Instead of Finger-Jointed Pine

Rot almost always starts at the trim.
Builders use finger-jointed or primed pine around windows, doors, and corners. It soaks up water, and the glued finger joints swell and open until the trim rots from the inside out — usually within a few years wherever it meets splashback or ground.
Pros use fiber-cement, like Hardie, or cellular PVC. Neither rots. Ever. PVC trim can sit in standing water and not care.
Both hold paint far better than swelling pine. The corner of a house is where water goes to do its worst, and this is the material that ignores it.
15. Solid-Core Interior Doors Instead of Hollow-Core

Knock on a production-home bedroom door. That hollow drum sound is cardboard honeycomb inside a thin skin.
Hollow-core doors are standard in volume builds because they’re light and cheap. They rate around STC 20 to 25 — which is to say they block almost no sound.
Solid-core doors hit STC 27 to 35, feel substantial in the hand, and close with a solid thunk instead of a rattle. Lifetime Building Supply lays out the sound difference clearly.
It’s the fastest tell of overall build quality on a walkthrough. Open one door and you know what the builder cared about.
16. Plywood Cabinet Boxes Instead of Particleboard

Try this in any showroom. Push on the back panel of a cabinet box.
If it flexes and gives, that’s particleboard — the material builder and big-box cabinets are built from. It swells and crumbles the first time a sink supply line drips on it, and it strips out around screws so hinges and slides work loose.
All-plywood boxes cost roughly 30 to 50% more. They hold hardware tight, resist moisture, and last 20 to 30 years. Kitchen Cabinet Kings spells out the moisture and screw-holding difference.
The doors look the same in the store. The boxes behind them decide how long the kitchen lasts.
17. Dovetail Drawer Boxes with Full-Extension Soft-Close Glides

Pull a drawer all the way out. This is the test every knowledgeable buyer runs first.
Builder cabinets come with stapled particleboard drawer boxes riding half-extension epoxy slides. They sag, they stick, and they only open two-thirds of the way so you can never reach the back.
Pros insist on dovetailed solid-wood or plywood drawer boxes on full-extension, soft-close undermount glides. The drawer glides out completely, holds real weight, and closes itself with a quiet pull instead of a slam.
One drawer tells you the whole story. Pull it and see.
18. Schluter Kerdi Bonded Waterproofing Instead of Greenboard

The scariest shortcut in the whole house hides behind bathroom tile.
Builders and flippers still tile showers straight over greenboard — moisture-resistant drywall. It has a green paper face and everyone assumes it’s waterproof. It isn’t. It’s water-resistant, which is a different word for a reason, and it’s no longer code-approved for wet areas in many jurisdictions.
Grout is not waterproof. It’s porous, and it cracks. Water works through the grout lines, reaches that greenboard, and the paper face turns to mush behind tile that still looks perfect from the outside.
By the time you see a stain on the ceiling below or feel a soft spot in the shower wall, mold has been growing in the dark for months. Now you’re gutting the shower to the studs, hiring a remediation crew, and finding out how far the rot traveled inside the wall.
Pros build the shower as a fully bonded, waterproof box. Cement board plus a membrane, or a Schluter Kerdi system where the waterproofing bonds directly behind the tile so water never reaches anything that can rot. DIYTileGuy walks through why greenboard has no business behind a shower.
The tile can look identical either way. One shower lasts 30 years. The other is a mold claim waiting to happen.
19. Ditra Uncoupling Membrane Under Floor Tile

Cracked tile and cracked grout usually aren’t a tile problem. They’re a movement problem.
Builders set floor tile straight onto subfloor or thin backer. When the substrate expands and contracts with the seasons, that movement telegraphs straight up through the rigid tile and snaps it.
Pros put an uncoupling membrane — Schluter Ditra — between the tile and the substrate. It lets the floor beneath move without dragging the tile along with it.
That’s why a pro’s tile floor still looks new a decade later while the flip down the street is already growing hairline cracks in every grout line.
20. Solid 3/4″ Hardwood Instead of Thin Engineered or Laminate

There’s a floor you refinish and a floor you throw away. They cost about the same to install.
Production homes get laminate or ultra-thin engineered flooring with a wear layer thinner than a business card. Scratch it, dent it, or let it swell at the seams and you can’t sand it — you replace the whole floor.
Pros lay true 3/4″ solid hardwood, or engineered with a thick wear layer, that sands and refinishes multiple times across decades. Your kid can scuff it for eighteen years and you just sand it back to new.
This is a floor your grandchildren could inherit. The laminate goes in a dumpster in fifteen years.
21. Metal Kickout and Step Flashing Instead of a Bead of Caulk
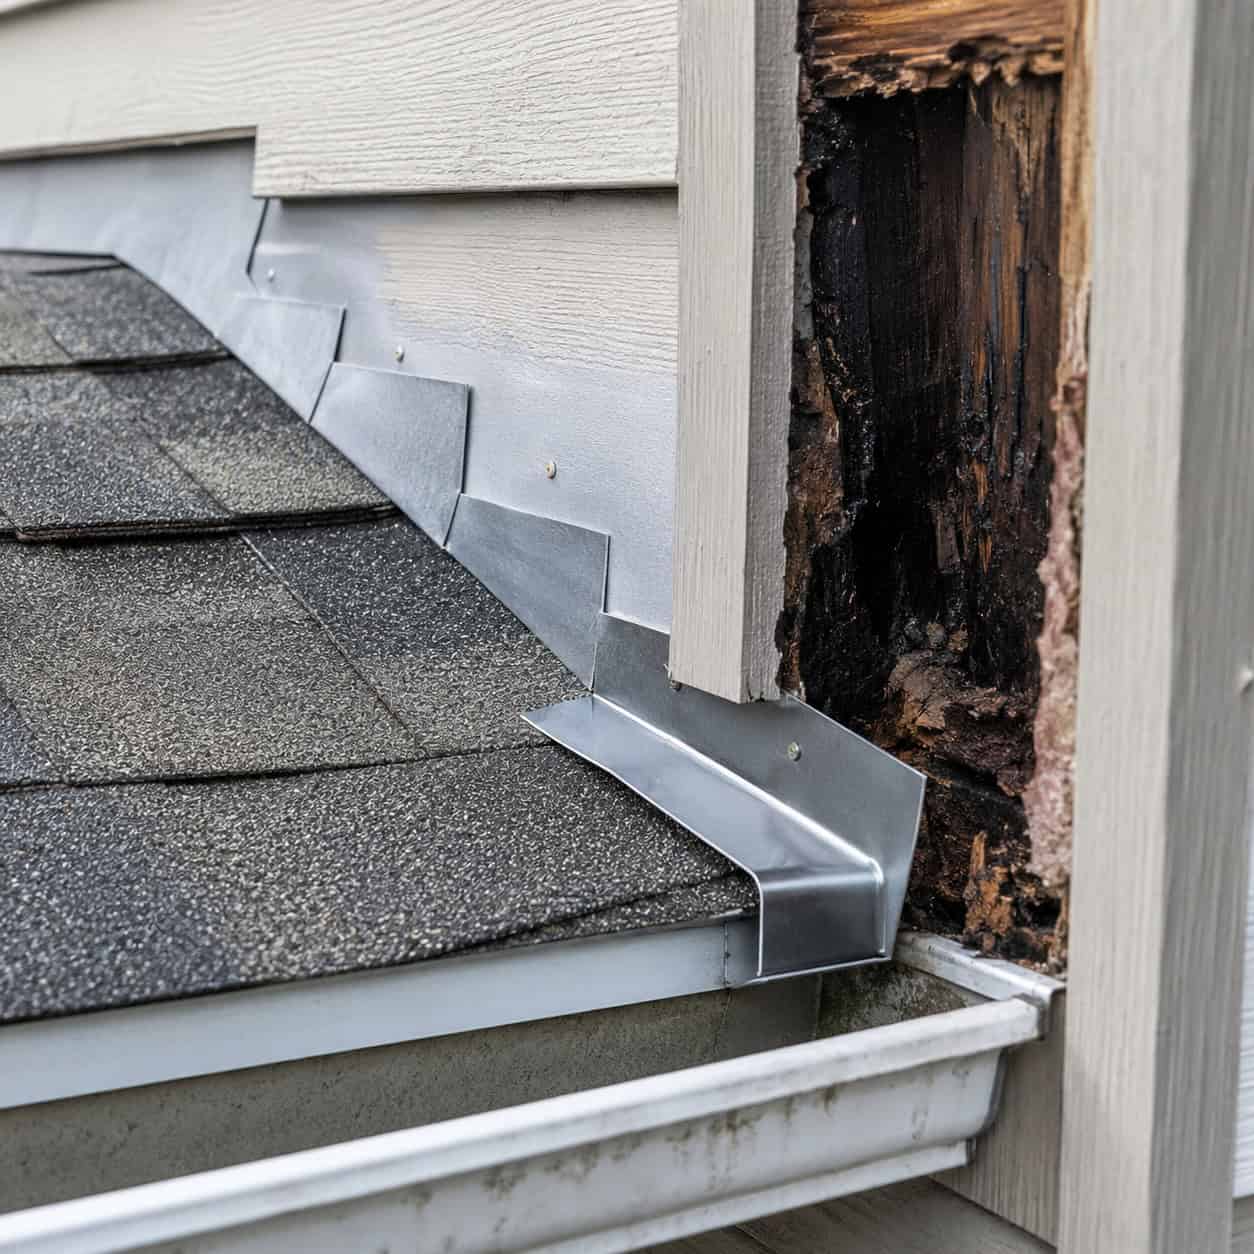
A $5 piece of bent metal is the only thing standing between a wall and a $20,000 repair.
Wherever a roof edge meets a wall, water has to be directed out and away from the siding. That’s the job of step flashing running up the joint and a kickout flashing at the bottom that punches the water out into the gutter instead of behind the siding.
Builders too often skip the kickout and run a bead of caulk instead. Caulk cracks and shrinks within a season. Then every rainfall funnels water straight down the wall and behind the siding, where nobody can see it.
Missing kickout flashing is one of the most notorious causes of hidden wall rot in the business. Water pours into the wall cavity for years. The sheathing rots, the framing rots, mold spreads through the insulation, and the homeowner has no idea until the siding gets pulled and the wall behind it is black and crumbling.
By then the repair isn’t a piece of flashing. It’s new sheathing, new framing, remediation, and interior finishes — tens of thousands of dollars, all to save the cost of a part that fits in your pocket.
Pros never skip the metal. It’s the cheapest insurance on the entire exterior.
22. Backer Rod and High-Grade Polyurethane Sealant Instead of Cheap Latex Caulk

Cheap caulk is a promise that lasts one season.
Builders gun painter’s latex caulk into every exterior gap. It shrinks, cracks, and pulls away from the joint within a year, opening the exact air and water paths it was supposed to close.
Pros pack the joint with backer rod first, then tool in high-movement polyurethane or silicone sealant rated to flex for decades. The backer rod gives the sealant the right shape to stretch and compress as the joint moves.
Tiny material cost. Enormous difference in how tight a house stays and how well it ages.
23. Quality 100% Acrylic Paint and a Real Primer Coat

The one-coat-flat shortcut is the easiest one to spot, because you spot it every day you live there.
Builder-grade paint is a single thin coat of the cheapest flat, usually with no dedicated primer under it. It scuffs if you look at it wrong and smears the first time you try to wipe a mark off the wall.
Pros prime properly, then roll on full-bodied 100% acrylic paint in enough coats to actually cover. It scrubs clean, resists scuffs, and holds its color for years.
This is the cheapest upgrade on the entire list. It’s also the one you touch, lean on, and clean the most. Spend the extra twenty dollars a gallon.
24. Copper Water Supply Lines Instead of Plastic

Some pros go all the way and run copper for the supply lines.
Copper has been proven in walls for a century. It doesn’t degrade in sunlight during construction, it handles heat without question, and it isn’t going to be the subject of the next big pipe recall.
It costs more than plastic and takes more skill to solder. Builders won’t touch it on a budget job for exactly those reasons.
For a house someone plans to keep, copper is a longevity bet that’s paid off for generations of plumbers.
25. A Cast-Iron or Steel Tub Instead of a Thin Acrylic Insert

Sit in a builder’s acrylic tub and it flexes under you. Fill it and the water’s lukewarm before you’ve finished a chapter.
Thin acrylic units are light, cheap, and fast to drop in — everything a volume builder wants. They also lose heat fast and creak when you shift your weight.
Pros choose heavy enameled cast iron or steel. The mass holds heat, so a hot bath stays hot. The tub doesn’t flex, doesn’t creak, and takes decades of use without complaint.
It’s a beast to carry up the stairs. That’s the only downside, and it’s a one-day problem for a lifetime tub.
26. Continuous Exterior Rigid Foam Insulation

Every stud in your wall is a small hole in your insulation.
Wood conducts heat straight through the wall around the insulation between the studs — a thermal bridge repeated every 16 inches across the whole house. The NAHB component data is a reminder of how long an envelope has to perform, and thermal bridging quietly undercuts it the entire time.
Pros wrap the exterior sheathing in a continuous layer of rigid foam before the siding goes on. That unbroken blanket covers the studs too, cutting the thermal bridge and boosting the whole wall’s real-world performance.
Builders skip it to save a layer of material and labor. In a well-built envelope, it’s the detail that makes the walls perform the way the R-value on paper always promised.
The Pattern Behind All of Them
Notice what almost every one of these has in common. It’s hidden. It’s cheap to do right at the moment of construction. And it’s expensive or impossible to fix later.
That’s the whole game. Volume builders optimize for the walkthrough — the finishes you see and price on. Pros optimize for the decade after the walkthrough, when the subfloor either squeaks or it doesn’t, the shower either holds or it molds, and the wall either dries out or it rots.
You can’t see most of this in a finished house. But now you know where to knock, where to push, and which drawer to pull all the way out.
The cheapest house and the built-to-last house often wear the same granite. The difference is everything you’d never think to look at.