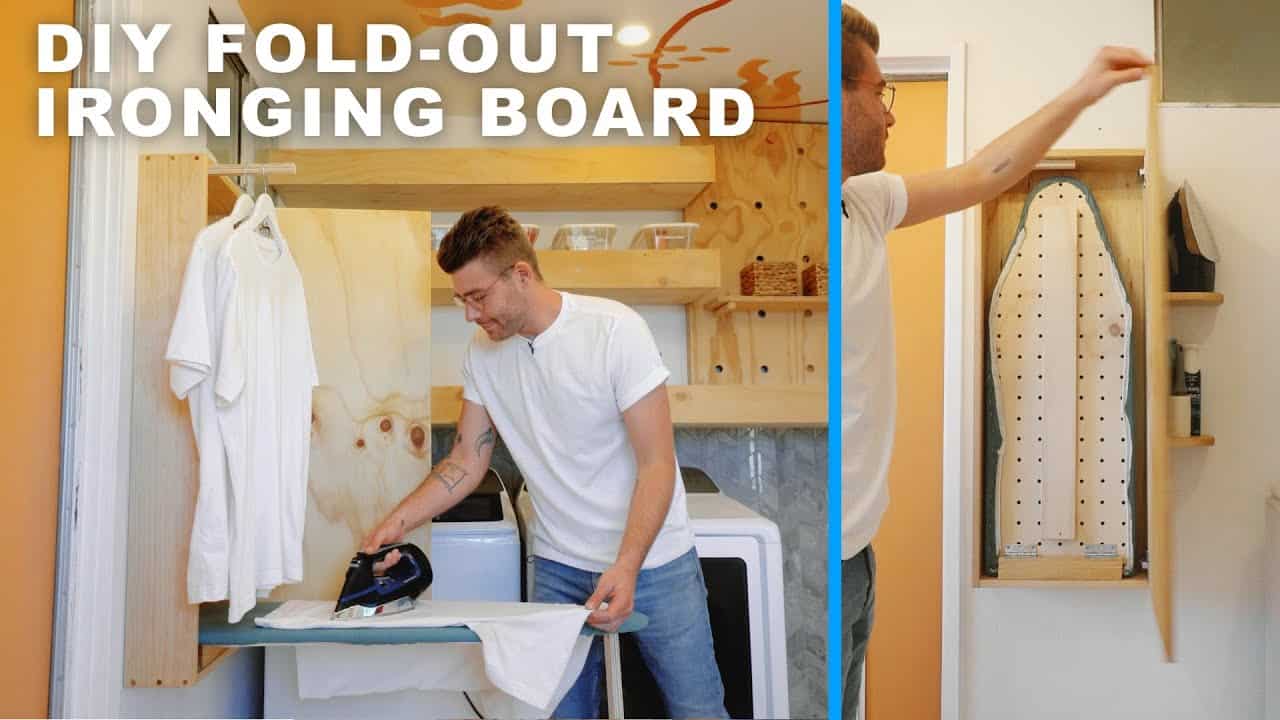
This project was built and designed by Mike Montgomery from Modern Builds. It’s a space-saving fold-out ironing board cabinet that adds function and style to any laundry room.
Designed with storage in mind, this wall-mounted unit includes a folding ironing surface and dedicated spots for your iron and accessories. Mike walks through the entire process using basic tools and thoughtful joinery to create a clean, modern piece.
Watch the full video and subscribe to Mike’s channel:
Why a Fold-Out Ironing Board?
Traditional ironing boards are awkward, bulky, and often hard to store. This project offers a smart solution by turning an everyday necessity into a compact wall cabinet that folds out only when needed.
It also helps keep laundry supplies organized and out of sight, improving both the look and usability of your space. With a few sheets of plywood and some hardware, Mike turns this idea into a sleek, functional cabinet.
Materials and Tools
Mike uses select pine for the frame and sanded plywood for the back and door panels. The plywood door adds thickness and durability while matching the rest of the build aesthetically.
Other materials include soft-close hinges, wood glue, screws, and plugs for pocket holes. Tools used are basic: a circular saw, pocket hole jig, drill, router with rabbeting bit, and sander.
Breaking Down the Lumber
The build begins with cutting the main pieces to size using a circular saw. Accuracy is important here, especially for the cabinet frame, so consistent measuring and straight cuts are key.
Pre-drilling screw holes is recommended to avoid splitting and to keep fasteners neatly recessed. Pocket holes are used to join the frame securely, giving the cabinet a strong foundation.
Routing for the Back Panel
Once the frame is assembled, a trim router with a rabbeting bit is used to cut a groove for the back panel. This groove helps the plywood panel sit flush with the frame and adds structure to the cabinet.
To avoid tear-out, shallow passes are taken and the plywood edges are sanded smooth after cutting. These small steps give the cabinet a more finished, professional look.
Constructing the Door and Ironing Surface
The ironing board itself is built from leftover plywood and shaped with a rounded edge to make the fabric cover easier to attach. Mike uses the scrap efficiently, showing that offcuts can still be functional.
A riser board is added to lift the ironing surface slightly, allowing the cover and padding to fit properly. This detail also helps the hinges operate smoothly and prevents fabric from snagging.
Installing Hinges and Folding Hardware
Soft-close hinges are installed to allow the ironing board to fold out and retract cleanly. Using a Forstner bit, Mike recesses the hinges into the cabinet for a flush fit.
Instructions from the hinge kit are followed closely to ensure proper alignment. A scrap plywood stop is hinged at the base to support the board while in use, adding stability and helping the surface sit flat under pressure.
Adding Storage Features
Mike builds in exterior storage by cutting and installing shelves on the cabinet’s side. These shelves are sized to hold an iron, spray bottle, or other small laundry essentials.
Using a jigsaw, shelf pieces are shaped to fit the layout and attached with screws from the interior. The design keeps clutter contained while still offering easy access to tools during ironing.
Clean Finishing Details
Once assembled, the cabinet is sanded thoroughly to smooth all edges and prepare it for finishing. Mike uses pocket hole plugs to fill visible screw holes and maintains crisp corners throughout.
A basic finish is applied using a wipe-on method—rubbed in and buffed off to highlight the wood grain while protecting the surface. The result is clean, simple, and ideal for a utility space.
Installation and Functionality
The cabinet is mounted to the wall at a comfortable working height, taking care to hit studs for secure anchoring. The ironing board folds down and locks into place, providing a sturdy surface that feels solid under use.
Built-in ventilation holes in the board improve airflow and help prevent moisture buildup, which is useful when ironing damp clothing. It’s a small feature that adds long-term durability to the design.
A Smart Upgrade for Any Laundry Room
This fold-out ironing board cabinet is a great blend of form and function. It replaces a bulky, standalone board with a built-in solution that saves space and looks good doing it.
Whether you’re upgrading your laundry area or just want a satisfying shop project, this one is worth the effort. Mike’s thoughtful design and easy-to-follow process make it approachable for woodworkers of all levels.
Please support Mike by visiting his website: https://www.modernbuilds.com/.

Matt’s Take
These are my personal thoughts and tips based on my own experience in the shop. This section is not written, reviewed, or endorsed by the original creator of this project.
This type of wall-mounted storage really showcases how thoughtful design can solve everyday problems. The key to success with a project like this is getting the proportions right—you want the cabinet deep enough to house your iron and supplies, but not so deep that it becomes a wall hog. Mike’s approach of building the ironing surface from plywood is smart since it stays flat under heat and moisture better than solid wood might.
One thing I always emphasize with wall-mounted cabinets is the mounting hardware. Don’t skimp here—this thing will see regular use and needs to handle the dynamic loads of someone actually ironing. Toggle bolts work if you can’t hit studs, but finding at least two studs is always the better call. Also worth noting that soft-close hinges are a game-changer on a fold-down application like this. They prevent the door from slamming down unexpectedly, which could be a safety issue.
The built-in storage shelves are where this design really shines. Having a dedicated spot for your iron, starch, and other supplies keeps everything within arm’s reach. If you’re building one of these, consider adding a small lip or rail to those shelves—it’ll keep things from sliding off when the door opens and closes. Simple details like that separate a good project from a great one.